Lately I have been working on fabricating patterns for my big Wisconsin T-head restoration - no its not one of those little air cooled putt-putts - we are talking a vintage 1925 water cooled six cylinder (5-3/4"x7") which tips the scales at over 1500 lbs. producing 104 hp at 1000 rpm.
Anyway, Over the past few weeks I was able to make a couple of trips up to The Odd Duck Foundry in Orrington, ME.
http://www.oddduckfoundry.com/index.html
to observe my parts being cast and to have a great lesson in Foundry 101
Here are the patterns and core boxes for the intake manifold - it will be an exact copy of the original which was built-up from bronze castings joined by 1-3/4" dia. brass tubing.
click here
Cores in place ready to have the drag and cope re-assembled
click here
Peter Grant - Owner of Odd Duck making a pour
click here
Here are the rough bronze castings
click here
A cleaned-up intake manifold fitting
click here
Here is the new oil pump drive casting fresh out of the sand. This was cast in 660 bronze.
click here
Trial fitting of the new oil pump drive housing - That isn't gold paint.....it is a bronze crankcase
click here
A pair of new valve shrouds
click here
And last but not least a cast iron valve guide blank and a new oil strainer cover
click here
Casting day

Re: Casting day
Beautiful castings!
What is the material used for making the core boxes?
Harold
What is the material used for making the core boxes?
Harold
Wise people talk because they have something to say. Fools talk because they have to say something.
Re: Casting day
Since these will only be used a couple of times the core boxes are Plaster of Paris (POP) cast from male masters mounted on MDF board. If they get damaged I can simply cast them again. For a finish I gave them a sealing coat of shellack followed by flat gray auto primer and a finish coat of enamel automotive paint. Imperfections etc. were filled with Durham's water putty.
Here are the patterns for the valve guide blank and oil strainer cover. The cover in the background is the one that came with the engine but is incorrect. Earlier we had machined a complete set of 12 guides from round stock (shown) with a seperate interference fit collar. This was rather a rather time consuming way to make these. Any way....i decided to make a pattern for cast iron blanks to make life a bit easier for others who may want to restore one of these beasts. Each guide is over 4 inches long and bored and reamed for a .557" valve stem.
Here are the patterns for the valve guide blank and oil strainer cover. The cover in the background is the one that came with the engine but is incorrect. Earlier we had machined a complete set of 12 guides from round stock (shown) with a seperate interference fit collar. This was rather a rather time consuming way to make these. Any way....i decided to make a pattern for cast iron blanks to make life a bit easier for others who may want to restore one of these beasts. Each guide is over 4 inches long and bored and reamed for a .557" valve stem.
- Attachments
-
Re: Casting day
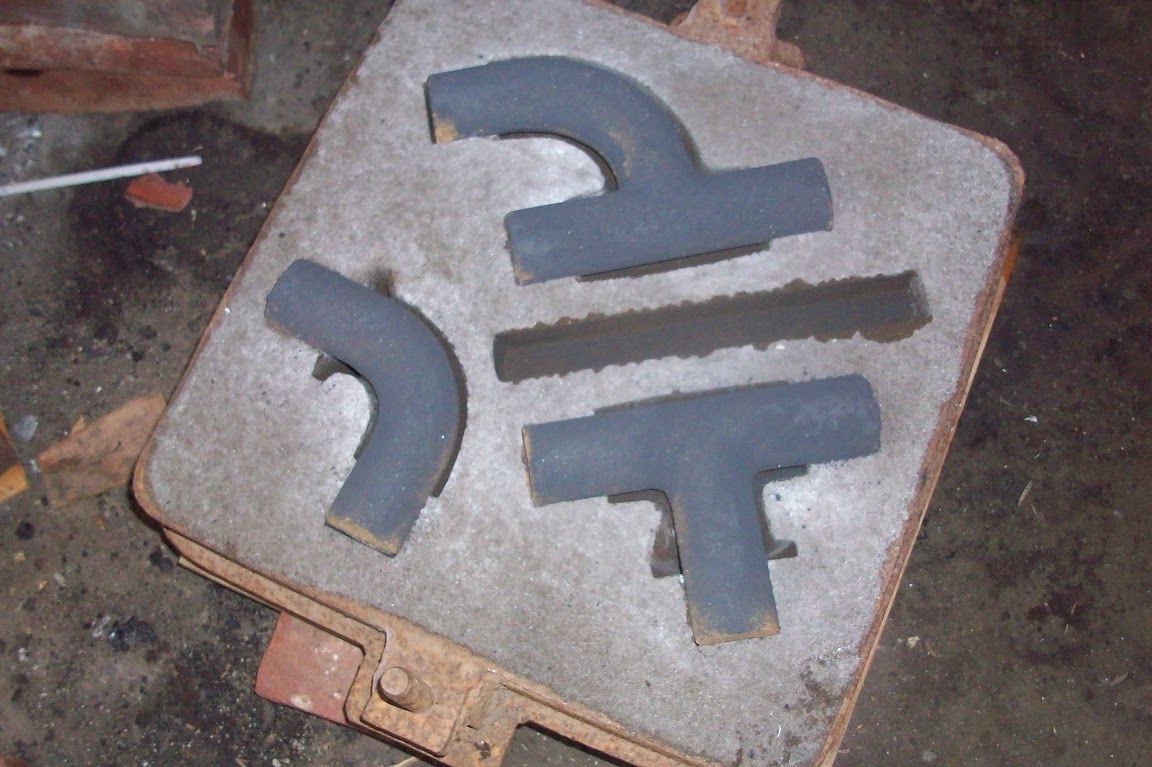
With the castings for the intake manifold in-hand I have been working on and finished the four patterns and core boxes for the top Water Manifold.
These will be cast in bronze as well. Here is the pattern for Part No. A32A (Top Water Manifold Extention) and Part No. A20A (Top Water Manifold Rear Section)
When machined a 1/2" dia. hole will be bored in the tab of part A32A - I believe this was for a cord or wire which helped secure the radiator hose from flopping around.
In between making a lot of wood shavings I managed to clean-up the two new Valve shrouds (Part No. 026X) Now I have a complete set of 12. FYI.....yes the crankcase is a 500 lb. bronze casting - thats not gold paint!
Incidently the part numbers I refer to are taken from a Lombard parts Manual (circa 1926). Being a AAA++++ personality I had to do that. In addition I have created a complete set of CAD drawings
for every part I have had to replace.
If your curious.....and I know you are...............here is what this beast will sound like when complete. The engine I have was originally in this tractor. However,
years ago Don found another Wisconsin PT in running condition so he swapped it out.
I also took time-out from pattern making to etch a couple of Motometer face plates... This one is for a Frontenac Ford Model 'T'
These will be cast in bronze as well. Here is the pattern for Part No. A32A (Top Water Manifold Extention) and Part No. A20A (Top Water Manifold Rear Section)
When machined a 1/2" dia. hole will be bored in the tab of part A32A - I believe this was for a cord or wire which helped secure the radiator hose from flopping around.
- Top Water Manifold Assembly
- Part No. A32A (Top Water Manifold Extension)
- Part No. A20A (Top Water Manifold Rear Section)
In between making a lot of wood shavings I managed to clean-up the two new Valve shrouds (Part No. 026X) Now I have a complete set of 12. FYI.....yes the crankcase is a 500 lb. bronze casting - thats not gold paint!
Incidently the part numbers I refer to are taken from a Lombard parts Manual (circa 1926). Being a AAA++++ personality I had to do that. In addition I have created a complete set of CAD drawings
for every part I have had to replace.
- Part No. 026X (Valve Shroud)
If your curious.....and I know you are...............here is what this beast will sound like when complete. The engine I have was originally in this tractor. However,
years ago Don found another Wisconsin PT in running condition so he swapped it out.
I also took time-out from pattern making to etch a couple of Motometer face plates... This one is for a Frontenac Ford Model 'T'
- Frontenac Ford Motometer Face
Re: Casting day
I thought you might like to see the condition of this beast "as-found" and some of the work completed to date.
As you can see by the above photo time had not been kind to the old beast. In thier efforts to salvage all the bronze and brass fittings
many parts were smashed - note the bent valves. I had to fabricate a complete set from SS blanks originally destine for a G.E. Locomotive.
The finished valves have a 2-5/8" dia. head, .557" stem and measure 9" long. I also had to fabricate a new set of cast iron valve guides - these
were machined from gray cast iron and measure about 4" long.
Rebuilding the valve train was a big project - Scavengers had removed all but two of the bronze lifter guides and roller lifters
Fortunately my friend Don provided me with a complete set he had collected. We had to fabricate two roller lifters to replace a couple that were beyond salvage
and fabricate new adjustment screws for all of the lifters.
When the scavengers took the brass and bronze they smashed the water pump housing. In addition the impeller was totally worn out. Thanks to Don's parts stash I was
able to combine parts from three diffrent pumps to make a complete unit. Fabricating a new shaft and bushing inserts and installing new grease cups and a drain cock completed the job.
I also had to replace the front water cover - the orignial had been smashed to "liberate" the bronze water fitting.
This of course lead to fabrication of 6 new Primer cup studs
And a zillion new studs to replace all the sheared-off studs.
Have I enjoyed this project? You bet!
- As Found
many parts were smashed - note the bent valves. I had to fabricate a complete set from SS blanks originally destine for a G.E. Locomotive.
The finished valves have a 2-5/8" dia. head, .557" stem and measure 9" long. I also had to fabricate a new set of cast iron valve guides - these
were machined from gray cast iron and measure about 4" long.
- New Valve
- New Valve Guides
Rebuilding the valve train was a big project - Scavengers had removed all but two of the bronze lifter guides and roller lifters
Fortunately my friend Don provided me with a complete set he had collected. We had to fabricate two roller lifters to replace a couple that were beyond salvage
and fabricate new adjustment screws for all of the lifters.
- New Roller Lifters and guide
able to combine parts from three diffrent pumps to make a complete unit. Fabricating a new shaft and bushing inserts and installing new grease cups and a drain cock completed the job.
- Rebuilt Water Pump
- New Water Cover
- Primer Cup Studs
- New Studs
Re: Casting day
Today I finished the patterns and core boxes for part No. A33A (Lower Water Manifold Extension)
Because the pipe is rotated 13 degrees from the centerline of the flange I had to make a follower. Like all the other water fittings
this will be cast in bronze as well.
Because the pipe is rotated 13 degrees from the centerline of the flange I had to make a follower. Like all the other water fittings
this will be cast in bronze as well.
- Attachments
-

Re: Casting day
Great work!! Please keep us updated on the progress.
I saw it on the other site back when you first acquired it and figured it would be a great project.
I saw it on the other site back when you first acquired it and figured it would be a great project.
Glenn
Operating machines is perfectly safe......until you forget how dangerous it really is!
Operating machines is perfectly safe......until you forget how dangerous it really is!
Re: Casting day
Thanks Glenn, I appreciate the encouragment!
The other day I finished the pattern for Part No. A31A (Lower Water Manifold extension) This was one of the easier patterns to make!
Its slightly over size to allow turning down to 1.5" dia so it will be a slip fit at the gland fitting. I also made it extra long so iit could be chucked
easily in the lathe for turning and facing and parted-off to length. As with the other water fittings this to will be cast in bronze.
- Attachments
-
Re: Casting day
Here we have the finished upper water manifold. Awhile back Peter at odd Duck Foundry cast the bronze fittings for me.
These will be connected with 1-1/2" radiator hose. There is quite a lot of satisfaction when you complete a part like this
knowing that you pretty much created it from scratch i.e. from taking the measurements, creating the drawings, fabricating the patterns and core boxes,
ramming-up the flasks and performing the machining.
- Attachments
-
Re: Casting day
I continue to be impressed with both your skill and your ambition in this project!
Don Young
Re: Casting day
ditto
Glenn
Operating machines is perfectly safe......until you forget how dangerous it really is!
Operating machines is perfectly safe......until you forget how dangerous it really is!