4 Ton Plymouth build, 1:5 scale, 4.75" gauge, Leslie Salt #9
Moderator: Harold_V
-
timmy wheeler
- Posts: 237
- Joined: Thu Feb 26, 2009 6:21 pm
- Location: So. California
Re: 4 Ton Plymouth build, 1:5 scale, 4.75" gauge, Leslie Sal
Eric, anything new with the Plymouth? Just curious, Timmy
illigitimi non carborundum
Re: 4 Ton Plymouth build, 1:5 scale, 4.75" gauge, Leslie Sal
Hi Guys. There are a few reasons for the silence on this project. I've had a few distractions like some vintage motorbike inspired bike projects, my section handcar build, the 1 1/2" scale ore tipple: http://www.chaski.org/homemachinist/vie ... 33&t=99155 and there is one other little detail; my wife and I just had our first baby, a boy.  His first name is Ryden and his middle name is Zephyr.
The Plymouth has been sitting on the work table in my shop for months now but I must admit I have been thinking about it recently. It might be calling to me to get back on it. I do have small update today though for those of you that have been waiting to see more.
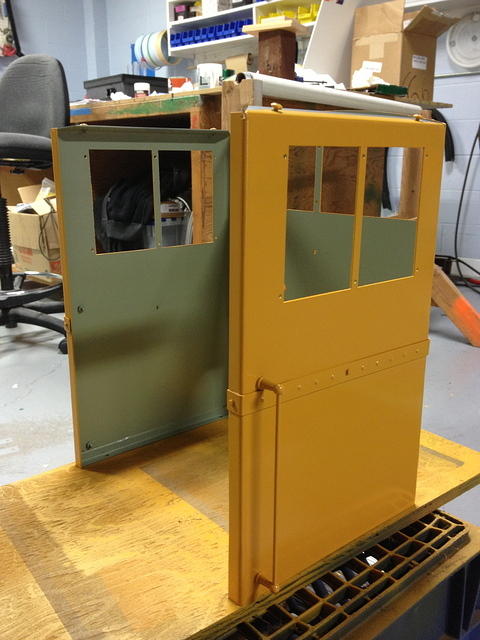
The cab has been painted. The exterior is "Old Equipment Yellow" and the interior is actually a military color. It is the same light green that was used in the cockpits of WWII aircraft. I thought it was a suitable looking color for a critter cab interior.
I decided to make working sander hatches. I will also be going one step further, when the sander hatches are opened you will be able to see sand inside but we'll get to that later.
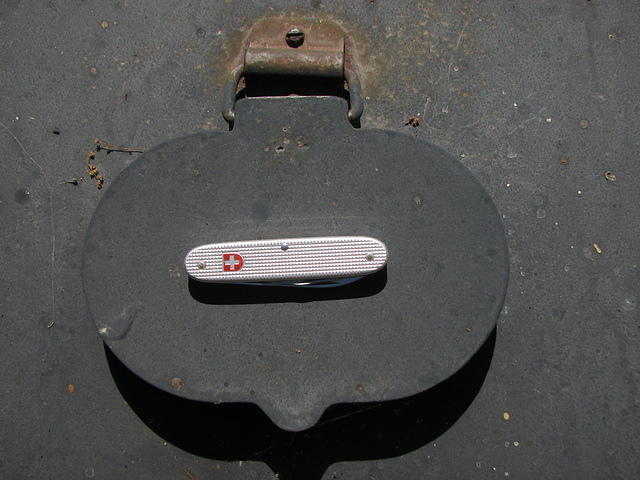
This is the prototype sander hatch as seen on Mission Cement #4.
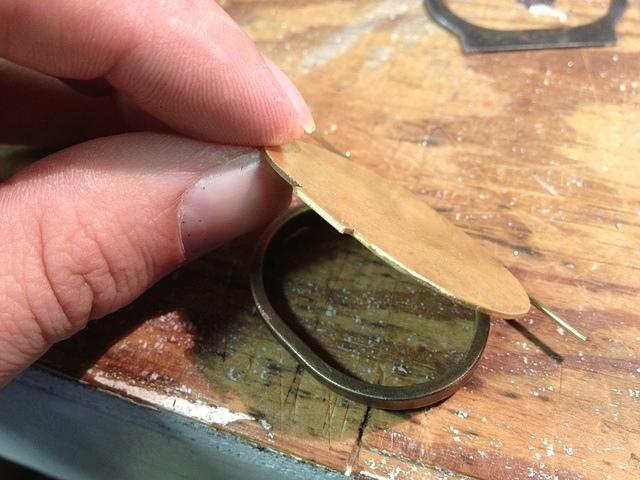
The hatches with working hinges were fabricated from brass.
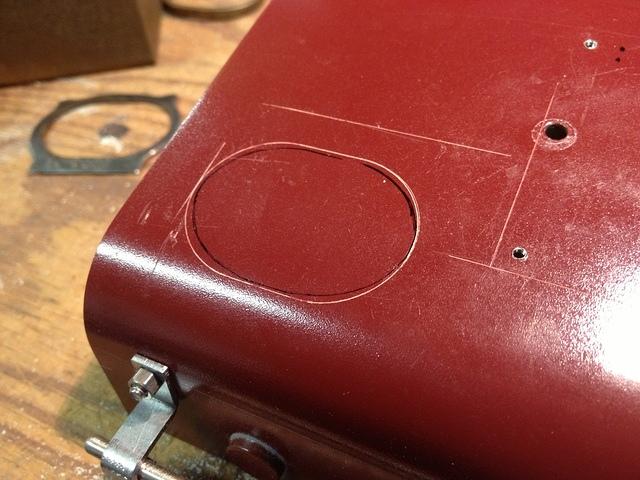
The location for the hatches is scribed into the hood. There are two hatches; one on either side of the hood, close to the front of the cab. I then opened up the holes for the hatches with a unibit, nibbler and files.
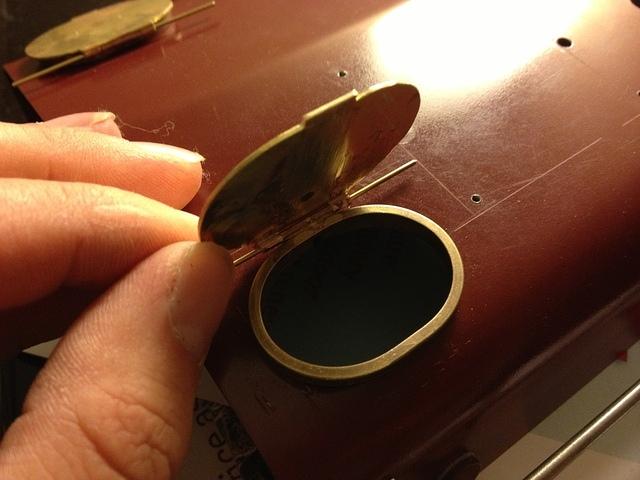
Here are the hatches all mocked up in place. They were JB welded in for the final installation.
The stock Maxitrak came with a ridiculously small decorative "muffler" and exhaust pipe. The diameter of the pipe is only about 1/4" which is WAY too tiny. I began thinking about a new solution that would not only be more detailed but more appropriately scaled as well.
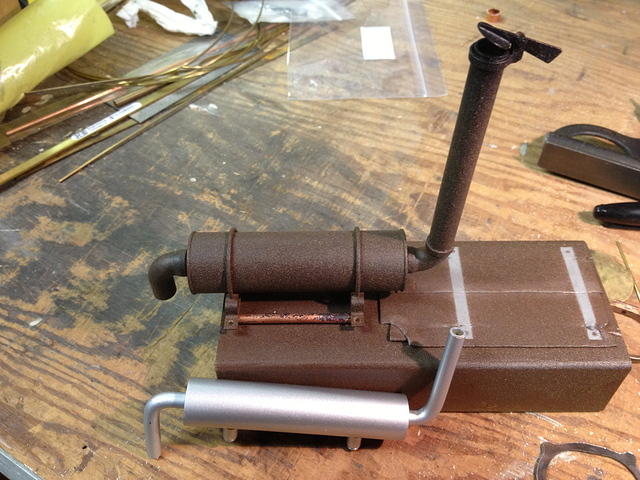
The original exhaust pipe and muffler is in front. The new one is in the back. The old one was attached to the hood with some simple standoffs. For the new one I fabricated some nice cradles and straps that secure the muffler. The new exhaust pipe is made from 3/8" copper pipe. The little tractor-style rain cap actually works. There is a magnet under the cap and one inside the exhaust pipe so the cap bonces a bit as I go down the track. The muffler is an aluminum turning. I am going to work a bit more on the finish of this part because I almost think I went overboard with the rustyness.
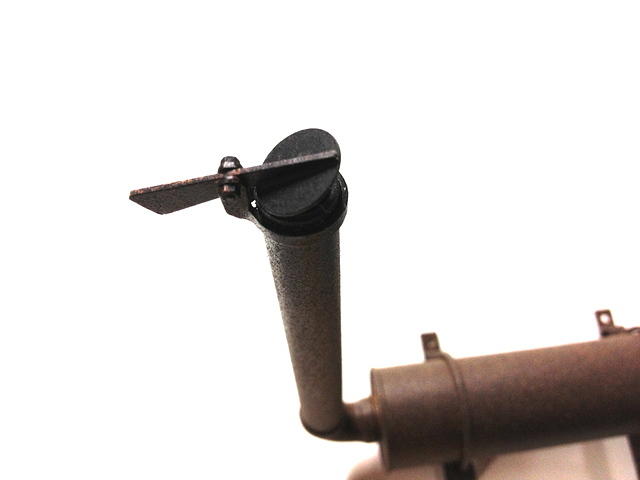
Here is a closeup of the rain cap.
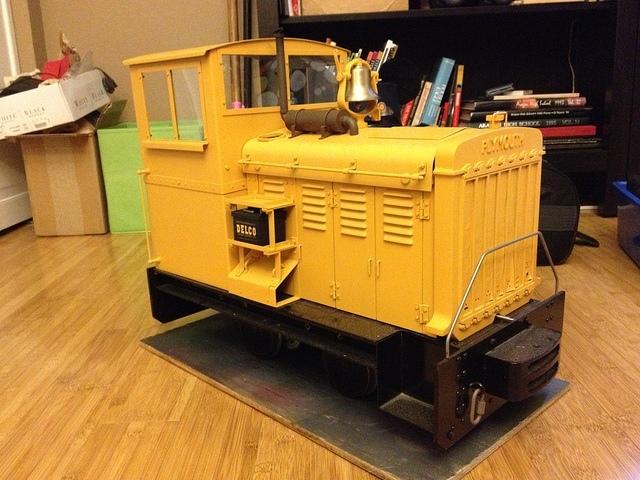
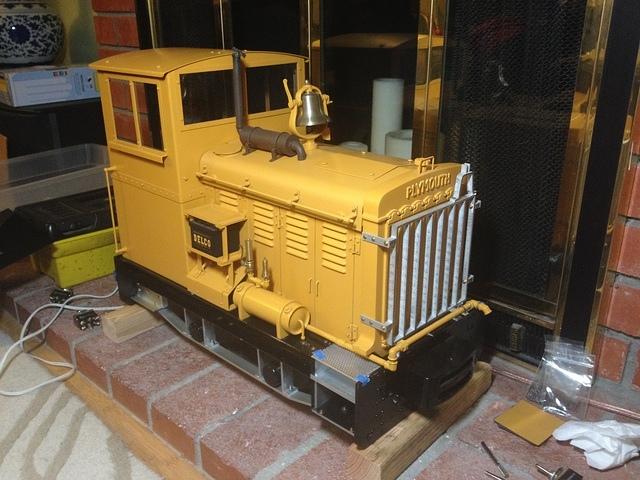
With the hood, radiator and cab getting close to finished I decided to put everything together for a quick mockup. There is still a LOT to do. I have lots of plans for detailing the chassis and even the cab interior.
Okay, so, moving on. The next thing I did was work on starting the chassis details. My Plymouth pulls inspiration from various models in the Plymouth line. The chassis most resembles the TL series because they were smaller tonnages and were built up from steel plate instead of castings.
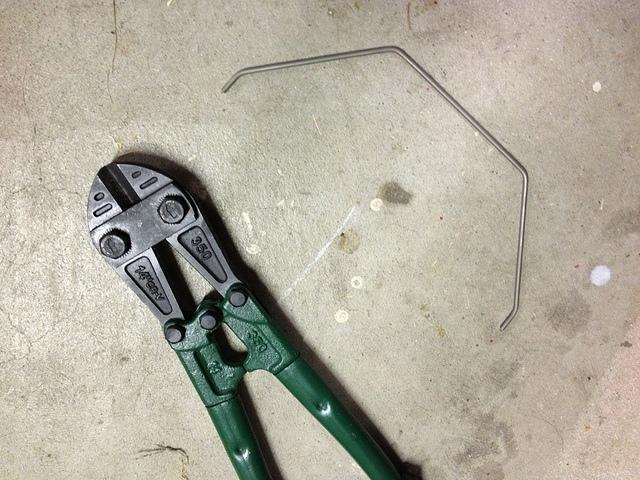
First order of business was to cut the bent steel wire radiator guard off.
Filing down the little stub left behind.
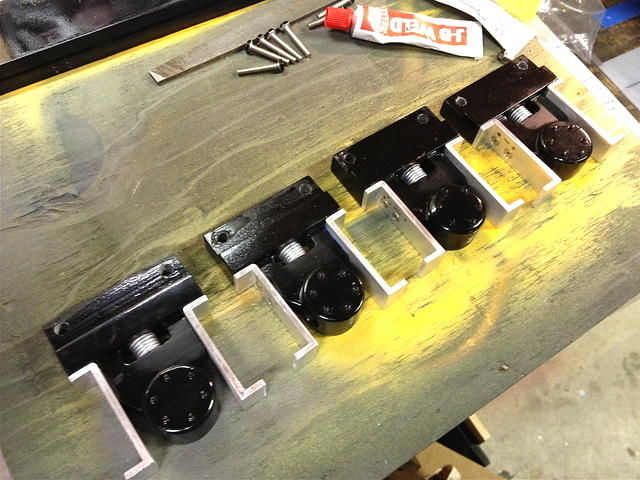
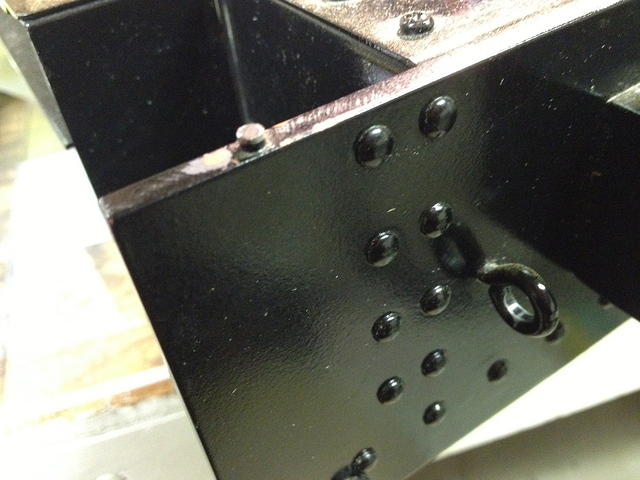
The TL Plymouths had a sort of "archbar" like steel strap that mounted under the axle journals that attached to the frame end plates. This picture shows my modified journals that will allow the archbar. I also added dummy suspension springs (the real springs are above the axles on the Maxitrak.)

Closeup of one of the axle boxes. All these frame parts will be painted Old Equipment Yellow.

A quick mockup of the chassis with the newly modified axle boxes gives a sense of where we are headed. I still have to form the archbars.
Ok. So, that's the latest. I am feeling like I might dust this project off and get back into it. Might be something good to work on during Ryden's naps
Thanks for looking,
Regards,
The Plymouth has been sitting on the work table in my shop for months now but I must admit I have been thinking about it recently. It might be calling to me to get back on it. I do have small update today though for those of you that have been waiting to see more.
The cab has been painted. The exterior is "Old Equipment Yellow" and the interior is actually a military color. It is the same light green that was used in the cockpits of WWII aircraft. I thought it was a suitable looking color for a critter cab interior.
I decided to make working sander hatches. I will also be going one step further, when the sander hatches are opened you will be able to see sand inside but we'll get to that later.
This is the prototype sander hatch as seen on Mission Cement #4.
The hatches with working hinges were fabricated from brass.
The location for the hatches is scribed into the hood. There are two hatches; one on either side of the hood, close to the front of the cab. I then opened up the holes for the hatches with a unibit, nibbler and files.
Here are the hatches all mocked up in place. They were JB welded in for the final installation.
The stock Maxitrak came with a ridiculously small decorative "muffler" and exhaust pipe. The diameter of the pipe is only about 1/4" which is WAY too tiny. I began thinking about a new solution that would not only be more detailed but more appropriately scaled as well.
The original exhaust pipe and muffler is in front. The new one is in the back. The old one was attached to the hood with some simple standoffs. For the new one I fabricated some nice cradles and straps that secure the muffler. The new exhaust pipe is made from 3/8" copper pipe. The little tractor-style rain cap actually works. There is a magnet under the cap and one inside the exhaust pipe so the cap bonces a bit as I go down the track. The muffler is an aluminum turning. I am going to work a bit more on the finish of this part because I almost think I went overboard with the rustyness.
Here is a closeup of the rain cap.
With the hood, radiator and cab getting close to finished I decided to put everything together for a quick mockup. There is still a LOT to do. I have lots of plans for detailing the chassis and even the cab interior.
Okay, so, moving on. The next thing I did was work on starting the chassis details. My Plymouth pulls inspiration from various models in the Plymouth line. The chassis most resembles the TL series because they were smaller tonnages and were built up from steel plate instead of castings.
First order of business was to cut the bent steel wire radiator guard off.
Filing down the little stub left behind.
The TL Plymouths had a sort of "archbar" like steel strap that mounted under the axle journals that attached to the frame end plates. This picture shows my modified journals that will allow the archbar. I also added dummy suspension springs (the real springs are above the axles on the Maxitrak.)
Closeup of one of the axle boxes. All these frame parts will be painted Old Equipment Yellow.
A quick mockup of the chassis with the newly modified axle boxes gives a sense of where we are headed. I still have to form the archbars.
Ok. So, that's the latest. I am feeling like I might dust this project off and get back into it. Might be something good to work on during Ryden's naps
Thanks for looking,
Regards,
Eric Maschwitz
Head of Operations, Squirrel Mountain Mine
Former Whistle Punk,
Gunn Lake Land and Lumber, a subsidiary of East Devils Hill Lumber Co
Head of Operations, Squirrel Mountain Mine
Former Whistle Punk,
Gunn Lake Land and Lumber, a subsidiary of East Devils Hill Lumber Co
-
redneckalbertan
- Posts: 1274
- Joined: Thu Nov 01, 2012 10:39 am
- Location: South Central Alberta
Re: 4 Ton Plymouth build, 1:5 scale, 4.75" gauge, Leslie Sal
Congratulations on the addition to your family! The Plymouth is looking great! Hopefully it will provide many hours of family entertainment.
Re: 4 Ton Plymouth build, 1:5 scale, 4.75" gauge, Leslie Sal
Ok so it looks like I have gotten sucked back into the Plymouth and the progress has been good considering my new parental responsibility. So let's get going with some pictures!
Chassis, belly up, ready for fitting arch bars.
The arch bars are formed and fitted. Since these parts are largely decorative I went with aluminum. The material is 1/8" thick bar stock ripped to a custom width. Bolted in with scale hex screws.
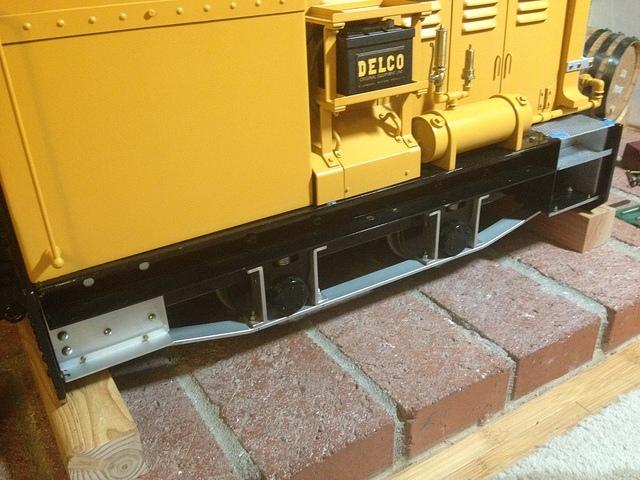
Here you can see the arch bars bolted in. This looks much more American and really has the character of a TL Plymouth chassis now.
Another view.
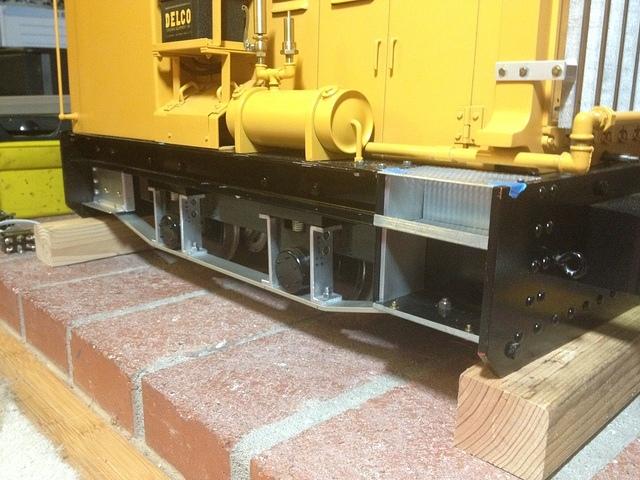
Some of you might have noticed a few additional details in the above pictures so lets have a closer look at those.
Inspired by West Side Lumber No. 1 I have a frame-mounted compressed air tank with pop valve and whistle. The brake line piping is exposed and runs out to the front of the loco. The West Side Plymouth didn't always have air brakes. They were a later retrofit using the frame mounted tank and an external compressor on the fireman's side. I will be replicating these details.
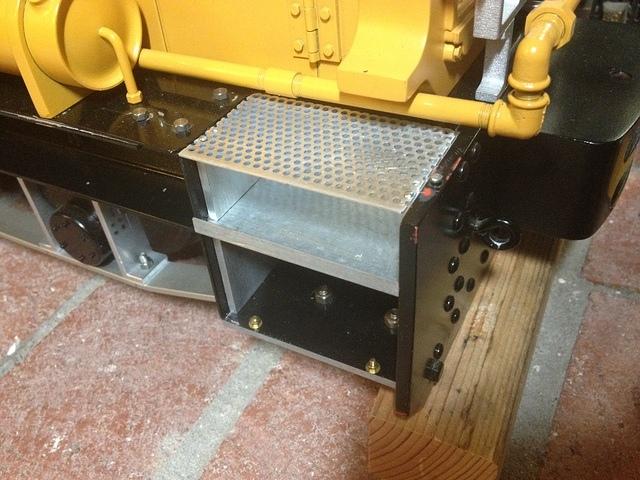
This is a frame filler I came up with that uses steel and aluminum. This filler is especially important because it will provide a place to mount the external compressor on the other side of the loco.
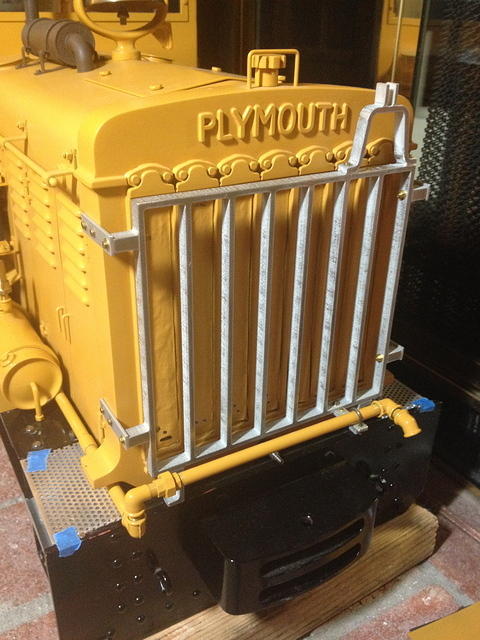
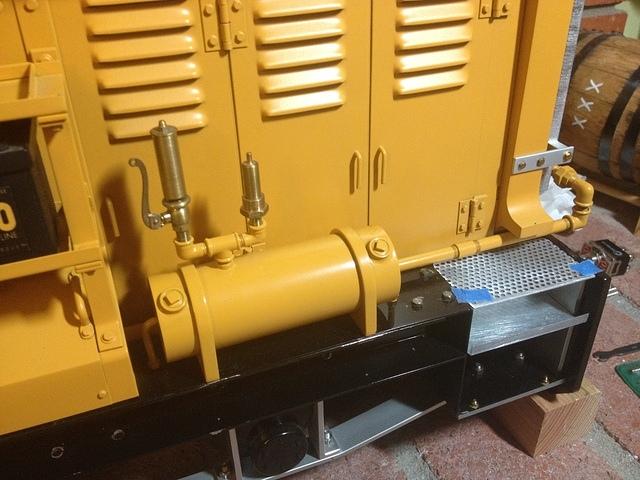
I mounted the radiator guard. I needed it in place fabricate the bracket for the air brake line on the front. The mounting location for a tractor style head lamp is shown in the upper right corner.
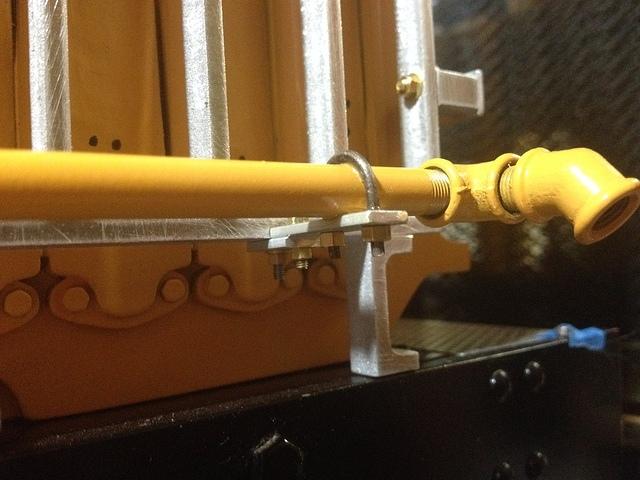
A closeup of the little u-bolt bracket I made for the air line mount to the radiator guard. It can be unbolted for disassembly.

A top view of the air line bracket.
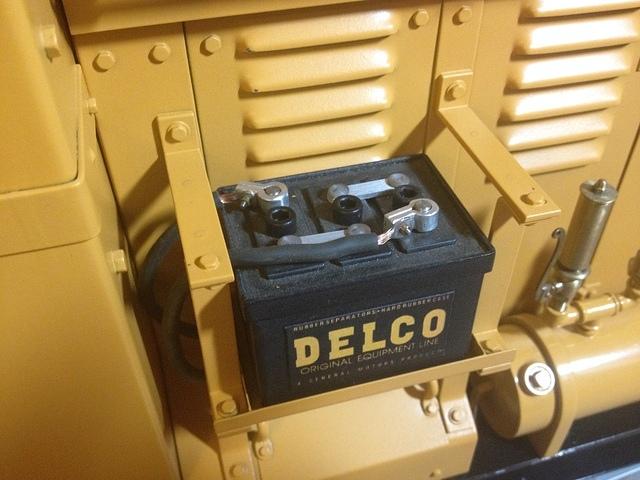
Remove a small tool tray and you can see the starter battery. which is now installed with some scale leads and clamps.
An overall progress shot. I'm working in the living room in front of the fire place so I can be close by if my wife needs me to do anything baby related. So far she hasn't complained about the tools and tiny nuts and bolts that I have spread out for the project.
So the chassis is pretty much done. I will be breaking the loco back down so the chassis can be painted. I'm not getting fancy with contrasting colors. The chassis will also be yellow. This is an industrial locomotive with an suitable color scheme. The next step is to tackle the cab interior/backhead area which will be detailed with scale levers, the gasoline tank and transmission covers. Stay tuned for that and the chassis paint!
Regards,
Chassis, belly up, ready for fitting arch bars.
The arch bars are formed and fitted. Since these parts are largely decorative I went with aluminum. The material is 1/8" thick bar stock ripped to a custom width. Bolted in with scale hex screws.
Here you can see the arch bars bolted in. This looks much more American and really has the character of a TL Plymouth chassis now.
Another view.
Some of you might have noticed a few additional details in the above pictures so lets have a closer look at those.
Inspired by West Side Lumber No. 1 I have a frame-mounted compressed air tank with pop valve and whistle. The brake line piping is exposed and runs out to the front of the loco. The West Side Plymouth didn't always have air brakes. They were a later retrofit using the frame mounted tank and an external compressor on the fireman's side. I will be replicating these details.
This is a frame filler I came up with that uses steel and aluminum. This filler is especially important because it will provide a place to mount the external compressor on the other side of the loco.
I mounted the radiator guard. I needed it in place fabricate the bracket for the air brake line on the front. The mounting location for a tractor style head lamp is shown in the upper right corner.
A closeup of the little u-bolt bracket I made for the air line mount to the radiator guard. It can be unbolted for disassembly.
A top view of the air line bracket.
Remove a small tool tray and you can see the starter battery. which is now installed with some scale leads and clamps.
An overall progress shot. I'm working in the living room in front of the fire place so I can be close by if my wife needs me to do anything baby related. So far she hasn't complained about the tools and tiny nuts and bolts that I have spread out for the project.
So the chassis is pretty much done. I will be breaking the loco back down so the chassis can be painted. I'm not getting fancy with contrasting colors. The chassis will also be yellow. This is an industrial locomotive with an suitable color scheme. The next step is to tackle the cab interior/backhead area which will be detailed with scale levers, the gasoline tank and transmission covers. Stay tuned for that and the chassis paint!
Regards,
Eric Maschwitz
Head of Operations, Squirrel Mountain Mine
Former Whistle Punk,
Gunn Lake Land and Lumber, a subsidiary of East Devils Hill Lumber Co
Head of Operations, Squirrel Mountain Mine
Former Whistle Punk,
Gunn Lake Land and Lumber, a subsidiary of East Devils Hill Lumber Co
Re: 4 Ton Plymouth build, 1:5 scale, 4.75" gauge, Leslie Sal
Eric,
Congratulations on your new small scale (at this time) baby boy. Wait till he gets to crawling around and you won`t want to leave Tiny parts in sight.
Thank you for sharing your build, Very informative, great photos and a well detailed locomotive. An Inspiring example of "how to".
Motor Mounts--I especially noticed the motor mounts that have often been mentioned, asked about by other builders using quite similar parts and, How do you make the "setup" flexible?? It appears you have a Three point motor mounting that allows for Flexibility. I am familiar with, and have made some of my own drive systems like that on four and eight wheel (2 truck) locomotives.
But, sure Not as neat and professional looking as your motor mounts. Rough and crude am I sorry to say. But it works.
My thought is , with your ability to photograph and describe builds so well, perhaps you might consider a few comments on the Motor mounts and gear sizes as well. Just a thought it would help others.
Thank you.
Chooch
Congratulations on your new small scale (at this time) baby boy. Wait till he gets to crawling around and you won`t want to leave Tiny parts in sight.
Thank you for sharing your build, Very informative, great photos and a well detailed locomotive. An Inspiring example of "how to".
Motor Mounts--I especially noticed the motor mounts that have often been mentioned, asked about by other builders using quite similar parts and, How do you make the "setup" flexible?? It appears you have a Three point motor mounting that allows for Flexibility. I am familiar with, and have made some of my own drive systems like that on four and eight wheel (2 truck) locomotives.
But, sure Not as neat and professional looking as your motor mounts. Rough and crude am I sorry to say.
My thought is , with your ability to photograph and describe builds so well, perhaps you might consider a few comments on the Motor mounts and gear sizes as well. Just a thought it would help others.
Thank you.
Chooch
Re: 4 Ton Plymouth build, 1:5 scale, 4.75" gauge, Leslie Sal
Hi Chooch,
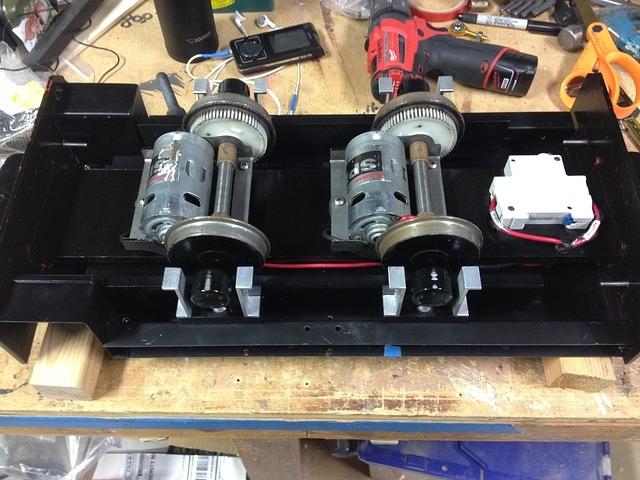
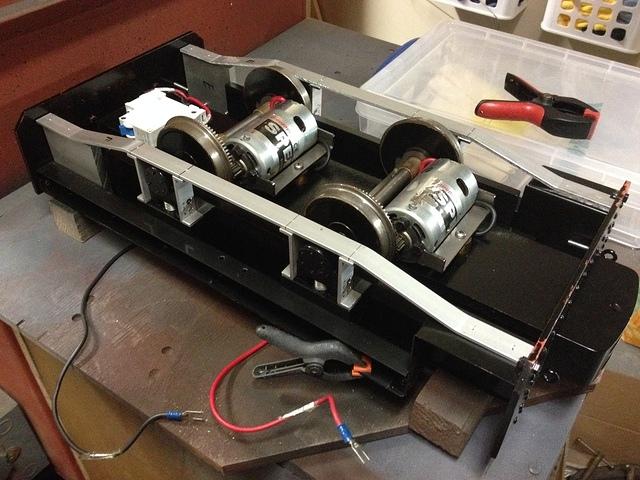
Thanks for the comments! The motor mounts are part of the original Maxitrak mechanicals. They are quite simple. I think they could be replicated without too much difficulty. They are indeed a 3 point mount. The front single mount is the pivot. The rear twin mounts are actually the springs. The motor axle assembly is made from folded sheet steel--pretty thick stuff at that. The motor attaches to this steel part with four screws. Flanged bronze sleeve bearings for the axles are pressed into this same steel part. Most of Maxitrak's business is 5" gauge but they designed the motor mounts to work with 4 3/4" gauge also. I haven't measured the gears but there is a small brass pinion on the motor and a large fiber reinforced plastic gear on the axles. The pivot and spring mounts are simply clearance holes with through-bolts. The pivot mount has a piece of what looks like flexible plastic or rubber tubing as a spacer and the other mounts have springs, of course. These Motor assemblies are bolted to a large thick steel plate that runs the length of the chassis. This design would work well for any small rigid frame 0-4-0 or 0-6-0 internal combustion loco. I suppose you could adapt a similar idea to trucks or bogies if you were so inclined. Some of the larger Maxitrak locos (and the 7 1/2" gauge Accucraft Plymouth) use a similar design with two motors on each axle. I'll try to take some more detailed pictures when I disassemble for paint.
Regards,
Eric Maschwitz
Head of Operations, Squirrel Mountain Mine
Former Whistle Punk,
Gunn Lake Land and Lumber, a subsidiary of East Devils Hill Lumber Co
Head of Operations, Squirrel Mountain Mine
Former Whistle Punk,
Gunn Lake Land and Lumber, a subsidiary of East Devils Hill Lumber Co
-
morten1996
- Posts: 26
- Joined: Tue Jul 10, 2012 10:30 am
Re: 4 Ton Plymouth build, 1:5 scale, 4.75" gauge, Leslie Sal
Hi Eric,
although not being a fan of those little critters I have to admit that your work taught me otherwise.
You created a real beauty with amazing details.
Please keep on with reports on your progress!
Regards
Norman
although not being a fan of those little critters I have to admit that your work taught me otherwise.
You created a real beauty with amazing details.
Please keep on with reports on your progress!
Regards
Norman
Re: 4 Ton Plymouth build, 1:5 scale, 4.75" gauge, Leslie Sal
Eric,
Thank you again for your reply, further information and photos posted regards the Motor Mounts of your locomotive. I know it should be a help to others and myself to make better looking and operating similar drive units.
So many of your details are exceptional but, the "Battery" is the "Unique" one. I didn`t want to say Cute.
Thanks.
chooch
Re: 4 Ton Plymouth build, 1:5 scale, 4.75" gauge, Leslie Sal
Chooch, I have no aversion to the term cute. I think narrow gauge locos are "cute", even critters.
Norman I'm glad my project has helped you appreciate critters even a little bit. I think if you get to know the world of industrial railroading I think you can appreciate little locos like this. Plymouth in particular was one of the worlds most prolific industrial locomotive manufacturers with production starting in 1910 and ending in 1999. They are known to have built over 7500 locomotives in almost every conceivable rail gauge. Nearly every locomotive they built was less than 25 tons with the smallest examples tipping the scales at a dainty 2.5 tons.
And with that I have an update my little four tonner.
Years ago while cleaning out my wife's accumulated kitchen gadgets I found a tool that looked like a pair of scissors but instead of blades there were two half-sphere shaped scoops. It turns out this was a vintage meatball shaping tool. I asked if I could have the tool and my wife said "sure, I don't even know what that is" The potential I saw in the meatball molding tool was the possibility of using the scoops as headlamp reflectors.
Now fast-forward to recent history when I started on the Plymouth project I discussed the meatball mold headlamp idea with a friend of mine named Dennis Mead. Dennis told me he could tackle turning the scoop shapes into headlamps. These would look like vintage auto or tractor headlamps which is perfect for an industrial locomotive like this. Well Dennis sure came through. He gave me the initial parts for the headlamps last Saturday and they are really fantastic.
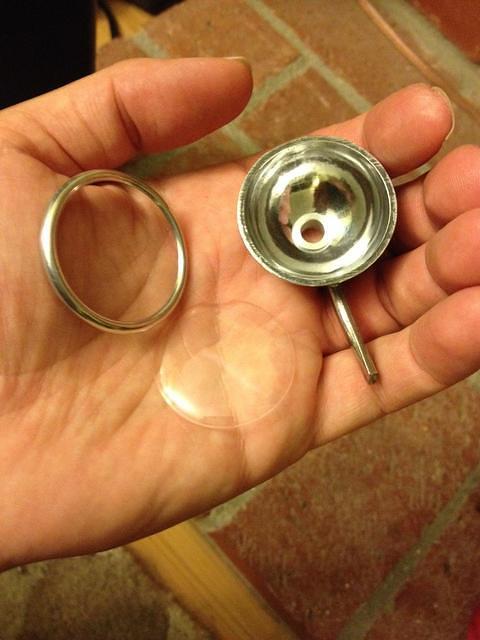
Okay, so here are the parts to assemble one headlamp. On the right is the reflector/lamp housing made from the meatball tool. On the left is a polished aluminum bezel that Dennis turned. In the middle is a vintage surplus watch crystal that will be used for the lens.

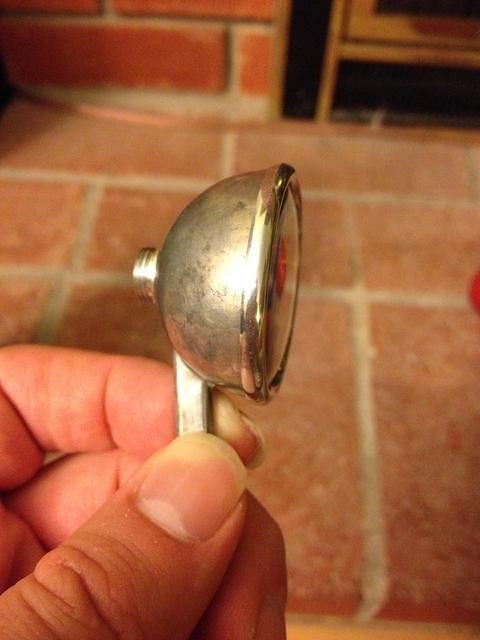
What once was an unusual kitchen tool is now a scale model tractor headlamp. Dennis polished the reflective surface on his lathe. The nice polished bezel perfectly captures the watch crystal "lens".
Dennis machined a threaded socket that will hold a small incandescent bulb. The socket has yet to be installed. There are parts to make two of these lamps so one will be mounted forward facing on the radiator guard. The other will be reverse facing bracketed to the cab roof.
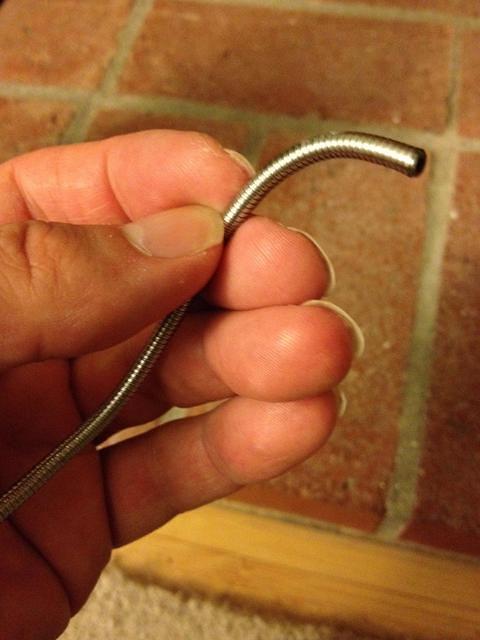
This tiny armored flexible conduit which was taken from a small cheap flashlight will protect the wiring for the headlamps.
I have a bunch more sanding, finishing, painting to do on these parts but boy is it great to have friends like Dennis!
Regards,
Norman I'm glad my project has helped you appreciate critters even a little bit. I think if you get to know the world of industrial railroading I think you can appreciate little locos like this. Plymouth in particular was one of the worlds most prolific industrial locomotive manufacturers with production starting in 1910 and ending in 1999. They are known to have built over 7500 locomotives in almost every conceivable rail gauge. Nearly every locomotive they built was less than 25 tons with the smallest examples tipping the scales at a dainty 2.5 tons.
And with that I have an update my little four tonner.
Years ago while cleaning out my wife's accumulated kitchen gadgets I found a tool that looked like a pair of scissors but instead of blades there were two half-sphere shaped scoops. It turns out this was a vintage meatball shaping tool. I asked if I could have the tool and my wife said "sure, I don't even know what that is" The potential I saw in the meatball molding tool was the possibility of using the scoops as headlamp reflectors.
Now fast-forward to recent history when I started on the Plymouth project I discussed the meatball mold headlamp idea with a friend of mine named Dennis Mead. Dennis told me he could tackle turning the scoop shapes into headlamps. These would look like vintage auto or tractor headlamps which is perfect for an industrial locomotive like this. Well Dennis sure came through. He gave me the initial parts for the headlamps last Saturday and they are really fantastic.
Okay, so here are the parts to assemble one headlamp. On the right is the reflector/lamp housing made from the meatball tool. On the left is a polished aluminum bezel that Dennis turned. In the middle is a vintage surplus watch crystal that will be used for the lens.
What once was an unusual kitchen tool is now a scale model tractor headlamp. Dennis polished the reflective surface on his lathe. The nice polished bezel perfectly captures the watch crystal "lens".
Dennis machined a threaded socket that will hold a small incandescent bulb. The socket has yet to be installed. There are parts to make two of these lamps so one will be mounted forward facing on the radiator guard. The other will be reverse facing bracketed to the cab roof.
This tiny armored flexible conduit which was taken from a small cheap flashlight will protect the wiring for the headlamps.
I have a bunch more sanding, finishing, painting to do on these parts but boy is it great to have friends like Dennis!
Regards,
Eric Maschwitz
Head of Operations, Squirrel Mountain Mine
Former Whistle Punk,
Gunn Lake Land and Lumber, a subsidiary of East Devils Hill Lumber Co
Head of Operations, Squirrel Mountain Mine
Former Whistle Punk,
Gunn Lake Land and Lumber, a subsidiary of East Devils Hill Lumber Co
Re: 4 Ton Plymouth build, 1:5 scale, 4.75" gauge, Leslie Sal
Eric,
Absolutely thinking Outside the box with your Headlight and other items you have made for your "Critter" !!
The meatball scoop just gave me the thought-- I wonder about a similar Fruit scoop? Don`t some of those Party fruit bowls have such scoops?
The Exhaust cap you also made, there is, or recently used to be a Toothpaste tube with a Flip top cap that I used for an exhaust pipe as you did. (darn,can`t remember the brand)
What I would like to point out to others is: STOP, LOOK and THINK. What can I use to make this that is not available, affordable, will work and look good even if not to Exact scale or prototype. It`s your equipment.
I build freelance, have few machine tools but, Many times use / make the "unusual" as you have done.
Eric, Your Plymouth is a :Rock" of inspiration to many I`m sure.
Thank you.
chooch

Re: 4 Ton Plymouth build, 1:5 scale, 4.75" gauge, Leslie Sal
Really enjoying this build series. Thanks for taking the time to post.
-Mike
-Mike
Live Steam Photography and more - gallery.mikemassee.com
Product Development and E-Commerce, Allen Models of Nevada
Product Development and E-Commerce, Allen Models of Nevada
Re: 4 Ton Plymouth build, 1:5 scale, 4.75" gauge, Leslie Sal
I have to agree, this is fun. I like to find things to use also. I needed a sink for my caboose. My wife came home with an ice cream scoop and said "will this work?" You bet. Cut off the handle, cobble a counter top, JB Weld it all together and presto, a sink!
Jim
Jim