
Recently, the German guy, Stefan Gotteswinter, did a deburring video so I am at least familiar with the idea...
I was doing some engravings on aluminum strips, about 0.020" deep. How would you deburr them?
My first thought is to just run them on the belt sander. The thing is that the aluminum was aged and has a nice frosty surface that helps the engraving stand out. Once I polish them up they don't have as much contrast.
I thought of just floating an endmill over the surface to knock the burrs off, but I'm sure they will still be rough.
How to Deburr
How to Deburr
Standards are so important that everyone must have their own...
To measure is to know - Lord Kelvin
Disclaimer: I'm just a guy with a few machines...
To measure is to know - Lord Kelvin
Disclaimer: I'm just a guy with a few machines...
Re: Ho to Deburr
I wanted to add that this is drag engraving.
Standards are so important that everyone must have their own...
To measure is to know - Lord Kelvin
Disclaimer: I'm just a guy with a few machines...
To measure is to know - Lord Kelvin
Disclaimer: I'm just a guy with a few machines...

Re: Ho to Deburr
I'm unaware of any type of deburring that wouldn't alter the surface of the part(s). I suspect you'll have to live with the condition, or consider abrading the entire surface. If the parts are flat, you can do that on a piece of abrasive paper (or cloth) that is placed on a flat surface (mill table, or even a surface plate). If you straight line the parts, the end result will look reasonably well. I'd lose the idea of using an end mill, though, unless you can stay a reasonable distance from the surface consistently.
Once finished, if you want the engraving to stand out, you might consider applying a coat of paint, then removing it on the surface. You'd likely enjoy success with a toothpick if you don't want to paint the entire surface. That would limit the amount of paint you'd have to remove. You can also use a wax stick made for the purpose. I once filled the engraving on an old safe with a stick and it worked quite nicely.
H
Wise people talk because they have something to say. Fools talk because they have to say something.
Re: Ho to Deburr
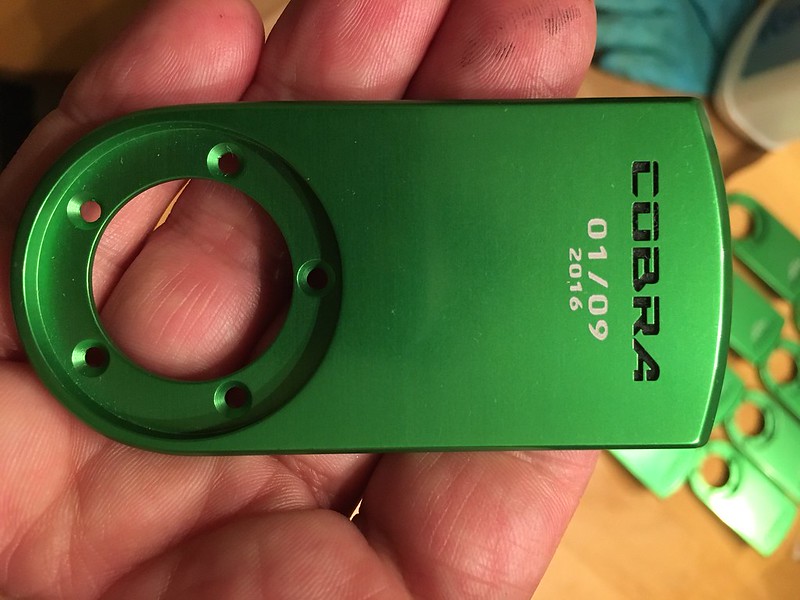
I engrave aluminum often. Once engraved you can deburr by placing a piece of fine grit sandpaper on a surface place or on a block and stroke it over the part. If you want contrast you can use baking soda in a blaster to matte the surface. Below are two pieces showing my methods. Engraved, anodized then infill painted. The other pic shows how it looks after deburring on a surface plate.

Vision is not seeing things as they are, but as they will be.
Re: Ho to Deburr
I think I just have to sand them. I've always wanted to get a blaster... Nice engravings.
Standards are so important that everyone must have their own...
To measure is to know - Lord Kelvin
Disclaimer: I'm just a guy with a few machines...
To measure is to know - Lord Kelvin
Disclaimer: I'm just a guy with a few machines...
Re: Ho to Deburr
You don't need the whole shootin match when it comes to blasters like a cabinet and so on. Especially with baking soda, all you need is a hand held unit like a "speed blaster" or even a DIY unit like a long slender air nozzle spliced into a plastic tube with the tube sitting in a container of soda. I did it that way for many years. Baking Soda (Bicarbonate) is cheap and very effective on aluminum. Being water soluble it's perfect if you plan to anodize your parts as there is no embedment. Just do it outside, oh and safety - wear a mask!.
Vision is not seeing things as they are, but as they will be.
Re: Ho to Deburr
Nice shot of a Molson Canadian cap  And very professional quality engraving and anodising RSG.
Re: Ho to Deburr
LOL thanks Pete, The cap happened to just be laying there....really.....well ok, I was drinking the beer. But the engraving work was complete for the night
Vision is not seeing things as they are, but as they will be.
Re: Ho to Deburr
Well, I've seen more than enough of those caps I bet I could spot one at 3 miles. My last dog was called Molson.
-
neanderman

- Posts: 896
- Joined: Mon Jan 09, 2012 7:15 pm
- Location: Cincinnati, Ohio, USA
Re: Ho to Deburr
Picture? I have a notion of what you're talking about, but a picture would sure clarify it.RSG wrote:...a DIY unit like a long slender air nozzle spliced into a plastic tube with the tube sitting in a container of soda.
As for the nozzle, how long and how slender?
Ed
LeBlond Dual Drive, 15x30
US-Burke Millrite MVI
Atlas 618
Files, snips and cold chisels
Proud denizen of the former "Machine Tool Capitol of the World"
LeBlond Dual Drive, 15x30
US-Burke Millrite MVI
Atlas 618
Files, snips and cold chisels
Proud denizen of the former "Machine Tool Capitol of the World"

Re: How to Deburr

Probably talking about something like a non-valve blaster head like this.
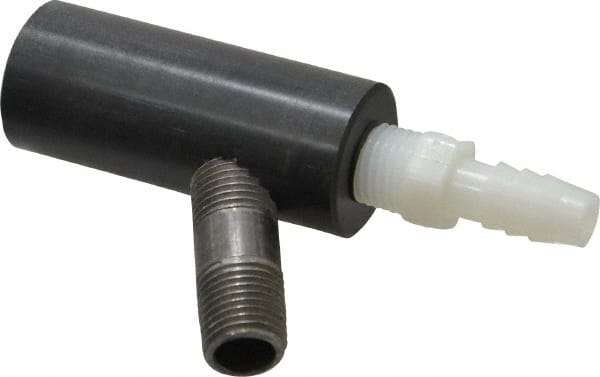
Or for home made for soda, something like this? Just drop the lift tube in a container of soda, and wear a suitable mask. Proportions would likely need changed, but that's the idea.
Russ
Master Floor Sweeper
Master Floor Sweeper
Re: How to Deburr
This is what I used to use....I called it my Ghetto-blaster! LOL
The tip of the blaster is cut into the top of the hard plastic tube about 1" back leaving room under it for the media to move up through. The other end of the plastic tube was inserted into the spout of an old vinegar squirt bottle turned upside down with the bottom cut off.

The tip of the blaster is cut into the top of the hard plastic tube about 1" back leaving room under it for the media to move up through. The other end of the plastic tube was inserted into the spout of an old vinegar squirt bottle turned upside down with the bottom cut off.
Vision is not seeing things as they are, but as they will be.