Grinding a corner rounding end mill by hand

Topics include, Machine Tools & Tooling, Precision Measuring, Materials and their Properties, Electrical discussions related to machine tools, setups, fixtures and jigs and other general discussion related to amateur machining.

Moderators: GlennW, Harold_V

Post Reply
Doubledog
Posts: 86
Joined: Tue Dec 26, 2006 4:19 pm
Location: Kaiserslautern, Germany

Grinding a corner rounding end mill by hand

Post by Doubledog »

Hi gang, Anybody have one of these in metric shank as thats what my collets are. Really need one for my next project. Not picky about the dia as long as a small bench top mill can handle it.

Thanks in advance, -Jamie

by the way, I mill almost soley aluminum. Shipping is to a US address. Thanks again.

Image
You never know what your faith is until your faith has truely been tested.
User avatar
Harold_V
Posts: 20251
Joined: Fri Dec 20, 2002 11:02 pm
Location: Onalaska, WA USA

Post by Harold_V »

As an alternative, you can hand grind the appropriate radius on a piece of HSS, which would then be used in a fly cutter.

If the radius in question will be generated on a pocket of sorts (where you can't fit a fly cutter), you can also hand grind an end mill shank, making a single edged cutter. If you find this is acceptable and would like more input, feel free to ask. I have accomplished the task by both methods with very acceptable results.

Harold
Doubledog
Posts: 86
Joined: Tue Dec 26, 2006 4:19 pm
Location: Kaiserslautern, Germany

Post by Doubledog »

Harold, as always your input is highly appreciated. Please feel free to move this to the general discussion forum for others. However, I'm not too sure about my grinding abilities producing the desired results.

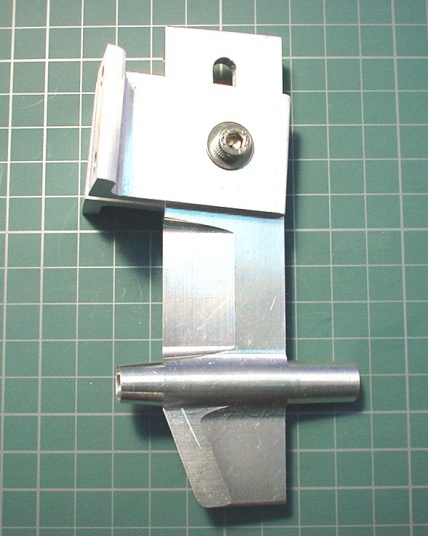
This is what I hope to make. Its a strut for a radio control gas boat.

.
Image
You never know what your faith is until your faith has truely been tested.
User avatar
Harold_V
Posts: 20251
Joined: Fri Dec 20, 2002 11:02 pm
Location: Onalaska, WA USA

Post by Harold_V »

The radius on the bracket?

This one is a no-brainer. Using the shank of an end mill (it is just as hard as the cutting edge of the end mill), grind a flat on the end, so that only half of the shank remains. In this case, you are looking to get the cutting edge on the centerline of the shank, so half of the shank should remain after grinding. Measure the thickness and grind until you have exactly half of the shank remaining, which will be the centerline of the shank. You'd end up with a round shank with a"D" configuration ground on the end. The shank must be larger in diameter than twice the radius desired, otherwise you can't achieve the full radius.

Keeping in mind that which side of the D that gets the radius will hand the cutter (it will cut in one direction only, CW or CCW, depending on which corner gets ground), grind the desired radius on one of the corners, making sure you have enough relief for the cutter to clear when in operation. Use a radius gauge to establish the desired radius, grinding on the corner of the wheel. The corner (of the wheel) should have a small radius, but it should be smaller than the target radius of the tool, which will allow for creating relief in the grind. When the tool has been ground, kill the opposite edge, so it does not contact the material when the cutter is in use.

Sounds complex, but it's very straight forward. Once ground, if the radius is a common size, you can usually stone the radius by gripping a round stone in a drill chuck and spinning at high speed. Apply the cutter to the stone such that it hones relief.

You can do it, and it's one of the finest learning experiences I can recommend. By mastering this process, you can free yourself from dependency of rarely used commercial tooling.

If you feel a picture of such a cutter will help, I think I may be able to post one. Let me know.

Harold
Doubledog
Posts: 86
Joined: Tue Dec 26, 2006 4:19 pm
Location: Kaiserslautern, Germany

Post by Doubledog »

Harold, you've got ideas coming to mind now. However, I'm hoping to make the long horizontal part right above the bottom. Its got a hole running through it for the drive shaft.

I might just take a two flute mill and grind it like you're talking about.

Would it be possible to just buy a regular SAE shaft mill and cut it to metric shaft on the lathe?
You never know what your faith is until your faith has truely been tested.
User avatar
Harold_V
Posts: 20251
Joined: Fri Dec 20, 2002 11:02 pm
Location: Onalaska, WA USA

Post by Harold_V »

Doubledog wrote:Harold, you've got ideas coming to mind now. However, I'm hoping to make the long horizontal part right above the bottom. Its got a hole running through it for the drive shaft.

I might just take a two flute mill and grind it like you're talking about.
That will work perfectly well. Besides, it gives you two flutes to grind, so if one fails, it can be killed, leaving the other.

Truth be told, you can grind the form in both flutes, but it's not easy getting them to match one another unless you have a cutter grinder.

It was common practice for us to hand grind radii on end mills, even multiple flute end mills. If the form is off on one of them, it's not all that big of a deal, because the other(s) will define the radius, or it may be the combined profile of all of the teeth that does. It's rather forgiving.
Would it be possible to just buy a regular SAE shaft mill and cut it to metric shaft on the lathe?
I'm inclined to say no. The shank of an end mill is very hard, so it does not lend itself well to turning. That's not to say it hasn't been done, but the problems you'd face in holding the end mill and getting it to run true may be more than you care to tackle, to say nothing of attempting to machine what is a HSS shank, fully hardened.

Your idea of grinding an end mill is fine. Use one that is dull, and performs poorly now, so you're not destroying a decent end mill. All of the areas that must cut will be ground anew, so if you do your work well, you will have effectively restored what was a non functioning tool to a new life. Besides, starting with a dull end mill will have solved part of the problem, that of establishing the D configuration.

There's one disadvantage, although it is a minor one and has a benefit as well. Because the flute of an end mill is a helix, it will be somewhat deceiving to grind the radius, but when you achieve your goal, the tool will perform much better than one made from the D I proposed. It will have positive rake, unlike the D tool, which has none.

I hope this has stimulated your thinking, which was my intention. It isn't in the cards for the home shop guy to rely on commercially prepared tools, especially when they may get used only one time. By being a little creative, you can usually make the tools you need, saving the money for those instances that can't be solved otherwise.

I have long told readers that until they can hand grind cutting tools, they will be held captive. It's true.

Harold
Doubledog
Posts: 86
Joined: Tue Dec 26, 2006 4:19 pm
Location: Kaiserslautern, Germany

Post by Doubledog »

Very insightful and inspired me to build from what I've got. We'll give it a try over the winter. Thanks so much.

Btw, please consider moving this to the General Discussion as it might help someone?. I'll change (or you can) the subject to reflect grinding a radi from a regular mill.?

Jamie
You never know what your faith is until your faith has truely been tested.
MasterMaker
Posts: 6
Joined: Tue Apr 28, 2009 2:38 pm
Location: Too far north for comfort!

Post by MasterMaker »

As long as you are milling alu(or anything non ferrous for that matter) you can use a carbide router bit, they come in all kinds of handy shapes and work great and as an added bonus they are usually dirt-cheap.

The ones with a bearing work as a great guide and make´s putting an even chamfer on the edges of a workpiece a breeze.
CB&Q
Posts: 397
Joined: Sun Sep 06, 2009 8:11 pm
Location: Missouri Ozarks

Post by CB&Q »

Harold_V wrote: .....I have long told readers that until they can hand grind cutting tools, they will be held captive. It's true.

Harold
Very early on, reluctantly, my Dad taught me to sharpen twist drills myself, if for no other reason, so I would burn up less bits, and pester him less. He always voiced the concern that I should not follow in his footsteps and become a machinist, tool & die maker, etc.

I didn't. I proudly use my skills solely for hobby gratification; never have earned a living thusly. (FWIW, not much, I'm afraid).

CB&Q
One can derive far more personal pleasure and reward from observing Mother Nature's living things instead of Humanity's Madness.....
10 Wheeler Rob
Posts: 1546
Joined: Tue Mar 21, 2006 2:44 pm
Location: East Hartford, CT

Re: adapting to metric collete

Post by 10 Wheeler Rob »

If you have a collet larger in diameter then an available radius cutter shank and access to a lathe make a sleeve to fit in the collet and over the shank. Slit a slot down the length with a saw and presto you have an adapter.

If you leave a shoulder on the OD on one end, then it will not slid into the collet to far.

Rob
Post Reply