
Actually, it isn't a negative rake tool. That's one of those TT inserts, not known for quality.
I'd say it's a combination of not enough speed and not a rigid enough setup.
The Sweet Spot - What's going on there?
Re: The Sweet Spot - What's going on there?
Glenn
Operating machines is perfectly safe......until you forget how dangerous it really is!
Operating machines is perfectly safe......until you forget how dangerous it really is!
-
refinery mike

- Posts: 623
- Joined: Sat Jul 02, 2011 1:54 pm
Re: The Sweet Spot - What's going on there?
1. you can not expect to grab a bolt by the head like that and cut on the end of the bolt. something is going to give. You have enough room to add a loose nut up near the head and then put in a washer and a lock washer to hold everything from turning in the nuts. clamp both the head and the first nut in the jaws. then try it again. Remember also that you do not have to take the whole tapper in one bite. the bolt is not very strong, if you do not take several light passes the bolt will flex enough to let it roll up over the cutter. Especialy at the tip you must take very light passes. Do you know how to center the bit on the work? Push the end of the bit up against the side of the bolt, pinching a light 6 inch ruller between the bolt and the cutter. if the ruler stands strait up you are on center if not adjust till you are. My last suggestion is to switch to high speed tools for this job. they are sharper, and carbide tools have to push harder on your bolt to cut, than high speed. With a properly sharpened high speed tool you should cut that steel smooth as butter start to finish. Cut the taper on the side of the cutter and not with the tip. if you cut with a sharp point when you get to the tip you will leave a little tit out the end.
For future referance if you want to do that job with better accuracy, you can make a internaly threaded cylinder that is slotted on one side. screw the bolt into the cylinder and clamp it in the chuck. that will hold it quite solidly and dead on center. I have to go now but if you still have trouble tell me and i will post some pictures of what i am trying to tell you got to go now.
For future referance if you want to do that job with better accuracy, you can make a internaly threaded cylinder that is slotted on one side. screw the bolt into the cylinder and clamp it in the chuck. that will hold it quite solidly and dead on center. I have to go now but if you still have trouble tell me and i will post some pictures of what i am trying to tell you got to go now.
Re: The Sweet Spot - What's going on there?
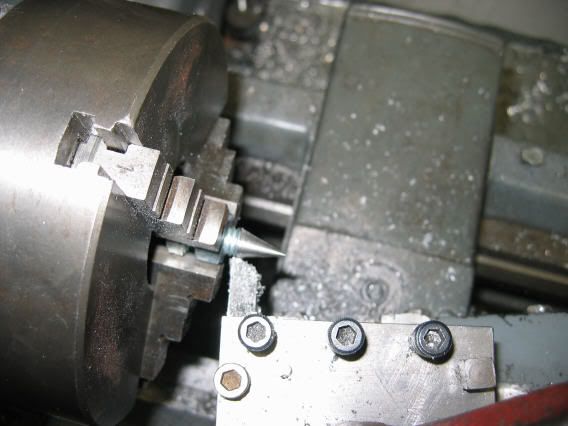
OK, I made a pointed 3/8-16 grade 5 capscrew as an example....... it can be done.
2 passes, one roughing, one finish.
pictures next
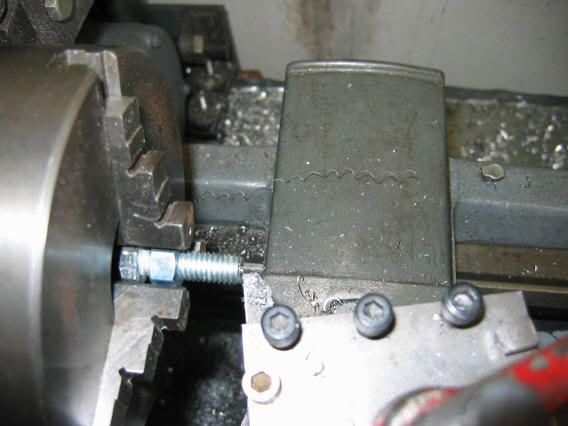
I reset the part between 1st and second pic, as I found the head of the screw needed to be shimmed... it loosened up when the tool got to it, evidently a slight difference in size from nut.
HSS tool, cutting on LEFT HAND SIDE ONLY. 15+ deg rake, started off on end of screw, cut in one pass, then reset inwards slightly and made a finish pass.
Note deeper setting, with nut ON THREADS as a stabilizer... the jaws CANNOT grab just the head well enough to hold it...
2 passes, one roughing, one finish.
pictures next
I reset the part between 1st and second pic, as I found the head of the screw needed to be shimmed... it loosened up when the tool got to it, evidently a slight difference in size from nut.
HSS tool, cutting on LEFT HAND SIDE ONLY. 15+ deg rake, started off on end of screw, cut in one pass, then reset inwards slightly and made a finish pass.
Note deeper setting, with nut ON THREADS as a stabilizer... the jaws CANNOT grab just the head well enough to hold it...
Re: The Sweet Spot - What's going on there?
Looks good to me.
Gotta love this board.
Gotta love this board.
Live for the moment!
Prepare for tomorrow!
Forgive the past!
Prepare for tomorrow!
Forgive the past!
-
refinery mike
- Posts: 623
- Joined: Sat Jul 02, 2011 1:54 pm
Re: The Sweet Spot - What's going on there?
Ok i am back.
1. put an extra nut washer and back up nut on the bolt, it works best if you do it in a vise.
2. using a small ruler to center the cutter on the work. it should stand straight up if the cutter is centered.
3. turning the taper with the side of the cutter. arrange it almost parallel to the proposed finished cut but bring the tip in just a little bit so a chip of about 3/16 inch wide will be made. (this is only for cutting right up to a sharp point, the longer chip will support the cut at the tip. This helps if your lathe is less than rock solid. keeps the bit from rolling under the tip at the end.
well hope my pictures help.
- Attachments
-
-
-
-
bobz3denver
- Posts: 19
- Joined: Thu Jan 19, 2012 4:28 pm
- Location: Denver, CO
- Contact:
Re: The Sweet Spot - What's going on there?
Fantastic info! Thanks to you all. And Mike finally answered the initial question - there is no "sweet spot". The initial pressure was required to overcome using the wrong tool in a weak set up. I've got another dozen of these to do. I'll stiffen the setup and use HHS  That'll be Lesson 2 - How to grind a tool.
There are no rules here, we're trying to accomplish something!
-
David Powell
- Posts: 531
- Joined: Thu Mar 13, 2003 10:38 pm
- Location: Pickering Ontario Canada.
Re: The Sweet Spot - What's going on there?
While using nuts, even splitting them, makes for a better way of holding SHCS than merely chucking the head and hoping for the best, a home made " collet like device" gives a better hold, As a commercial job I have taken 3/4" long 10/32 setscrews down to .050 for a 1/4 "length and then sharpened then to a 20 degree included point with a toolpost grinder for over 20 yrs. It is possible to point them with a tool but they are not so sharp as when ground.I havent found it necessary to use " split collets " for this job, mine are simply 3/4 dia mild steel about 1" long tapped 10 /32 through, the set screws to be modified are simply screwed in, up to another set screw inserted from the other end locked with a nut and adjusted so that theres minimum overhang of the part to be attacked and locked with a nut tightened against the front face of the collet.Lots of experimenting, and some heartache has resulted in that I use HSS tooling, cut down to the fifty thous diameter in one pass at what seems a very slow speed for the diameter ( What exactly it is I simply do not know). and always finest feed in the changebox. I used to do thousands but now business has declined to a few dozen each year. If the tool is not on centre, or the front locknut is not tight I soon know it. SHCS vary in hardness and machinability but are machinable with care.Hope this is encouraging. regards David Powell.
Re: The Sweet Spot - What's going on there?
Not entirely true. There can certainly be a "sweet spot" of a sort when machining material of that type.bobz3denver wrote:Fantastic info! Thanks to you all. And Mike finally answered the initial question - there is no "sweet spot". The initial pressure was required to overcome using the wrong tool in a weak set up.
SHCS are a high strength alloy, hardenable, and are hardened as a means to get their higher strength.
Such material will often "work harden" as I mentioned in an earlier post, if the tool is allowed to "rub" without cutting. Then it IS indeed necessary to apply a greater pressure to get the tool to "start", if it ever will at all. Some materials will harden to the point that most tools won't touch them, and often efforts to force the tool to cut them only make the situation worse.
Even the grade 5 cap screw in my pictured example showed the tendency, if the tool didn't keep progressing, the surface was hardened and the tool had to be forced to re-start the cut.
The "sweet spot" therefore is a feed rate sufficient to avoid work-hardening, while not forcing the tool past the limits of the tool, machine, or setup.
You set up the ideal situation for this, because the long stick-out with poor work-holding allowed an initial flex and/ or actual movement, so that the less-than-razor-sharp carbide tool didn't initially cut. Might not be the only reason, but certainly contributed.
When the tool DID cut, it would dig-in with a larger depth than expected, either because of spring-back, or because the part was actually off-center and the cut was naturally deeper on the high spot. Probably both, and mostly the latter.
The lessons are that
1) work must be held solidly against movement
2) work-hardening material must have a constant cutting action or it WILL harden and resist further cutting.
Notice that I have NOT said the wrong tool was used. The tool was not wrong for the material, it was wrong for the setup.
While I used HSS for the part I did, that was because I had a point to make about doing it in one pass, and I have HSS tools suitable for that. Also, I used no washer, and needed a cutter that would cut at a low axial pressure so as not to push-in the part.
Carbide is quite suitable for cutting the material of a SHCS, but the way it is used is generally more forceful, since carbide is generally not so sharp as HSS can be made. Carbide is particles in a matrix, HSS is a pretty uniform alloy.
Carbide is more commonly used at high speeds, high feed rates, high stock reduction rates, and leaves a good finish in those conditions. But the work must be held in a manner capable of taking the pressures involved, which your screw was not.
BTW: the point about splitting the nut is good, that allows it to grip the threads. I used a snug nut, but not one as tight as a split would make it. That is partly the reason the screw could shift and needed the head shimmed.
-
10 Wheeler Rob
- Posts: 1546
- Joined: Tue Mar 21, 2006 2:44 pm
- Location: East Hartford, CT
Re: The Sweet Spot - What's going on there?
I find the thread clearance and concentricity of class 2 nuts often is not as accurate as one wants for turning points of threaded items. Making a home made split collet as mentioned usually works much beter for me than just using nuts. Some times you can use aluninum that is just bored to the od of the thread and then slpit to clamp on to it when you thighten the chuck of larger collet you clamp it with works.
Rob
Rob
-
refinery mike
- Posts: 623
- Joined: Sat Jul 02, 2011 1:54 pm
Re: The Sweet Spot - What's going on there?
GO to TUBALCAIN sharpening on youtube. He has great instructions on sharpening lathe bits. In fact watch everything he has to say on the lathe. he will save you years of learning on your own.
-
bobz3denver
- Posts: 19
- Joined: Thu Jan 19, 2012 4:28 pm
- Location: Denver, CO
- Contact:
Re: The Sweet Spot - What's going on there?
Update:
I got the points on the rest of the screws. I made what was essentially a large, thick round nut that covered most of the screw, threaded the center hole, and chucked that up. Worked very well. I was able to point the screws in two passes, one heavy (about 90%) and one light just to finish it up. Both passes were run towards the chuck. I also took a stab at grinding a tool - that does work much better than the carbide (thanks to all of you who suggested I take the plunge.)
Along the way I found out a few things about my G0516. First of all, when parting - it works best when the compound is set back so the tool is nearly over the compound pivot. (A stronger compound collar is on the to-do list.) I was able to part off a 1.75" steel rod - can't say it was pretty, chip jams stopped me quite a few times, but I did get the parting completed.
One of the huge things I was fighting, and didn't realize, was that my head spindle was loose. When I started working on the parting, I was getting chatter no matter what I did. And this was chatter to the point where it was seriously gouging the workpiece. So - I took a pry bar and started gently prying on the various parts and pieces of the lathe, looking for movement. I found a bit of movement in the compound and tighted the gibs up. Then I got to the chuck. There was probably close to a 1/16" inch of wobble in the chuck! (Absolutley my fault as I'd pulled the spindle out when I was cleaning the cosmoline off. Apparently, I didn't get the spindle all the way back in.) I used the pulley nut and judicious use of a hammer to tighten up the spindle. I probably got a full turn on the pulley nut before everything seemed to tighten up. I'll have to run it some and see if things loosen up again. Once the spindle was tight, as you might imagine, parting went MUCH better.
I do need to work on my tool grinding technique, there's quite a bit of chatter when I try turning down my 1.75" bar, but it's smooth a a baby's rump when I face that bar (from the center, out). So, I'm pretty sure my angles are off. I found the Tublican videos a while back, now that I've muddled about for a couple of weeks, I'm sure I'll get alot more out of them now. Like someone else suggested in another thread, it seems the smartest guys are the ones who've made the most scrap.
As far as "the sweet spot" goes, at this point, I'd have to say that it's the area between getting the tool into the work and jamming it all up with too big of a cut. The "width" of that spot depends on the rigidness of the set up, and the appropriateness of the tool. If either of these are off, the sweet spot gets real small in a hurry. If both of these are good, the sweet spot is as wide as Broadway.
There are no rules here, we're trying to accomplish something!
Re: The Sweet Spot - What's going on there?
One thing that is rarely mentioned (at least that I have noticed) is the importance of being on-centre with the cutting tip for accuracy. It may cut OK if it's high or low, but the depth of cut won't be what you think it is. The dials (or DRO) are only accurate when the height is on centre.
Don't Ask Me How I Know This. (tm)
Don't Ask Me How I Know This. (tm)