Glen,
thanks so much for your guidance. I feel so much better now knowing that I may use the smoother engagement points.
I will post results next time I get the chance to go out to the shop and experiment.
Thanks again.
I don't understand why the engagement would be any different between different numbers. With a "Single lead" lead screw, the numbers (or halfs) should line up allowing engagement of the halfnuts for each revolution of the lead screw. The screw and half nuts always see the same relationship when engaged regardless of what number the thread dial shows. The thread dial just keeps track of the lead screws sync with the spindle. Am I missing something?
Anyone know the rule for when you can use which numbers on the thread dial??? I know it has something to do if you can divide the TPI of the thread to be cut with the TPI of the leadscrew, but I don't remember the details. My Dad's very old southbend had some instructions about it cast right onto a nice brass plaque.
The rules vary in detail depending on the pitch of the leadscrew, the number of teeth on the threading dial gear, and the number of marks on the dial and how they are marked. A common arrangement has an 8 TPI leadscrew, a 32 tooth gear, and either 4 or 8 marks on the dial.
It does not matter how the marks are numbered. In the case mentioned, 32 teeth on an 8 TPI leadscrew, it takes 32 revolutions of the leadscrew for the dial to go completely around. This is also equal to 4 inches of carriage movement. So one revolution (4 inches) will give a complete whole number of threads for all pitches that are not divided smaller than 1/4 thread per inch. A 11 1/2 TPI thread will have 46 in four inches, a 5 3/4 TPI will have 23. A 24 TPI thread will have 96 threads in 4 inches. What this means is that if your thread dial goes around one time when you move the carriage 4 inches, you can use it for all 1/4, 1/2, 3/4, or whole number threads. You can start at any number and continue to use that number.
If the thread you are cutting is a 1/2 or whole number (not 1/4 or 3/4) you do not have to wait for the dial to go all the way around. You can use any two marks that are directly opposite. If your thread is a whole number (not 1/4, 3/4, or 1/2) you can use any 4 marks which are 90 degrees apart. If your thread is an even number such as 14 you can use any of 8 marks which are 45 degrees apart. If your thread is divisible by 4, such as 12 or 16, you can use any of 16 marks which are 22 1/2 degrees apart.
And finally, if your thread is divisible by 8 (the leadscrew pitch) you can use any of 32 marks which are 11 1/4 degrees apart. This also means that you don't have to use the thread dial at all, because those are the only places the half nuts will engage.
To simplify matters, the manufacturers instructions always assume starting the threading on the 1 mark. They don't always give you all the possible marks; it doesnt hurt anything to use every other possible mark and it keeps the dial readable. It seems confusing but if you will study the dial and its rotation as you move the carriage and the leadscrew you will understand it. The dial just tells you where along the leadscrew you can find another point where the leadscrew and work threads line up with the half nuts and your threading tool.
I figured out my problem, lack of experience!
My threads were being munched because I was going to deep and not paying attention loike I should have. On the last couple passes I have been advancing too much.
I will be looking for those tips you put on the micrometer for internal threads. Not to mention that a little common sense goes a long way.
Does anyone know an inexpensive way to measure internal thread depth with a ID of around 1 1/4'' and up?
You make a plug with external threads and use it to gauge the size of the internal threads.
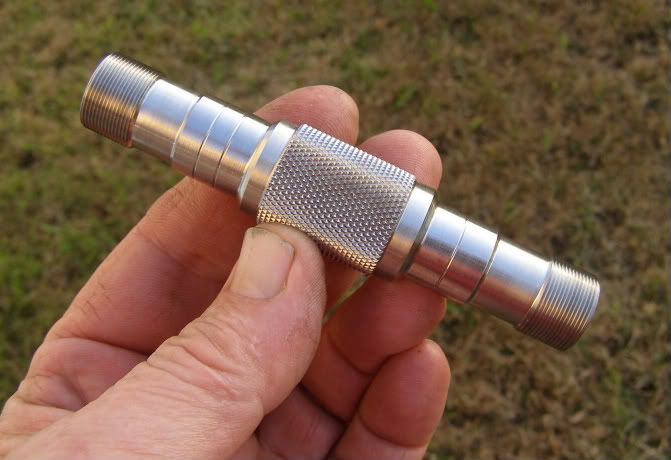
I just made this one this morning as I need to internally thread some parts 11/16 32 back inside a recessed bore with a shoulder.
One end is a bit small so when it fits I know I'm getting close and better start paying attention, and the other end is the proper size so it should just screw in. It's not a tru Go No-Go gauge, but will do what I need to be on size.
You use thread measuring wires to size the external threads correctly.
Glenn
Operating machines is perfectly safe......until you forget how dangerous it really is!
Glenn,
That sure is a dandy lug gauge. I bet you could make sets of them in most popular sizes and sell them like hot cakes!
All the stuff that you make is like it came from the factory. I bet you worked long and hard to get to that level? I could only wish that I'll ever produce that kind of work.
I thought I seen a micrometer that had a set of tips sold with it that was used to measure thread depth? I suppose you could use it to measure other things as well.
Glenn, at this stage in my learning I'm lucky to get away with a decent one off project. Producing plug gauges to the tolerance that you have achieved is not going to happpen any time soon.
Morph wrote:
I thought I seen a micrometer that had a set of tips sold with it that was used to measure thread depth? I suppose you could use it to measure other things as well.
I believe you are thinking of something like this.
Inspector,
Yes thats it. I guess it wouldn't work for internal thread depth because you wouldn't be able to fit it in the hole.
well, practise is what I really need and I will indeed get alot of that by attempting to make some plug gauges like Glenn did.
(edit) After looking closer at the tool I think you could measure larger ID's threads.