Hello all, and Jet 1236PS 1236-PS

Re: Hello all, and Jet 1236PS 1236-PS
that's a pretty nice chuck. You made that backing plate?
-
Charlie W.

- Posts: 72
- Joined: Mon Feb 02, 2009 6:18 pm
- Location: Concord, CA.
Re: Hello all, and Jet 1236PS 1236-PS
The gearhead is a Goodway, 1440 gapbed, w/D1-6 spindle lathe. It is very much like the current Victor 1660s and like the Osama jr. 1440 of the same time period. The picture is the one from the ad that the previous owner posted when it was for sale. I haven't taken a current picture of it to post. I don't know what the C-clamp is about in the picture.stevec wrote:Charlie, what make is your 14x40?
My 16x60 has a very similar guard just above the apron handwheel.
And, what the heck is that on the tailstock, a C clamp?
It had some missing handles which I have since replaced. It is my 10th lathe and a really nice lathe to use. It weighs 3300 lbs and was a real task for me to bring home. I have the steady & follower rests for it. I hope to find, build, or convert a taper attachment for it some day. I made 2 carriage stops for it. One uses a dial gage and the other a barrel mic.
Charlie
Last edited by Charlie W. on Tue Sep 20, 2011 4:27 pm, edited 1 time in total.
-
Charlie W.
- Posts: 72
- Joined: Mon Feb 02, 2009 6:18 pm
- Location: Concord, CA.
Re: Hello all, and Jet 1236PS 1236-PS
I made the backing plate from a barbell weight. It worked out pretty well. As usual, after I made the backing plate I came across several backing plate blanks that would have been a little easier to make it from.Rex wrote:that's a pretty nice chuck. You made that backing plate?
The collet closer had a 8 x 2-1/4 thread in it when I bought it and I just enlarged it to the 8 x 600 mm size to fit the Jet spindle.
Charlie
-
swatson144

- Posts: 214
- Joined: Fri Sep 16, 2011 7:39 pm
- Location: SE Virginia
- Contact:
Re: Hello all, and Jet 1236PS 1236-PS
Running that would remind me too much of the Navy days, Charlie. I really didn't want to move anything that gutbustingmadasheckfriggenheavy  . I do have friends with large equipment but I have made them agree that if I ever ask to use one they are to club me as soon as I turn my back to face the machine. Nice machine.
Since Rex is looking and comparing I'll post some more pics of sections. I'd removed the swarf from the last project last night, and anyway I find taking big pictures and looking over them shows me stuff I probably wouldn't notice just inspecting. They are re sized to forum size so if anyone ever wants a closer view let me know.
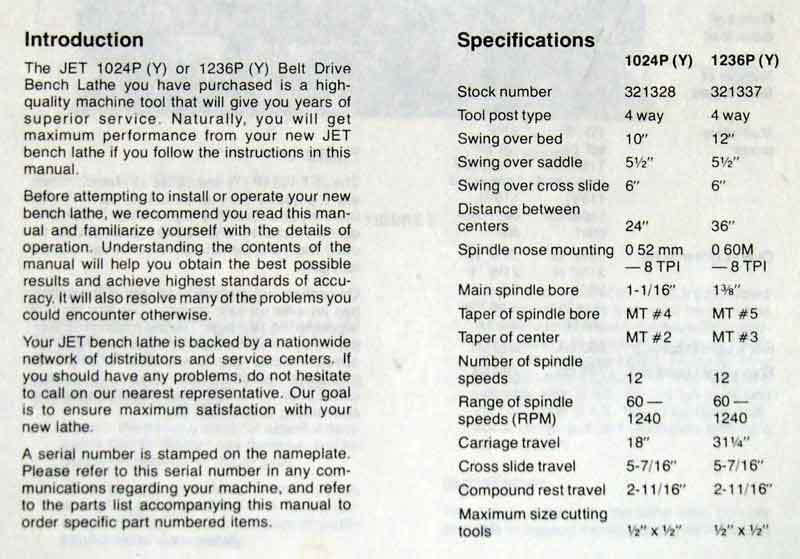
Spindle nose I haven't worried with much since it came with a decent 3 jaw, 4 jaw, faceplate, and an extra partially machined 8" backing plate. I know it's bigger than 2 1/4x8 as Paul gave me a nose protector of that size and it was too small. There is handwriting on the front of the manual that says they were 66mmX8TPI SAE and changed to 2 1/4x8. I'm figuring to cipher it all out on the next chuck change or when I get the #5mt sleeve in hand. Charlie said his was 60mm which goes along with my casual measuring of just near 2 3/8x8 but a bit small to be comfortable (certainly not > 2 1/2). I'm thinking charlie is right on the money but I'll get the mics out and wire and prove it before I buy or make anything for this spindle nose.
Age? I'm nearly certain that both machines were bought at the same time and both were made in '83. I know I saw the MFG date on both of them one being June and tother November. I can't seem to find them now but I think the lathe's must be towards the wall where it said "Wired for 120V". MOF I am so sure I really didn't look that hard today. The switch on the apron was what seemed to make it a 1236PS. I say that because the manual makes no reference to the electricals on other models but in regards to the drum switch etc it has a header of " 1236PS" there is a diagram of the 1024S with a drum that I am assuming is for a rotary switch like the 9x10s were (probably wrong though). Looking at Charlie's 1236 it looks like his feed shaft runs where the switch shaft is on mine.
Since Rex is looking and comparing I'll post some more pics of sections. I'd removed the swarf from the last project last night, and anyway I find taking big pictures and looking over them shows me stuff I probably wouldn't notice just inspecting. They are re sized to forum size so if anyone ever wants a closer view let me know.
Spindle nose I haven't worried with much since it came with a decent 3 jaw, 4 jaw, faceplate, and an extra partially machined 8" backing plate. I know it's bigger than 2 1/4x8 as Paul gave me a nose protector of that size and it was too small. There is handwriting on the front of the manual that says they were 66mmX8TPI SAE and changed to 2 1/4x8. I'm figuring to cipher it all out on the next chuck change or when I get the #5mt sleeve in hand. Charlie said his was 60mm which goes along with my casual measuring of just near 2 3/8x8 but a bit small to be comfortable (certainly not > 2 1/2). I'm thinking charlie is right on the money but I'll get the mics out and wire and prove it before I buy or make anything for this spindle nose.
Age? I'm nearly certain that both machines were bought at the same time and both were made in '83. I know I saw the MFG date on both of them one being June and tother November. I can't seem to find them now but I think the lathe's must be towards the wall where it said "Wired for 120V". MOF I am so sure I really didn't look that hard today. The switch on the apron was what seemed to make it a 1236PS. I say that because the manual makes no reference to the electricals on other models but in regards to the drum switch etc it has a header of " 1236PS" there is a diagram of the 1024S with a drum that I am assuming is for a rotary switch like the 9x10s were (probably wrong though). Looking at Charlie's 1236 it looks like his feed shaft runs where the switch shaft is on mine.
- Attachments
-
-
-
-
-
Re: Hello all, and Jet 1236PS 1236-PS
My 1024 has a rotary switch.
the 1224 has the same 4-screw square hole, but no switch in it. A Furnas-style switch was laying on the chip pan with cover off and a ground wire attached.
I figured it was a replacement for a dead OE switch.
I would like some pics of your switch, as that's where I'm stuck on this 1224 - wiring the motor from basically scratch.
-
swatson144
- Posts: 214
- Joined: Fri Sep 16, 2011 7:39 pm
- Location: SE Virginia
- Contact:
Re: Hello all, and Jet 1236PS 1236-PS
My switch is mounted at the bottom of the bedways, and would be nearly impossible to make any sense of if i pulled it and took pictures, since the wires conjugate into another box also (not to mention in the motor itself).
Here's some pics of when I was changing over from factory 120V to 240V. In the back of the manual you'll find the wiring diagram which should help. It even mentions a Furnas switch.
You wiring for 120 or 240?
Lathe wires shows what I started with.
Steve
Here's some pics of when I was changing over from factory 120V to 240V. In the back of the manual you'll find the wiring diagram which should help. It even mentions a Furnas switch.
You wiring for 120 or 240?
Lathe wires shows what I started with.
Steve
- Attachments
-
Re: Hello all, and Jet 1236PS 1236-PS
I forgot yours was a pushbutton.
Actually, I may wind up using a push-button switch on this one.
Found this at the local ReStore Saturday

Actually, I may wind up using a push-button switch on this one.
Found this at the local ReStore Saturday
-
Charlie W.
- Posts: 72
- Joined: Mon Feb 02, 2009 6:18 pm
- Location: Concord, CA.
Re: Hello all, and Jet 1236PS 1236-PS
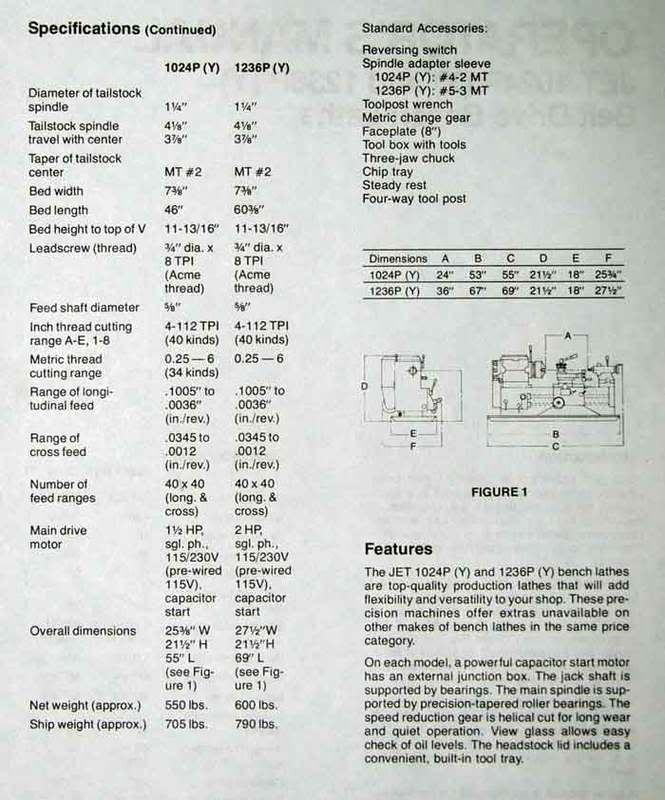
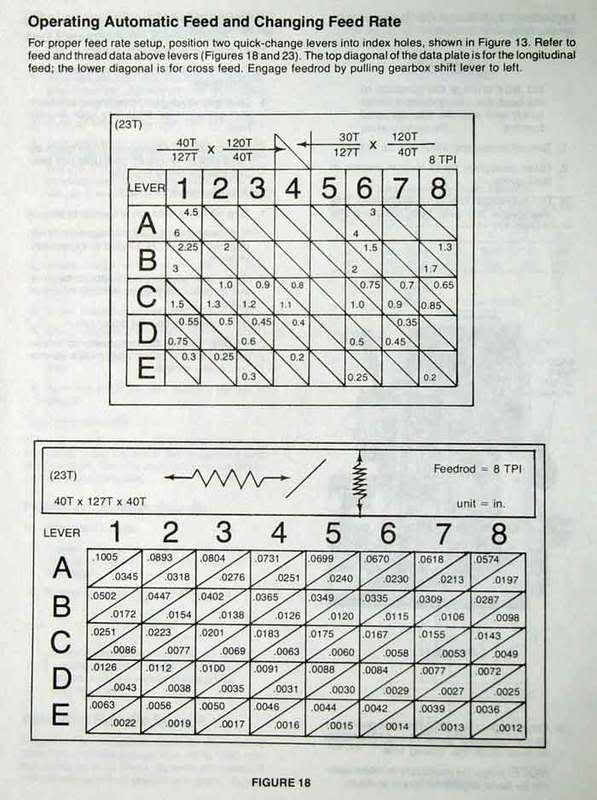
I scanned these pages from the manual, some time back, when other questions have come up. The manual is for the 1024PY and the 1236PY that I had. I had to make a new bushing for the bull gear/spindle pulley. It was worn out and made a knocking noise when the lathe was run in direct drive. It also needed a few bushings in the QC gears as they were quite worn where the lathe had been run all the time. Mine had a 2hp 220V 1phase motor. I liked the lathe a lot. It was my 8th metal lathe. In the past I owned an anchient gearhead 1330, several Atlas lathes, a couple Logans, a Sheldon 11" and still have the Prentice Bros. treadle lathe pictured in my avatar.
Charlie
Charlie
-
swatson144
- Posts: 214
- Joined: Fri Sep 16, 2011 7:39 pm
- Location: SE Virginia
- Contact:
Re: Hello all, and Jet 1236PS 1236-PS
you can see the side the lines come in. opposite R & S. Switch side is on the left and all the motor wires lead in from the right. 1 and 2 are one field, 3 & 4 the other while 5 & 6 are starting field (reversing them reverses the direction.
Connecting the fields in parallel =120v ie in this case 1&3 and 2&4 (you'll need to look up the field wires for your motor and change them around to suit. Ie your motor has U&T as common wires on a field and X&Y as another then U=1 T=2 x=3 y=4 and the situation begins to resolve itself as we start running out of wires.
Am I on a tangent or is this what you are asking?
Steve

Re: Hello all, and Jet 1236PS 1236-PS
Indeed it did. The ribbing is likely to have provided a great deal of rigidity.Charlie W. wrote:I made the backing plate from a barbell weight. It worked out pretty well.
Well done!
Harold
Wise people talk because they have something to say. Fools talk because they have to say something.
Re: Hello all, and Jet 1236PS 1236-PS
Steve that's a big help to me. so of the 6 wires, I can use an ohmmeter to find pairs for the fields, with the same resistance for those. And the pair with a different resistance (higher or lower?) would be the start curcuit.swatson144 wrote:you can see the side the lines come in. opposite R & S. Switch side is on the left and all the motor wires lead in from the right. 1 and 2 are one field, 3 & 4 the other while 5 & 6 are starting field (reversing them reverses the direction.
Connecting the fields in parallel =120v ie in this case 1&3 and 2&4 (you'll need to look up the field wires for your motor and change them around to suit. Ie your motor has U&T as common wires on a field and X&Y as another then U=1 T=2 x=3 y=4 and the situation begins to resolve itself as we start running out of wires.
Am I on a tangent or is this what you are asking?
Steve
So it would work OK with one of each circuit tied to one leg of the 110V power cord, and the other 3 to the remaining leg?
-
swatson144
- Posts: 214
- Joined: Fri Sep 16, 2011 7:39 pm
- Location: SE Virginia
- Contact:
Re: Hello all, and Jet 1236PS 1236-PS
Rex the resistances are so low that it will be hard to get the same reading, but yes with care, you should be able to tell the 2 fields from the starter winding. I emailed a simple primer which makes it about as plain english as it can get. If I remember right he even covers figuring out what is which. It even shows some about the barrel switches.
Steve
Steve