Machining a pulley

All discussion about lathes including but not limited to: South Bend, Hardinge, Logan, Monarch, Clausing and other HSM lathes, including imports

Moderators: GlennW, Harold_V

davec43
Posts: 52
Joined: Thu Dec 17, 2009 6:26 pm
Location: 108 Mile Ranch, BC

Machining a pulley

Post by davec43 »

What would the process be for machining an aluminum (7050) 2 step pulley - 2.5" and 5" with 5/8 bore? This is part of a project to make my wood cutting bandsaw go slow enough for cutting metal.
IMG_2381.JPG
At this point I have a 5x5x1.75" block of aluminum, bandsawn the corners off with appropriate flats for my 3 jaw chuck, cleaned up one side to 5.080 and drilled a 9/16 hole in the center. The extra hole goes less than halfway through and was there to start with. This is some scrap metal from the aerospace industry.

Given Harold's advice to always rough the dimensions before final machining I am thinking:

1. Turn it around and round off the other side (side 2) to 5.080.
2. Face that side to 1.520
3. Turn down to 2.5" x .750
4. Cut V groove
5. Bore to .625
6. Turn around again and face .020 off side 1
7. Turn side 1 to 5.000
8. Cut V groove
9. Cut keyway
10. Drill and tap for set screw in bottom of groove on 2.5" pulley
11. Make more holes to match the one near the rim for appearance. Balance probably not an issue at 195 rpm.

I am not sure if this is the best process to follow.
Dave C

Grizzly 12x36 lathe, Gorton 1-22 milling machine
User avatar
Harold_V
Posts: 20248
Joined: Fri Dec 20, 2002 11:02 pm
Location: Onalaska, WA USA

Re: Machining a pulley

Post by Harold_V »

A few things to ponder.
Your chuck appears to have master (two piece) jaws. Soft jaws would work wonders for this project.
Are you familiar with their use? If not, there is a lengthy thread in the Resource Library. Well down on the page. From it you should be able to learn everything you'll need to put them to work.

I would recommend you rough the grooves before doing any finishing. Turn the entire pulley, machining all features, but leaving material for finish cuts. That way, your finishing tools will remain sharp.

If you use soft jaws, you'll be able to grip finished surfaces without doing any damage, and they'll run true (if you use soft jaws properly, they should repeat within a half thou, often less). Nice part is you don't have to worry about registering the part. The soft jaws will orient the part exactly as it should be, so you can take it out of the chuck and put it back in without issues, and it takes no longer than it takes to tighten or loosen the chuck with the key.

Please do give soft jaws some thought. If you haven't used them, this is a golden opportunity to come to terms with their usefulness.

Harold
Wise people talk because they have something to say. Fools talk because they have to say something.
davec43
Posts: 52
Joined: Thu Dec 17, 2009 6:26 pm
Location: 108 Mile Ranch, BC

Re: Machining a pulley

Post by davec43 »

i do have some soft jaws which were a complicated project from last month. I have not used them yet. I bought the chuck in Nov to get the 2 piece jaws for that purpose.
IMG_2385.JPG
I assume for this job I would machine 2 steps in the jaws, maybe .200 to .250 deep to match the diameters of the 2 pulleys - 2.500 and 5.000. This would allow me to rough the belt grooves on side 1 and then turn side 2 grooves, then finish the bore and the grooves, chucking each side as required.

Is that right?
Dave C

Grizzly 12x36 lathe, Gorton 1-22 milling machine
User avatar
Harold_V
Posts: 20248
Joined: Fri Dec 20, 2002 11:02 pm
Location: Onalaska, WA USA

Re: Machining a pulley

Post by Harold_V »

davec43 wrote:I assume for this job I would machine 2 steps in the jaws, maybe .200 to .250 deep to match the diameters of the 2 pulleys - 2.500 and 5.000. This would allow me to rough the belt grooves on side 1 and then turn side 2 grooves, then finish the bore and the grooves, chucking each side as required.

Is that right?
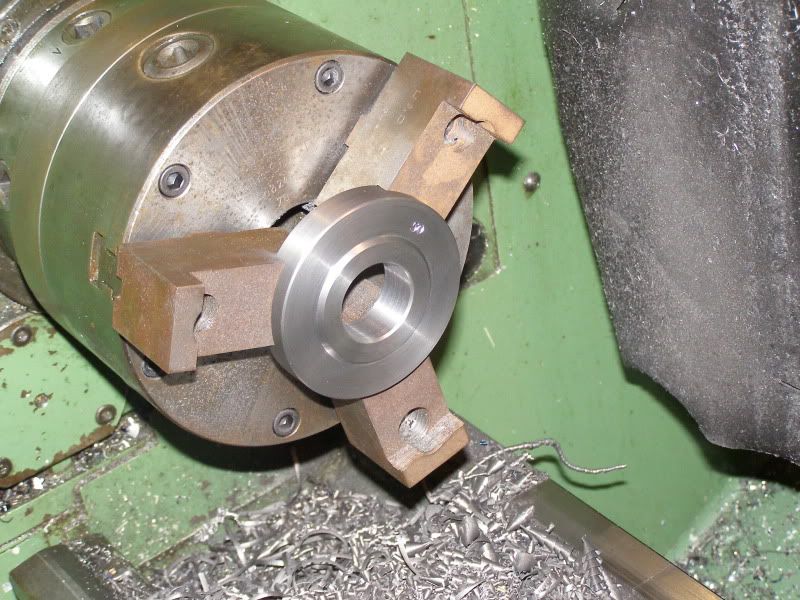
A great deal depends on where you machine the step in the jaws. Truth be told, you need only one step, which you'd use for all functions, but you'd have to re-machine the step after doing the finish cuts on the larger diameter. Hope this makes sense to you. If not, ask.

You'd have to pick a spot on the jaws where you could grip the smaller diameter, yet open the jaws up via the scroll to grip the larger diameter. For roughing, it wouldn't matter if the radius on the jaws was correct, or not, but once you've done any finishing, the diameter you bore in the jaws should not vary by more than a thou from the part diameter, so that you use the same place on the scroll when you tighten the chuck. Otherwise you risk run-out.

So then, if you elect to give the idea a go, start by checking to see if you can make the necessary setup. What will limit you is the jaw travel. Make sure you have adequate engagement of the scroll with the jaws when holding the larger diameter, yet the chuck can close down to grip the smaller diameter before bottoming out. If you do not, you may then require two shoulders.

Considering you are not familiar with the use of soft jaws, be certain to read the thread I mentioned. There's a lot of very useful information provided, which should help you make decisions. Pay particular attention to the spider used for machining the soft jaws. It provides for total flexibility, so you can modify jaws with very little being removed from the existing surfaces.

Remember, the wider the jaws, the less chance of damaging finish machined parts.

Harold
Wise people talk because they have something to say. Fools talk because they have to say something.
Multitasker
Posts: 14
Joined: Mon Feb 20, 2012 8:11 pm
Location: Ontario, Canada

Re: Machining a pulley

Post by Multitasker »

You should consider mounting your pulley on a stub mandrel for finishing. With proper tooling selection you can finish both grooves in the same setup, and get them pretty darn true to the bore.

Rough out as much as you can in the chuck including the grooves by flipping in your hard jaws, try to get the faces parallel, and as a last operation in the chuck finish bore and face in the same setup (without removing). Then put some round stock in the range of 2"- 3" dia. in the chuck, face, center drill, drill and tap (1/2 or 7/16, whatever you have, look for the bolt first) then turn a stub on the end to .625" or as close as you can to the size of the hole you just bored in the pulley. The stub doesn't have to be long, just enough to tell if it fits good in the hole. Next get the biggest washer you have, or make one around 2" dia. for under the bolt head. I would probably use around .25" thick steel minimum.

The idea here is that you want the biggest diameters you can get to clamp the most surface area. If when you tighten it down the washer flexes and you can get even .001" under it, re-evaluate. Get a thicker washer or dish it out so it's thinner in the middle and has an outer rim. Same goes for the mandrel side. make sure the pulley sits right against the face. Use a sharp tool so there's no corner radius or allow for it with chamfer on pulley.

Take light cuts. Dont run in reverse. A 5/8 hole in a 5.0" piece is a big ratio, I usually use this process with smaller parts, but I think it could work here. Proceed with CAUTION.
User avatar
Harold_V
Posts: 20248
Joined: Fri Dec 20, 2002 11:02 pm
Location: Onalaska, WA USA

Re: Machining a pulley

Post by Harold_V »

Multitasker wrote:You should consider mounting your pulley on a stub mandrel for finishing. With proper tooling selection you can finish both grooves in the same setup, and get them pretty darn true to the bore.
No need if he uses soft jaws properly. Rather defeats the purpose of the soft jaws, although I'd give your suggestion a thumbs up for a guy that doesn't have soft jaw capabilities.

The reason I'd avoid the setup you suggested is that it won't be great for taking cuts (driving 5" from a half inch hole isn't my idea of a good setup), so if soft jaws are used, all it boils down to is more setups to make when he has one that will already provide the required degree of precision. There should be NO perpendicularity issues, and if he does his work well, less than a half thou concentricity error, if that. If he fears the pulley might not be held securely due to the thin rim, he can run a live center with a plate to ensure the pulley stays seated in the counterbored soft jaws. He would also have the luxury (should the need arise) to run in reverse. All in all, a much better setup. In fact, one that we used to use when machining cast steel pulleys for diesel engines when I worked for Eimco (maker of crawler tractors, now defunct).

Harold
Wise people talk because they have something to say. Fools talk because they have to say something.
User avatar
GlennW
Posts: 7287
Joined: Sun Apr 15, 2007 9:23 am
Location: Florida

Re: Machining a pulley

Post by GlennW »

Just to show a simple setup, here is a cast iron gear blank I was making being machined using soft jaws.

The jaws were machined to locate the blank perpendicular and concentric to the spindle axis.

Image

It's simple to do!

The jaws had been used previously for holding something larger. Just keep machining on them and using them until they are used up, but watch those corners, they can be a bit tough on the knuckles if you get too close when it's spinning! :shock:
Glenn

Operating machines is perfectly safe......until you forget how dangerous it really is!
Multitasker
Posts: 14
Joined: Mon Feb 20, 2012 8:11 pm
Location: Ontario, Canada

Re: Machining a pulley

Post by Multitasker »

Harold_V wrote:The reason I'd avoid the setup you suggested is that it won't be great for taking cuts (driving 5" from a half inch hole isn't my idea of a good setup)
I agree, Harold, it is a bit of a sketchy setup, but it didnt sound like davec43 was ready to cut into those nice softjaws he worked so hard to make. I definitely wouldn't try it with just a bolt, or a small washer. It's not so much the bolt as the washer, or cap, thats holding the part. Thats why it has to contact at the outer edge, not just the center

My suggestion is how I would do it on my 9" Standard Modern lathe which can't take much more than .01" cuts in even the best of setups, so I'm used to taking my time at home. At work, with all the resources, I would opt for the softjaws and, you're right, have it done in less setups.

For parts that need to be really round however, not so much this pulley, I have found no substitute for axial clamping (along the spindle axis - z axis) as opposed to radial clamping (in a chuck/collet). Just to highlight some advantages of this method. I was using this method at work making titanium lense holders, but they were very thin and would be .001" out of round when you just looked at them with a chuck key or vise handle in your hand. The GD&T callout was .0005" roundness and similar flatness and parallelism.They were about 2" dia. and I held them with a 1/4-20 bolt in the center and a thick cap, but only for the finishing after grinding flat and parallel. Probably took something like .005" depth of cut max.
Multitasker
Posts: 14
Joined: Mon Feb 20, 2012 8:11 pm
Location: Ontario, Canada

Re: Machining a pulley

Post by Multitasker »

Multitasker wrote: titanium lense holders..., but only for the finishing after grinding flat and parallel.
Sorry, I was confused, we didn't grind titanium, I dont know if you can? They had to be lapped by hand to get somewhat flat before milling. We ground stator cores made from Hyperco, wich is a nickel based alloy, definitely magnetic, and used the same techniques to achieve roundness. Sorry this has nothing to do with your pulley :(
User avatar
Harold_V
Posts: 20248
Joined: Fri Dec 20, 2002 11:02 pm
Location: Onalaska, WA USA

Re: Machining a pulley

Post by Harold_V »

Multitasker wrote:For parts that need to be really round however, not so much this pulley, I have found no substitute for axial clamping (along the spindle axis - z axis) as opposed to radial clamping (in a chuck/collet).
Certainly a matter of part design. A robust piece would have no issues with being held in jaws, regardless of the nature of the jaw, but I sure know what you're talking about. I've held thin material with what I considered borderline not enough chucking pressure, and ended up with those cloverleaf shaped parts to which you're likely making reference.

However, even when holding axially, if the part isn't dead square, and the mating surface equally as square, you still risk distortion. It's a whole different world when you start working with tight tolerances---a world in which some folks simply don't fit. You have to think totally differently, and often employ a method that you'd swear wasn't any good.

In my years of precision grinding, one of the parts we had to produce was the retaining cover for the bearing housings of the guidance system for the missile. The cover was made of a magnetic grade (don't recall the alloy) of stainless, and had to be held flat within a tenth. Being about 3½" in diameter and only .125" thick, that wasn't as easy to do as one might think. We tried all sorts of methods in an attempt to achieve the flatness, and failed regularly. In the end, we used an old (drip oilers on the spindle) Brown and Sharpe cylindrical grinder, grinding with the side of the (relieved) wheel, with the part held in a pot chuck. The pot chuck didn't restrain the part, it simply kept it on center, with the part allowed to float. We'd kiss the top side to clean up, then flip the part over and clean the critical face, then allow the part to spark out. Because the part was permitted to float, any movement that resulted in a flatness issue was removed by the wheel. Dead flat, every time. It took effort to get the wheel head oriented properly, so we didn't grind a crown, but once the head was oriented and the taper removed, we could crash through the parts without issue. This setup, in a sense, emulates the one you mentioned. Yes, it can be quite good.

Harold
Wise people talk because they have something to say. Fools talk because they have to say something.
User avatar
Harold_V
Posts: 20248
Joined: Fri Dec 20, 2002 11:02 pm
Location: Onalaska, WA USA

Re: Machining a pulley

Post by Harold_V »

Multitasker wrote:Sorry, I was confused, we didn't grind titanium, I dont know if you can?
Not a problem. The concept was the issue.

As far as grinding titanium, I've never ground any, but then I also was never introduced to the material until after I left the missile industry. None was used, to my knowledge, on the missile, but I worked in a job shop after leaving the missile industry, where I was exposed not only to titanium, but to zirconium as well. I expect each can be ground, but, for sure, titanium puts on quite a light show when it's ground. I've seen it applied to a grinding wheel by hand. I expect zirconium would behave similarly.

Harold
Wise people talk because they have something to say. Fools talk because they have to say something.
Russ Hanscom
Posts: 1955
Joined: Wed Mar 15, 2006 11:10 pm
Location: Farmington, NM

Re: Machining a pulley

Post by Russ Hanscom »

Nice work on the soft jaws, but they were meant to be cut up! You can also buy them for a reasonable cost, or weld on material after they are pretty well cut away.
Post Reply