Gentlemen.
My lathe is has a 63 mm x 8 tpi tenon on the spindle, and will spin 16x48. I was very green when I bought it, and only bought an 8 inch chuck. I needed a bigger chuck once in a while, so I bought a 12" 4 jaw from grizzly. I failed at the first attempt as I reported in another post to make a backing plate. I was trying to weld it together, and it got too hard to thread.
I begged a scrap of 6.25" 4140 from a guy I know who has a cnc shop, (I did buy him a box of moose head beer to say thanks). I sawed it . to length and bored it and threaded it, then I screwed it to the spindle and turned the OD and faced it. I drilled the mounting holes on the mill, using the rotary to good benefit. I tapped the bolt holes, (btw an old boring bar, the cheap ones for HHS makes a stellar tap wrench ). It turned out perfect inside and out. I had no success with HSS on the 4140, I tried both Crobalt and tangtung. I did cut the thread with a single point HSS, which I had to sharpen a few times during the cut. My 4way tool tool post that came with the lathe will take a 3/4" tool, and years ago I bought the cheap insert system. The one that takes triangular inserts that only cut on one side. These do not cut extremely bright on most alloys in my lathe, but on the 4140 they gave a very professional finish, and it cut almost all of the external work with one point . This is the first time I have indexed holes with the rotary, but I can say it was well worth the set up time, as they of came out in exactly the right place.
Mostly the luxury that the bigger chuck will afford me is the 3" hole through it. I am still at the stage in the craft where getting everything right and winding up with a bright finish is very rewarding.
Success at making a backing plate for a new chuck.
Re: Success at making a backing plate for a new chuck.
Congrats! Got pics? I've got a lathe with an 8 TPI spindle that I've been tempted to make a plate for. Did you have any trouble re-finding the thread when you took your HSS bit out to sharpen it, or did things index back? Did you get the thread fit you were shooting for? Seems like a shot in the dark there without having easy access to the spindle nose (extremely cumbersome if it's your only lathe, obviously) or a gauge. I think I'd start by making a male copy of my spindle nose, that fit my existing 8 TPI tooling, to use as a gauge.
Backing plates are a good project. I did a run of (3) of them a while back. My big lathe has a A1-6 spindle nose, so the trick there was matching the very subtle shallow taper on the spindle. The setup for that took a while, hence my decision to make three while I was at it. One was to bring a 10" 6-jaw Buck chuck to life that I'd gotten with the lathe as a toss-in, one was to mount a 5C collet chuck, and the 3rd was not a backplate per se but rather a 4-screw gunsmithing "chuck".
I did make a clone of my spindle nose to use as a gauge as per above. It was made to fit the taper in my two chucks with plates, the same as they fit the spindle. In my case I needed to have things pull up snug on the taper JUST as the mounting flats came into contact...
Here's a pic of the 10" plate. I had a 10" Bison plate for a different chuck to draw from in terms of creating the raised contact bands and swarf undercuts.
One trick for a good finish, and also for removing material by the .0001", which I did to final-fit the taper to the spindle nose, is to polish with say 600 grit... I didn't have the patience to do that to all surfaces.
I just received my 5C chuck (Bison 3960 Set-Tru) and so yesterday I finished up the plate for that. Just bolted it to the spindle and worked on it that way to get it TRUE. That plate has a spigot to match a recess in the chuck body. Today I will pull it off the spindle and index it in on the rotary table and drill/tap the three mounting holes for the chuck.
Anyway here's the big plate. It started out as a flame-cut blank 13"x2" thick. Made a LOT of blue chips getting it down to size!
click here

Re: Success at making a backing plate for a new chuck.
There's a message in that comment. You most likely ran too fast. HSS will handle the cuts, you just have to run slow enough, and understand how to rough. If the chips came off with any sign of color (not even light straw is acceptable), you ran too fast. In order for large diameter parts to operate at the required surface speed, the spindle often appears to operate too slowly. That's a good time to go to go to the books and calculate the necessary speed. That's especially true if you're used to machining aluminum, which is totally forgiving of overspeed, while chrome moly is totally intolerant.AllenH59 wrote: I had no success with HSS on the 4140, I tried both Crobalt and tangtung. I did cut the thread with a single point HSS, which I had to sharpen a few times during the cut.
Chrome moly is rather abrasive, so the keen edge is lost quickly. In your case, where you can justify the use of carbide, you'd achieve the best results, but you could have accomplished the task with HSS.
Harold
Wise people talk because they have something to say. Fools talk because they have to say something.
Re: Success at making a backing plate for a new chuck.
http://s872.photobucket.com/user/22to45 ... ng%20Plate
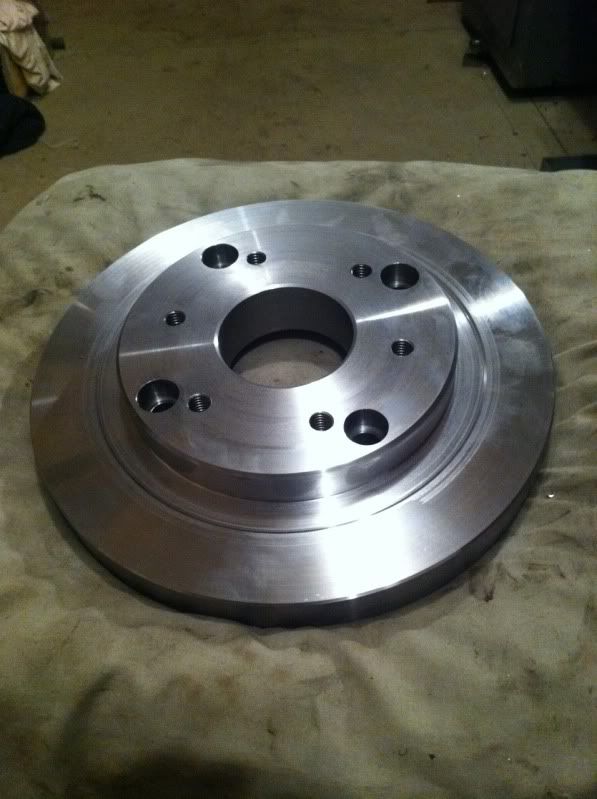
Here is a few poor pics of the process, my new blackberry Q10 takes poor pics. In the matter cutting the threads, I did cut a copy of the tenon a long time ago, so I had it to fit. I have lots of things that came with it that screw on, face plates etc and I just measured the bore of one of those, and bored the plate .005 oversize, as this was very tight, and started threading. The thing that I was very fussy about was the bored area behind the thread, and I got it in the range of .0005 over the size of the area it fits on the spindle, this is a few thousandths tighter than the stuff that came with the lathe, but I wanted a bit of support there. It tightens up nicely and the threads are pretty tight the last three or four turns. This afternoon I turned a 4" piece round and left it in the chuck. I took the chuck off the spindle, ( really just most of the way off the spindle) and re tightened it. I put the indicator on it and it was still centered.
In the matter of re sharpening the tool for threading, I just took it out of the boring bar and sharpened it, then when I put it back in I would have to find out where it was for depth, as of course I never got it back at the same depth, but I did not not have to "pick up" the thread in any other dimension, you are left with few options when your tool quits cutting.
As you can see, I am cutting the outside with a boring bar with the boring tool sticking out the back side and cutting away from the head stock. This worked very well and I was able to cut to a very exact size. I am using a plain brazed carbide that I had sharpened for boring, and as I said, I just turned it around for the OD, yes, the bar is sticking a long way out of the holder, but I did not get any chatter, and it worked fine.
I drilled the holes on the milling machine, with the rotary table. I centered it to within about .001", and measured where one hole had to go, and using an edge finder in both directions, I located the first hole. Then it was a snap to just turn it 90° for each hole. I put a center drill in a collet, and started the holes by raising the table, ( my spindle has a little play if you un lock it. ) I then lowered the table and put a bit in a collet, and drilled the holes for tapping. I happened to have a very good quality 1/2x13 tap, and I could not find my good tap wrench, so I clamped the tap in a boring bar, and it worked very well...
I did not have any socket head bolts, so there is a pic in there where I bolted on the chuck with the bolts from my clamp set for the milling machine, and tightened with a flanged nut. I just put in two until I bought bolts this afternoon ( I was impressed to be able to buy bolts on a Sunday afternoon on a long weekend here in a small city in Canada. )
You can see from the pic with the band saw that I had a long enough piece to make 2, so now I can make another if I get another chuck. I now have a 6" 3 jaw, and 8" and 12" 4 jaws. I am patient enough to 4 jaw almost everything, so I think I am pretty well set.