Enco 12x36 Bench Lathe

Re: Enco 12x36 Bench Lathe
That other lathe is a 9x20 on 120V - pretty nice little unit, with the usual limitations. The existing run should be good to 3 HP on 240V - I can't see anything bigger than that. Next Big Thing is intended to be a 9x49 Turn-Pro or Precision Matthews full size vari-speed 3 HP 3 phase motor. Might be a year or two, have to whittle away at these things. Shoulda bought a bigger VFD 
Chris -
http://raceabilene.com/kelly/hotrod
"Check all parts for proper condition before operation; if normal safety precautions are noticed carefully, this machine can provide you withstanding of accurate service."
http://raceabilene.com/kelly/hotrod
"Check all parts for proper condition before operation; if normal safety precautions are noticed carefully, this machine can provide you withstanding of accurate service."
Re: Enco 12x36 Bench Lathe
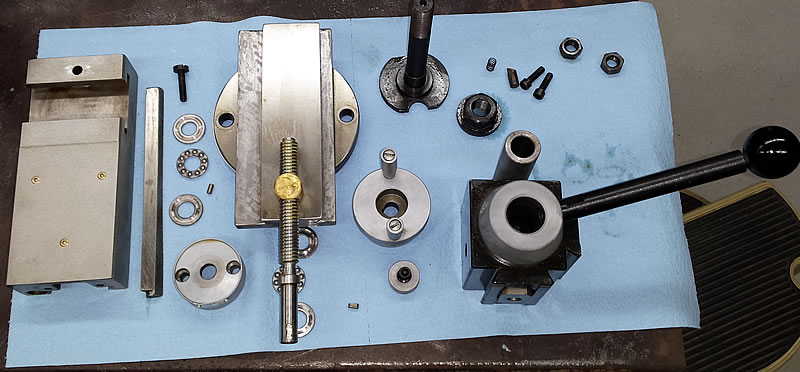
Blew the compound apart. After looking at this, I'll be taking the cross slide apart to get all the goo out of it. I'm glad I did the cross as the gib was put in with the roughest side facing the slide Vs so it needs a little 220 grit work on the surface plate. The other side is smooth - well, China smooth - but the notch in the gib to catch the rear adjustment screw is cut to put the bad side out. Might just take a little bite out of the other side and clean it up a bit. The tool post bushing was also pretty nasty/rusty. For any adjustments I'm referring to the Grizzly G4003 manual.
Chris -
http://raceabilene.com/kelly/hotrod
"Check all parts for proper condition before operation; if normal safety precautions are noticed carefully, this machine can provide you withstanding of accurate service."
http://raceabilene.com/kelly/hotrod
"Check all parts for proper condition before operation; if normal safety precautions are noticed carefully, this machine can provide you withstanding of accurate service."
-
seal killer

- Posts: 4696
- Joined: Sat Aug 18, 2007 10:58 pm
- Location: Ozark Mountains
Re: Enco 12x36 Bench Lathe
Chris--
Hmmm. I wonder if I now know what the compound on my G0709 looks like?
--Bill
Hmmm. I wonder if I now know what the compound on my G0709 looks like?
--Bill
You are what you write.
Re: Enco 12x36 Bench Lathe
Looking at the G0709 pics, I'd say "yep" - looks identical. I did find that the gib was installed "upside down" in that the machined side was facing the locking screw. I didn't notice until now, but in the picture you can see the mark from the locking pin on the good side of the gib. I buffed down the ruff side with 220 grit/WD-40 on the surface plate. It went back together a lot easier after that. I don't know anything about scraping, but I'll bet that gib would improve even more with a little of that. Backlash increased maybe .002 (it's about .005 now) after cleaning the nut and threads. The only real adjustment on the cross is to take most of the play out with the gib screws (not all), lightly tighten the mounting screws on the dial, then run the slide back and forth to feel for binding. Tap the dial up or down and repeat until it's smooth the entire travel. Snug the dial mount, then adjust the gib. 1/4 turn on the gib screws make a big difference.
Chris -
http://raceabilene.com/kelly/hotrod
"Check all parts for proper condition before operation; if normal safety precautions are noticed carefully, this machine can provide you withstanding of accurate service."
http://raceabilene.com/kelly/hotrod
"Check all parts for proper condition before operation; if normal safety precautions are noticed carefully, this machine can provide you withstanding of accurate service."
Re: Enco 12x36 Bench Lathe
Finally back to this a bit, so time for an update.
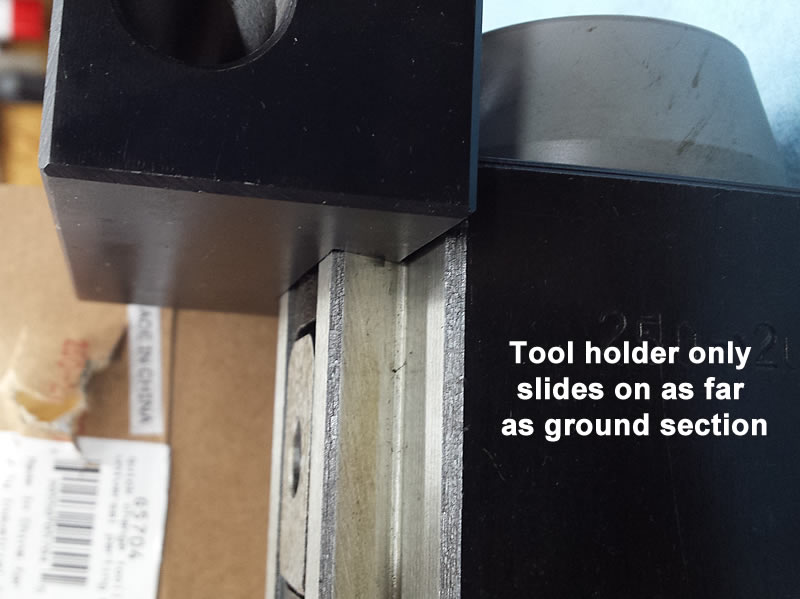
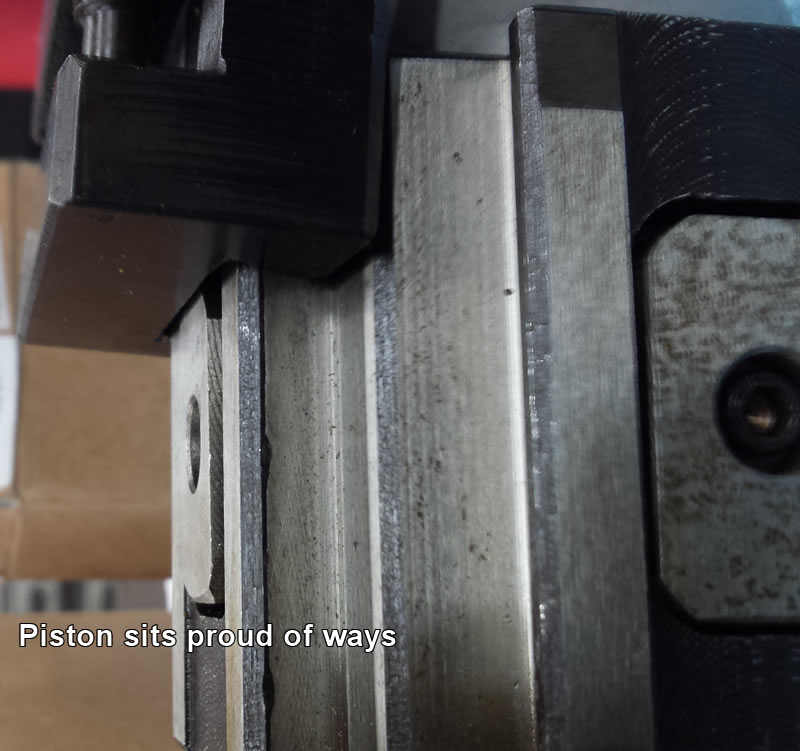
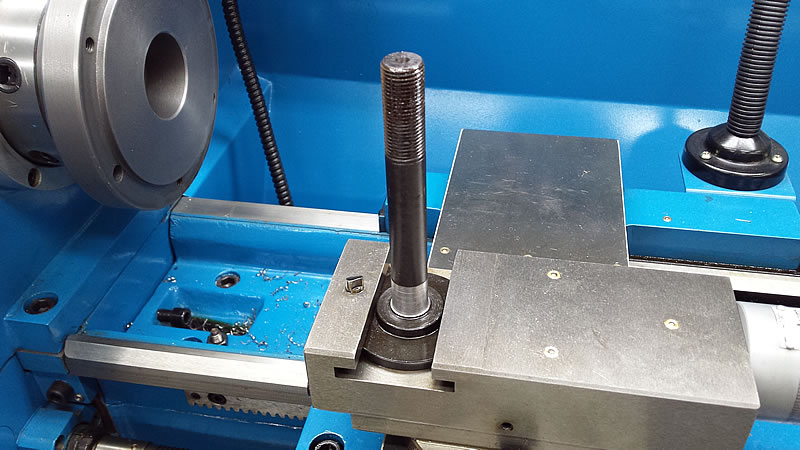
Can't do much without a tool post, and the tool post that came with the lathe has some issues. The big one is - no BXA / 20x tool holders will fit on it except the one that came sitting on the tool post. The second supplied tool holder only fits on one side and none of the Grizzly tool holders I have fit at all. The "good" tool holders only fit part way on one side and the 2nd one that came with the lathe won't clear the piston on the other side. Pictures tell the story don't it:
There is a short "ground" lip at the top of the post:
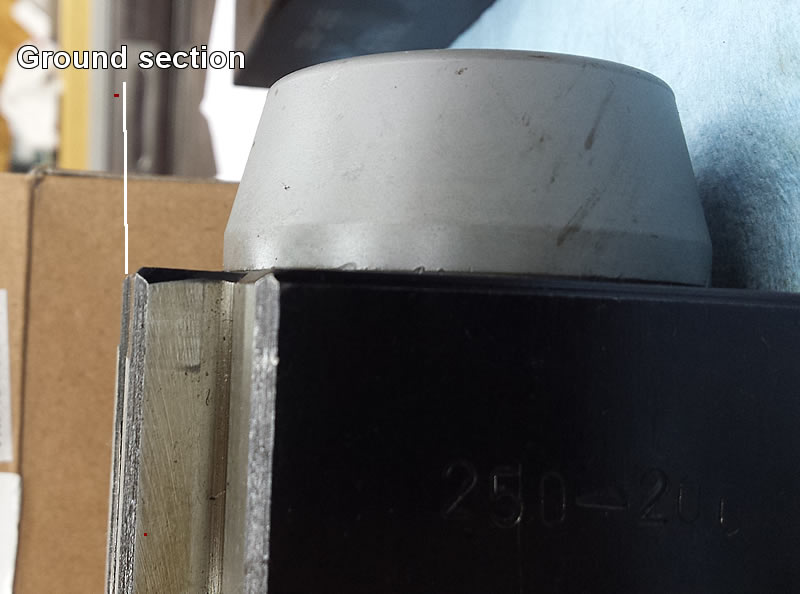
The little lip as viewed from the post face:
Tool holders run down the face only as far as the ground section:
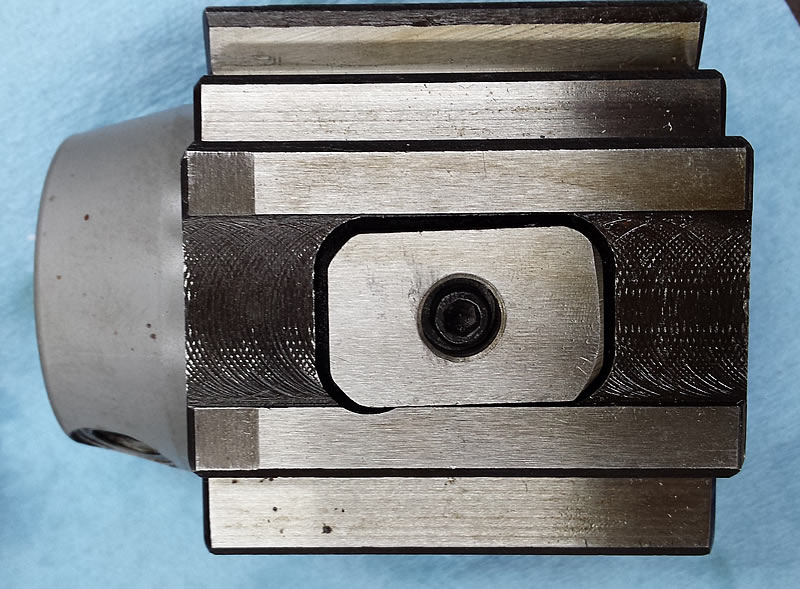
Post parts cleaned and tightened and this still sits proud of the post ways:
Bummer, yes. But I'll take this as an opportunity to wave the flag for the vendor, Enco. I made the call and after explaining the problem, the support desk became audibly interested in the problem and I was transferred to machine support. I'd mention the gentleman's name but I can't find my notes just now. I got an email address and forwarded the pictures. After they had some time to review the pictures - about a week ish which was OK since we had a business trip to California - I got a call from the machine support guy. "Sorry for the delay (no real delay) and a new tool post is on it's way to you. You should have it by the time you get back to Texas. It's a much better quality tool post than came with the lathe and it should resolve the problem."
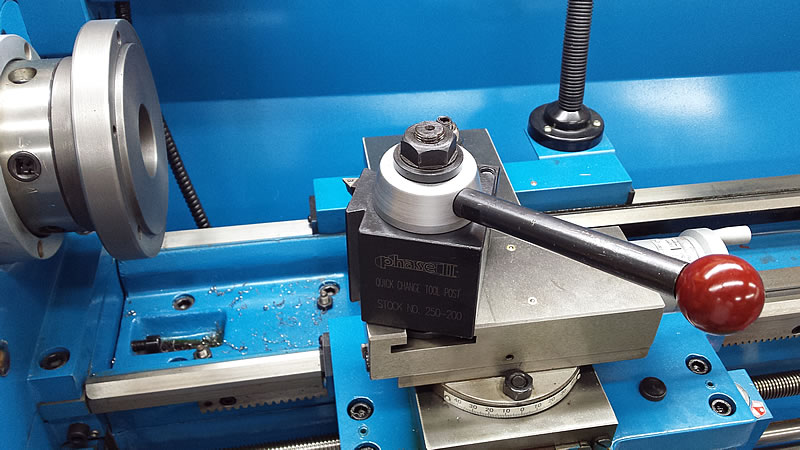
So we get back and pick up the medium size brick of a box and you bet, this solves all issues:
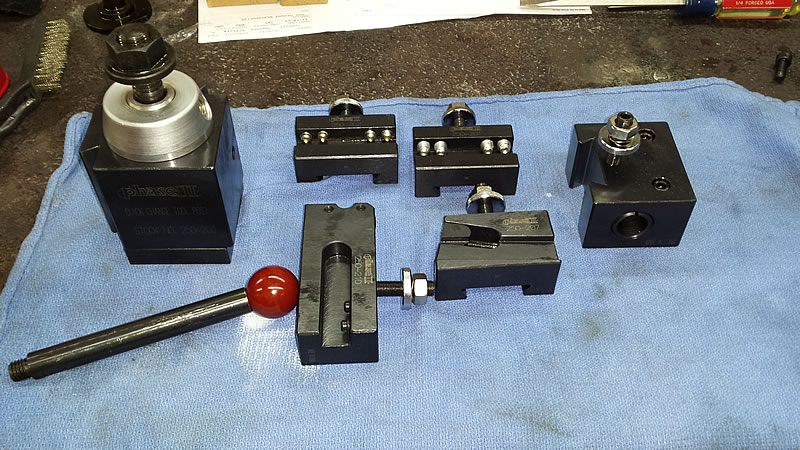
A complete Phase II Series 200 tool post package. This is well above and beyond any expectations I had. Just a working post would have made me happy. Now I'm more like a kid at Christmas. They pretty much nailed down my business. It's really good to know that the little guys in this hobby/field have vendors that can be counted on to make things right when needed.
All the holders fit on this 200 series post - EXCEPT the only one that fit the buggered up post. That tool holder is made so sloppy that the pistons on the Phase II won't lock it in place. If they do not want the old pieces back I might be able to mill it - or just toss it in the scrap bin.
Can't do much without a tool post, and the tool post that came with the lathe has some issues. The big one is - no BXA / 20x tool holders will fit on it except the one that came sitting on the tool post. The second supplied tool holder only fits on one side and none of the Grizzly tool holders I have fit at all. The "good" tool holders only fit part way on one side and the 2nd one that came with the lathe won't clear the piston on the other side. Pictures tell the story don't it:
There is a short "ground" lip at the top of the post:
The little lip as viewed from the post face:
Tool holders run down the face only as far as the ground section:
Post parts cleaned and tightened and this still sits proud of the post ways:
Bummer, yes. But I'll take this as an opportunity to wave the flag for the vendor, Enco. I made the call and after explaining the problem, the support desk became audibly interested in the problem and I was transferred to machine support. I'd mention the gentleman's name but I can't find my notes just now. I got an email address and forwarded the pictures. After they had some time to review the pictures - about a week ish which was OK since we had a business trip to California - I got a call from the machine support guy. "Sorry for the delay (no real delay) and a new tool post is on it's way to you. You should have it by the time you get back to Texas. It's a much better quality tool post than came with the lathe and it should resolve the problem."
So we get back and pick up the medium size brick of a box and you bet, this solves all issues:
A complete Phase II Series 200 tool post package. This is well above and beyond any expectations I had. Just a working post would have made me happy. Now I'm more like a kid at Christmas. They pretty much nailed down my business. It's really good to know that the little guys in this hobby/field have vendors that can be counted on to make things right when needed.
All the holders fit on this 200 series post - EXCEPT the only one that fit the buggered up post. That tool holder is made so sloppy that the pistons on the Phase II won't lock it in place. If they do not want the old pieces back I might be able to mill it - or just toss it in the scrap bin.
Chris -
http://raceabilene.com/kelly/hotrod
"Check all parts for proper condition before operation; if normal safety precautions are noticed carefully, this machine can provide you withstanding of accurate service."
http://raceabilene.com/kelly/hotrod
"Check all parts for proper condition before operation; if normal safety precautions are noticed carefully, this machine can provide you withstanding of accurate service."
-
seal killer
- Posts: 4696
- Joined: Sat Aug 18, 2007 10:58 pm
- Location: Ozark Mountains
Re: Enco 12x36 Bench Lathe
Chris--
That's a great story about Enco's solution! I am almost attached to Grizzly by the hip due to their customer support. BUT, they have never taken care of me in the upgraded manner that Enco took care of you!
--Bill
That's a great story about Enco's solution! I am almost attached to Grizzly by the hip due to their customer support. BUT, they have never taken care of me in the upgraded manner that Enco took care of you!
--Bill
You are what you write.
Re: Enco 12x36 Bench Lathe
Great thread Chris, not sure how I missed it for so long. Thanks for the recap, the table looks great! If I could suggest one thing it would be to use the threaded bases Glenn posted as they are very sturdy and stay put once set.
Vision is not seeing things as they are, but as they will be.
Re: Enco 12x36 Bench Lathe
I've had a couple issues with Enco (one website/order related, one product related) that they were quick to remedy. Nice bonus with the QCTP. I just received mine yesterday (AXA-size), and yes, it was a heavy little brick of a box. 
Re: Enco 12x36 Bench Lathe
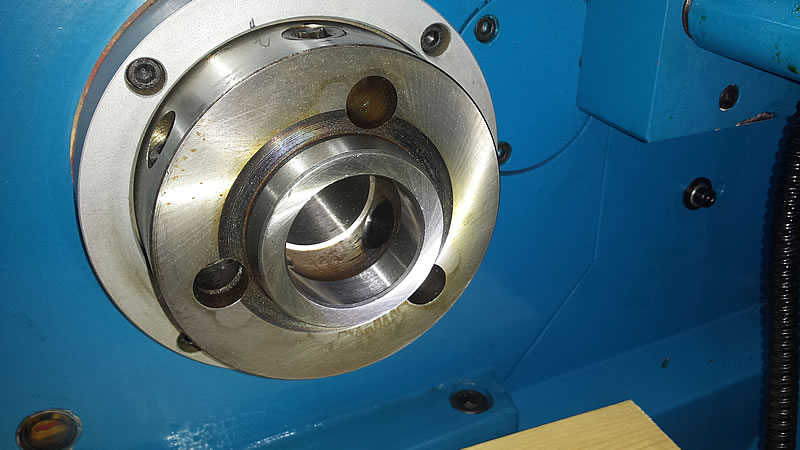
Spindle view - pretty clean as delivered.
This is the worst I could get on the test indicator
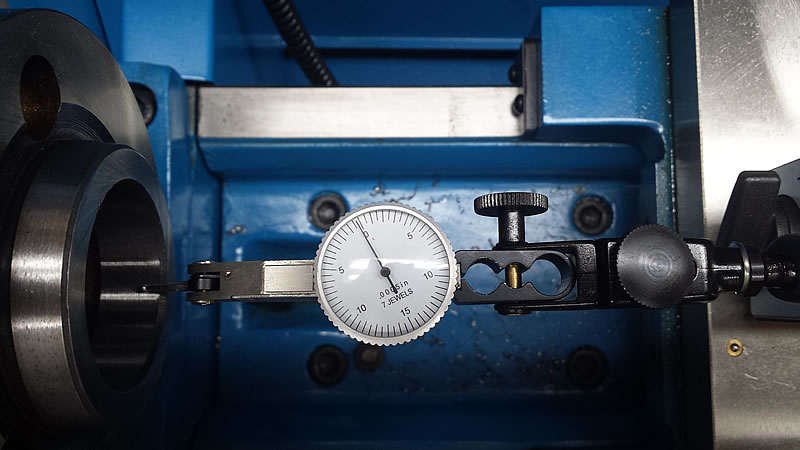
Put a test bar in the chuck - fergetaboutit. SO I checked runout on the chuck body.
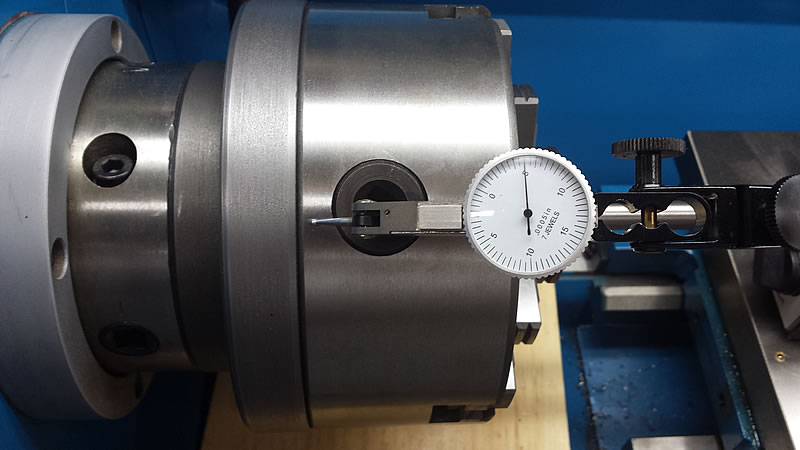
Maybe this means the chuck body is pretty true since the mount has the same runout. Maybe a little facing and trimming the edge of the mount will do it.
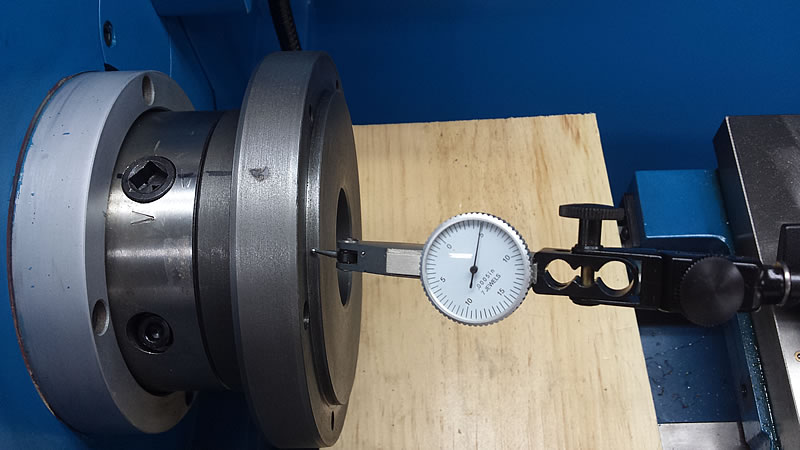
Chuck is in pieces on the bench for cleanup. Nothing special going on inside, just the usually gum-o-lene. I did figure out that the big wobble was likely from the D-4 mount. When I use a 3/8 extension and a T handle to really tighten the chuck mount, it settles down to the .005 runout. So I just can't be dainty with the D-4 cams. Also, the mount only likes two of the three positions and one cam won't close on the other position. So the as-delivered position seems to be the best available.
Now that I have a good tool post, I can play with the chuck plate a bit and see what's up with that. I got the 3 jaw on the 9x20 to run pretty true, we'll see what can be done with this big 'un. Haven't even unpacked the 4 jaw yet.
This is the worst I could get on the test indicator
Put a test bar in the chuck - fergetaboutit. SO I checked runout on the chuck body.
Maybe this means the chuck body is pretty true since the mount has the same runout. Maybe a little facing and trimming the edge of the mount will do it.
Chuck is in pieces on the bench for cleanup. Nothing special going on inside, just the usually gum-o-lene. I did figure out that the big wobble was likely from the D-4 mount. When I use a 3/8 extension and a T handle to really tighten the chuck mount, it settles down to the .005 runout. So I just can't be dainty with the D-4 cams. Also, the mount only likes two of the three positions and one cam won't close on the other position. So the as-delivered position seems to be the best available.
Now that I have a good tool post, I can play with the chuck plate a bit and see what's up with that. I got the 3 jaw on the 9x20 to run pretty true, we'll see what can be done with this big 'un. Haven't even unpacked the 4 jaw yet.
Chris -
http://raceabilene.com/kelly/hotrod
"Check all parts for proper condition before operation; if normal safety precautions are noticed carefully, this machine can provide you withstanding of accurate service."
http://raceabilene.com/kelly/hotrod
"Check all parts for proper condition before operation; if normal safety precautions are noticed carefully, this machine can provide you withstanding of accurate service."

Re: Enco 12x36 Bench Lathe
Blue the backplate surface that meets the spindle face and see if you have good contact.
The plate may be seating on the taper, but not the face. Should contact both.
The plate may be seating on the taper, but not the face. Should contact both.
Glenn
Operating machines is perfectly safe......until you forget how dangerous it really is!
Operating machines is perfectly safe......until you forget how dangerous it really is!
Re: Enco 12x36 Bench Lathe
For a minute there, having 2 lathes went from "spoiled tool brat" to " necessary". I was able to chuck the existing mount in the 9x20 and just trim about .040ish off the lower shoulder of the mount. About 5 minutes work and the Phase II fit bolted right on the machine.
Ready to go to work.
I will try checking the face of the spindle mount - thanks for the suggestion!
Ready to go to work.
I will try checking the face of the spindle mount - thanks for the suggestion!
Chris -
http://raceabilene.com/kelly/hotrod
"Check all parts for proper condition before operation; if normal safety precautions are noticed carefully, this machine can provide you withstanding of accurate service."
http://raceabilene.com/kelly/hotrod
"Check all parts for proper condition before operation; if normal safety precautions are noticed carefully, this machine can provide you withstanding of accurate service."
Re: Enco 12x36 Bench Lathe
Some progress to report - I took a skim cut on the chuck mounting plate and took about .005 off the center edge. I was able to tap in the chuck so that it has right at .001 TIR on the outside. I'm going to take a hair more off the center because I think I can get it closer. I hit a high point where tapping with the BRM (Big Rubber Mallet) didn't make a change. A test bar in the three jaw still has about .008 wobble which is 100x better than it was but still way off the cheapie 3 jaw on the 9x20. First run of the test bar looked like a T-Ball kid warming up for a base hit. The jaws are not marked on this chuck, so I'm going to rotate them around some and see what I can come up with.
Chris -
http://raceabilene.com/kelly/hotrod
"Check all parts for proper condition before operation; if normal safety precautions are noticed carefully, this machine can provide you withstanding of accurate service."
http://raceabilene.com/kelly/hotrod
"Check all parts for proper condition before operation; if normal safety precautions are noticed carefully, this machine can provide you withstanding of accurate service."