New York Central Streamlined Hudson
Moderator: Harold_V
-
Smokey N Steamer
- Posts: 50
- Joined: Sun Jul 29, 2012 4:09 pm
- Location: Seattle, WA
Re: New York Central Streamlined Hudson
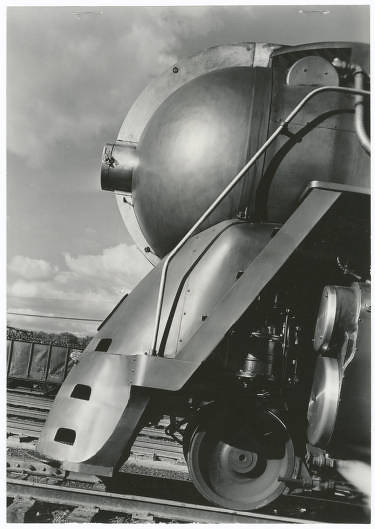
Hi. Just looked at photos of the REAL Dreyfuss Hudson (and Empire State Express Hudson) and while I was looking near the pilot, I did notice the hatch for the retractable coupler, but I noticed the absence of the obligatory uncoupling lever. I assume that the uncoupling lever is removable, only used when the coupler is in position. Other streamlined steamers have the uncoupling lever partly sticking out of the sides of the pilot (like on the PRR, for instance) but I am curious to see what the case is for the NYC Hudsons. Any photos that reveal this arrangement?
-
JBodenmann

- Posts: 3865
- Joined: Sun Oct 26, 2003 1:37 pm
- Location: Tehachapi, California
Re: New York Central Streamlined Hudson
Hello My Friends
Thanks Andy. And to answer Smokey N Steamers question, I don't think the was a coupler cut lever on this engine, at least I have not been able to find one on the drawings or in any of the photos. I think the front couplers were seldom used on the streamliners.
Jack
Thanks Andy. And to answer Smokey N Steamers question, I don't think the was a coupler cut lever on this engine, at least I have not been able to find one on the drawings or in any of the photos. I think the front couplers were seldom used on the streamliners.
Jack
-
makinsmoke

- Posts: 2262
- Joined: Thu Jul 10, 2003 12:56 pm
- Location: Texas Hill Country
Re: New York Central Streamlined Hudson
Hello Jack,
I respectfully disagree. I believe coupler cut
levers were required and regulated by the FRA
like much other required equipment and that
a missing or broken unit would require the
locomotive being taken out of service until
fixed.
I'll join the hunt for information.
Take care,
Brian
I respectfully disagree. I believe coupler cut
levers were required and regulated by the FRA
like much other required equipment and that
a missing or broken unit would require the
locomotive being taken out of service until
fixed.
I'll join the hunt for information.
Take care,
Brian
-
makinsmoke
- Posts: 2262
- Joined: Thu Jul 10, 2003 12:56 pm
- Location: Texas Hill Country
Re: New York Central Streamlined Hudson
The ten units streamlined were rebuilt without the
shrouding after 1945. Looking at a photo of an S1, if appears to have a similar pilot and front end
arrangement as a non-streamlined J3.
It has a shortened cut lever that looks like it might
fit behind the shrouding on the J3. The top
cutout on the pilot shrouding might be right in line with
that lever, allowing the coupler to be operated
with the shrouding in place, with the coupler
cover removed and the coupler in operating position.
Reference Model Railroader Cyclopedia Volume 1.
Take care,
Brian
-
JBodenmann
- Posts: 3865
- Joined: Sun Oct 26, 2003 1:37 pm
- Location: Tehachapi, California
Re: New York Central Streamlined Hudson
Hello My Friends
Thank you for the input. I did not know about the cut lever regulation so I guess it did have sone sort of cut lever. Any additional info on this would be very welcome. The only photo I have with the coupler door removed doesn't really show much. It's a pretty fuzzy photo.
Jack
Thank you for the input. I did not know about the cut lever regulation so I guess it did have sone sort of cut lever. Any additional info on this would be very welcome. The only photo I have with the coupler door removed doesn't really show much. It's a pretty fuzzy photo.
Jack
-
makinsmoke
- Posts: 2262
- Joined: Thu Jul 10, 2003 12:56 pm
- Location: Texas Hill Country
Re: New York Central Streamlined Hudson
Hi Jack and others,
I don't mean to Bogart the post. I read here often, but do not post very often.
I do like to research, and helping others with information.
I spent a little time this morning surfing the Internet and came up with the below.
I would suggest the streamlined J3A's had a cut lever very similar to their un-streamlined sisters,
with changes made to accommodate the shrouding. Jack, you might mock up a standard J3A
cut lever and see what doesn't fit behind the sheetmetal. Note the shrouding extends away from
the pilot as it goes in towards the centerline. That extra room would allow for some area behind the
shrouding. Enough for a standard cut lever? Maybe, maybe not. Maybe some additional angles or
bends in the rod would have to be made to accomodate.
I've noticed what appears to be a horizontal rod behind the top access hole. Is that the cut lever rod?
Granted, all three of those holes were most likely for foot access to the walkways and to clean the headlight lens.
Some links to views of J3A's with cutout in pilot shrouding:
J3a 5429 - rod visible behind shroud:
https://nycshs.files.wordpress.com/2014 ... 1981q3.pdf
Pg 26 in the PDF
By the way, great article on the Hudsons by the guy that started the streamlining with the Commodore Vanderbilt.
WIKI photo 1939 World's Fair
https://en.wikipedia.org/wiki/NYC_Hudso ... 39_DLC.jpg
5451 shop photo - rod again visible.
https://www.flickr.com/photos/alcomike/ ... 691193888/
How you service the headlight is beyond me. On one foot? Ladder? Hover board?
Mike has other images of J3A's including this one:
https://farm5.staticflickr.com/4116/490 ... 2a89_z.jpg.
5445 side view - hoses on pilot visible
https://www.flickr.com/photos/alcomike/ ... 691193888/
Take care,
Brian
-
JBodenmann
- Posts: 3865
- Joined: Sun Oct 26, 2003 1:37 pm
- Location: Tehachapi, California
Re: New York Central Streamlined Hudson
Hello My friends
Thank you for the info, and thanks Brian for the links to the photos. The rod in the top pilot steps was a grab iron. I just can't see how a cut lever set up would work on this engine, but it's not an issue as the model we are dealing with here doesn't need one. Lucky for me! The pilot steps were mentioned, they have a pocket behind each step, so here is something you may find useful for little things like this. A little die, form tool was made up. Call it what you like. The pockets were made up of .090" steel. Not much of a description is needed here, the photos tell the story. They were stuck together with the TIG welder but if you don't have one of these you could weld them with the oxy acetylene torch. For years this was how it was done, there wasn't always a TIG welder on hand. Go with what you got!
Thank you for the info, and thanks Brian for the links to the photos. The rod in the top pilot steps was a grab iron. I just can't see how a cut lever set up would work on this engine, but it's not an issue as the model we are dealing with here doesn't need one. Lucky for me! The pilot steps were mentioned, they have a pocket behind each step, so here is something you may find useful for little things like this. A little die, form tool was made up. Call it what you like. The pockets were made up of .090" steel. Not much of a description is needed here, the photos tell the story. They were stuck together with the TIG welder but if you don't have one of these you could weld them with the oxy acetylene torch. For years this was how it was done, there wasn't always a TIG welder on hand. Go with what you got!
- Attachments
-
-
-
-
-
JBodenmann
- Posts: 3865
- Joined: Sun Oct 26, 2003 1:37 pm
- Location: Tehachapi, California
Re: New York Central Streamlined Hudson
Here is some more. The top photo shows the set up for the layout of the dome for splitting. A little doobis was made for the surface gauge to hold our old friend the fine point sharpie. After splitting the dome it was trimmed to clear the intermediate streamlined piece that fits between it and the pilot. The middle two photos show how important the vertical fin and headlamp is to the proportions of the front end. Here they are just mocked up with card stock. The bottom photo has the headlamp in place. Does anyone out there have a photo showing the headlamp bezel latch? It did not have a normal latch like a Sunbeam or Pyle headlamp.
Next up, the vertical fins, too much fun!
Jack
Next up, the vertical fins, too much fun!
Jack
- Attachments
-
-
-
-
Last edited by JBodenmann on Tue Dec 01, 2015 9:04 pm, edited 1 time in total.
-
jessebanning
- Posts: 666
- Joined: Mon Jan 12, 2009 11:45 pm
- Location: Port Angeles, WA
- Contact:
Re: New York Central Streamlined Hudson
Hey Jack. Great works as always. Do you have the book the NYC made? I can mail it to you. It has great photos of this locomotive. I may still have a few detailed drawings. Email me or PM me and I'll get em' out in the mail to you.
www.banninglocomotiveworks.com
www.littleengines.com
www.littleengines.com
-
makinsmoke
- Posts: 2262
- Joined: Thu Jul 10, 2003 12:56 pm
- Location: Texas Hill Country
Re: New York Central Streamlined Hudson
Hello Jack,
I would venture the headlight was pretty much a standard light adapted to the streamlined nose.
What I mean is everything inside the housing was probably standard, so why wouldn't the bezel latch
assembly not be similar:
I still can't find any close up photos (maybe Jesse's book can help) but it appears from the left side
photos I've looked at the lever is raised instead of lowered. Maybe it latches pushed back towards the
smokebox, and is opened by pulling forward. That way a bird or other strike at 90 mph wouldn't let the
bezel come loose.
Take a look at the second to last photo on my earlier post, and the Ebay item below. You can mouse over
the Ebay photo and enlarge it somewhat. Not clear, but you'll see the vertical arm I'm talking about.
http://www.ebay.com/itm/New-York-Centra ... 1299968773
Thing is, why would the light company not use some standard off the shelf latch with maybe the arm and actuator
modified for this series of locos. Does anyone know if Pyle supplied the headlights?
Heck, maybe the latch you supplied with your headlights would work with a modified lever....
Still looking....
Brian
-
JBodenmann
- Posts: 3865
- Joined: Sun Oct 26, 2003 1:37 pm
- Location: Tehachapi, California
Re: New York Central Streamlined Hudson
Hello My Friends
Thanks Brian for the info on the Hudson. Jim Kreider found some drawings and apparently the streamliner had the same cut lever arrangement that the non streamlined engines had, except in an abbreviated form. Only what would fit under the streamlining. As to the streamlining, the front end has had a few bits added. The vertical fin is mostly done and fitted up. The fin was made of two thicknesses of 3/16" brass. The full size fin was 3" thick, made from steel castings, and split down the center. Things still need a bit of adjustment…..put it together, take it apart, hit it with a hammer a few times, put it back together. The top pilot steps still need to be fitted and welded to the intermediate piece. The top steps get little grab irons inside them. The pilot also will get some diamond tread platform steps that stick out from underneath. Then the boiler jacket will proceed from the smoke box to the back head. The boiler jacket covers the smoke box. Then the skyline casing. This will be a most interesting feature. It has a rounded top and upper edges and tapers from front to back. Narrow at the front and wide at the back, with an assortment of openings, louvres, doors, and hatches. Too much fun!
Happy Model Building.
Jack
- Attachments
-
-
-
-
JBodenmann
- Posts: 3865
- Joined: Sun Oct 26, 2003 1:37 pm
- Location: Tehachapi, California
Re: New York Central Streamlined Hudson
Here is a bit more; the top photo shows the first two strips in place on the armature. They will be clamped in place and then some shrinkage action with the oxy acetylene torch will snuggle it up to the armature and relieve any stresses. This will be done while it is clamped in place on the armature. Then the next strip will be fitted up and once all is good they will be tacked together with the TIG welder. The last photo here shows todays progress. The strips have been welded and ground off smooth. At this point the work piece is a bit lumpy and it will get some fine tuning with a body hammer on the steel table to raise the low spots and if there are any high spots they will be shrunk down with hot metal shrinkage. Then tomorrow the final strip across the top will be made and then the wings out towards the ends. More to come.
See you in the funny pages…
Jack
See you in the funny pages…
Jack