The latest operation. Note the spacer piece which is to allow clamping of the equalizer arm in the mill vise. As more and more metal is cut away, it becomes increasingly difficult to find a secure clamping setup which does not distort or throw the workpiece out of alignment.
As shown, one should only attempt light cuts with a sharp cutting tool. End mills are notorious for imposing yanking, twisting and grabbing forces on the workpiece.
Constructing the Josslin Hudson
Moderator: Harold_V
-
10 Wheeler Rob
- Posts: 1546
- Joined: Tue Mar 21, 2006 2:44 pm
- Location: East Hartford, CT
2D Cad is Possible, even for old dogs.
Hey,
Some nice looking work, the thick links (rockers) must have taken some hours on the band saw.
Reguarding the 2d CAD for lay out work. I bought a version of TURBO CAD Several years back, with 2D and 3D sufface programs. The best thing is it came with a great tutorial that tought you how to use it.
And I never bother with layers, not for lay out work. They are great for drafting where you want to hide center lines and hidden lines in views and have a lot of different parts.
I am machining some Stevenson's links at the moment, will try to get a picture to post some time.
Rob
Very nice work...
Very nice work guys.
I been hacking over the last week too.
Here are some of the hacked out parts.
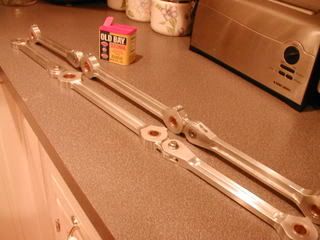
Those are going to the west coast in a day or so.
These are staying in our local club.

The little ones are for a 1" Rob Roy I will probably never finish.
Oh yea, that can of powder, the guys on the cannon site like a powder can just to relate to a cannon's size.
Keep on hacking!
Kap
I been hacking over the last week too.
Here are some of the hacked out parts.
Those are going to the west coast in a day or so.
These are staying in our local club.
The little ones are for a 1" Rob Roy I will probably never finish.
Oh yea, that can of powder, the guys on the cannon site like a powder can just to relate to a cannon's size.
Keep on hacking!
Kap
Fadal Turn, Fadal Vmc 15, Prototrak 16 x 30 Cnc Lathe, Pratt and Whitney 16 x 54 lathe, Pratt and Whitney Vertical Shaper, G & E 16" Shaper, B & O Electric turret lathe, 36" Doall band saw,
Enco B.P. Clone, Bridgeport CNC Mill, Delta 12" Surface Grinder.
Enco B.P. Clone, Bridgeport CNC Mill, Delta 12" Surface Grinder.
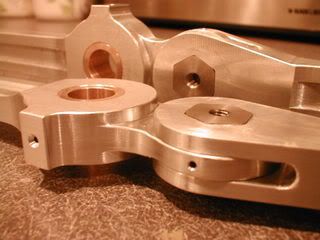
Rods
Sorry,
I'm sluggish on replys.
I can't get on here too often with work and all.
Siggy,
They are aluminum, 6061-t651.
Al,
They just have a 1/16" hole with a little c-sink in them.
smagovac,
Yes, I have an old bridgeport cnc that we reciently retrofitted with an
ahha control.
Sir John S. was a big help with that job.
I'm working on getting a Fadel, or a Haas toolroom mill with tool changer
to improve finish, and speed a bit.
The old Bridgeport is a bit jerky in the corners. Still much better than the rotary table route.
I have to polish with 320 wrapped round a stick in the drill press.
Thanks, didn't mean to steal the thread!
Kap
Fadal Turn, Fadal Vmc 15, Prototrak 16 x 30 Cnc Lathe, Pratt and Whitney 16 x 54 lathe, Pratt and Whitney Vertical Shaper, G & E 16" Shaper, B & O Electric turret lathe, 36" Doall band saw,
Enco B.P. Clone, Bridgeport CNC Mill, Delta 12" Surface Grinder.
Enco B.P. Clone, Bridgeport CNC Mill, Delta 12" Surface Grinder.
First, I would like to say thank you to all who have given their support and encouragement together with examples of their own work. Sometimes, it feels as though I have a never ending project.
On to the final construction photos.
The first photo shows the setup I used to finish machine the equalizer arm bosses. I started with a 3/16" diameter ball end mill (shown) to do most of the end rounding and followed it with a 1/8' ball end mill to finish the root radius to the print size. The only reason I did it this way was to reduce the cutting forces on the small end mill as its mechanical strength is not that great.
The rotary table was first centered under the mill spindle by "dialing in" on the pheriphery of a close fitting plug set in the center hole of the rotary table. The equalizer arm plug used in the milling setup has a 1/8" extention which fits closely the reamed hole in each end of the equilizer arm.
The last photo shows a couple of the finished parts. This brings the suspension to about the 20% completion mark with the more complicated bits still ahead!
Now, I have a question. What do you do to remove the machining marks when final finishing/polishing a machined part in steel?
- Attachments
-
- Suspension Machining Arm Bosses.jpg (75.73 KiB) Viewed 4348 times
-
- Suspension A Couple of Finished Equalizer Arms.jpg (45.93 KiB) Viewed 4348 times
Well, the only way I have found to get steel or SS finished nicely is to stone it with either a wet stone or a diamond stone. It takes a lot of elbow grease but the finish is beautiful.Carrdo wrote:Now, I have a question. What do you do to remove the machining marks when final finishing/polishing a machined part in steel?
This is what my A3 running gear looks like after diamond stoning all of the parts. BTW, the gear is all stainless steel.
Robert
- Attachments
-
- Closeup of A3 running gear
- Gear closeup.JPG (55.08 KiB) Viewed 4335 times
-
10 Wheeler Rob
- Posts: 1546
- Joined: Tue Mar 21, 2006 2:44 pm
- Location: East Hartford, CT
Nice Work, Any Sugestions on how to keep it looing nice over
What, no rouge and buffing wheel? Just kidding, nice looking work.
I often rub the flat serfaces on 400 and 600 grit emery sheets thats on a flat surface. Straight storkes for aperence and circular for contactacting surfaces.
Dose anyone have any sugestion on thow to keep the steel and cast iron looking nice over time. Obiviosuly it could be nickel plated, and but most of us do not have a resorce to do that. I would love to silver plate it, or even alumimum coat it so it would not rust.
All I do is try to keep it wiped down with oil, found lathe way oil or steam oil seems to stay on fairly good. But as I keeep making more sturff, I am going to have to retire to jsut keep up with ploishing and oiling, LOL.
Any one try the sprays made for machine tables, a friend told me there is wax based spary sold for preserving machine tables and ways between use, and its not oil so dosent soak into wood on wood working machines. No idea who sells it, guess I should search the MSC Catalog.
HI,
Just a dumb question: Has anyone ever tried paste floor wax (NOT the liquid kind) to keep the metal parts bright? I haven't myself, but it might be worth experimenting with. It makes a hard finish that's water repellent. Plating would still be the best I can think of though for long term protection.
Just a thought.
Richard Trounce.