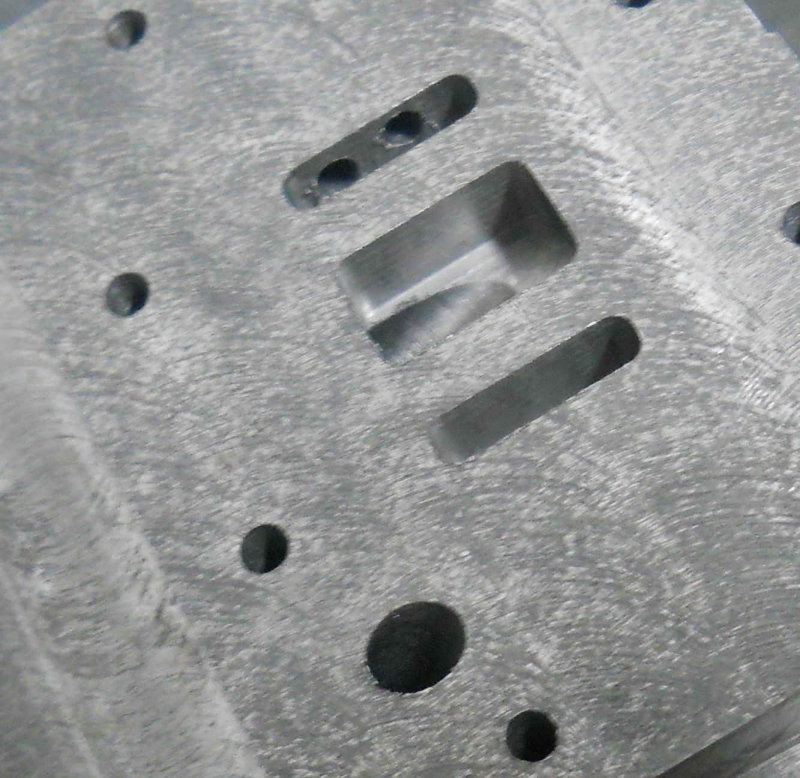
I drilled the first set of steam admission holes for my Kozo build. The "pilot" holes were 1/8", and one came out a bit high in the port, as seen in this photo:
Per plans, each hole would be .196 diameter, but redrilling the higher one would likely break through into the valve surface. I'm wondering what the best thing to do at this point might be. I can think of 3 possibilities:
1) Leave it alone, and just enlarge the other
2) Enlarge the hole but only part way so that it doesn't break through
3) Use a long endmill to enlarge and offset the hole (not sure this would work)
First thought, shouldn't this have been posted in another thread on another part of the board?
I don't have Kozo's drawing, but I can show an example of a drawing below of a french marine engine cylinder I'm drawing/stealing in AutoCAD:
There is a place where a small flat of the cylinder face is milled out where the steam inlet comes in at the top of the cylinder. You might be able to get away with your mistake. If quantity of steam is a concern, could the extra inlet be filled in with silver solder and milled flat? Or add the second steam inlet/hole to all of the cylinders to keep steam flow consistant?
kvom wrote:3) Use a long endmill to enlarge and offset the hole (not sure this would work)
Thoughts?
A great deal depends on the distance from one end of the hole to the other. It it's not unreasonable, a 3/16" end mill may serve perfectly well. They're more rigid than drills, and don't (normally) wander.
The biggest problem you'll have is deflection when starting the hole. I recommend you use a short end mill for that portion of the cut (held in a collet or end mill holder, not a drill chuck). Also, when the end mill breaks through the opposite end, you'll be cutting on one side and not the other, which will encourage the end mill to drift. A fine feed will help keep it in alignment. Best of all worlds would be if you could spin grind the periphery of the end mill, so it wasn't side cutting. You might consider using a 7/32" end mill that has been circular ground to the target .196" diameter.
Harold
Wise people talk because they have something to say. Fools talk because they have to say something.
First off, I would dress the bore and cylinder end for the admision clearance, that would give a flat surface to work through, instead of dealing with the 90* edge and rework from that end. Between having a flat surface to start from, and holding the work at the correct angle to open out the hole, I would think a higher degree of success is possible. An end cutting mill is of course part of the answer. I am thinking a shift in the hole is entirely doable.
Big Dave, former Millwright, Electrician, Environmental conditioning, and back yard Fixxit guy. Now retired, persuing boats, trains, and broken relics.
We have enough youth, how about a fountain of Smart. My computer beat me at chess, but not kickboxing
It is not getting caught in the rain, its learning to dance in it. People saying good morning, should have to prove it.
KV,
I think you started the holes (at least the RH one) in exactly the right place relative to the cylinder bore and adjusting the drill angle a degree or so, so that they break out lower in the valve box recesses, is what I would shoot for. If you can mill (x 3/16") in to the offset hole for say 1/3 its depth (and at the adjusted angle) this will create a bushing or guide for the final drill, and advancing the drill bit little at a time, the bit should follow the adjusted path and come out where you want it to. As Harold says it will be best to advance the bit with minimal pressure little bit at a time, perhaps one diameter, before clearing. Don't ask me how I know this ( . . . and it's not because Harold says so.)
Thanks for the replies. I modified the drawing to check clearances, and it seems that 2 degrees more upright (26 vs 28) would put the exit points right at the bottom of the port slot. Using an endmill to form a "bushing" also looks like a good idea that I'll try.
I once saw a machinist "pull" a mis-drilled hole as follows: He used every size dril bit between the pilot size and the final size, forcing each one in the direction the hole needed to go. Each drill then took just a little off the desired side of the hole. It worked surprisingly well.