
Hi All,
I have recently completed construction of a small refractory using an old propane bottle. I removed the top, and lined the interior with a mixture of fireclay, perlite & a small ammount of portland cement. The burner I used
was basically a reil design, and I followed the plans used by this gentleman:
http://metalcast.boorman.us/reil_1.html
in any event my small refractory works like a champ..
I am experiencing a few problems, and have a few questions.. (I did aluminum casting 20+ yrs ago back in high school metal shop - so some of my memories are a bit rusty!)
My main problem is that I made my crucible from a piece of 4" steel pipe and mig welded plate steel to the bottom - the problem is: I cannot get it to stop leaking!@! - I am a fairly decent welder & the bead(s) I have layed on the bottom seam are clean and solid. It appears that the furnace heats my homemade crucible to a temperature where the weld fails? and thus the molten aluminum forces through a thin spot? - I dont know - I simply cannot (through any ammount of bead laying) stop this guy from leaking
however to correct this, I have ordered a clay graphite crucible from budgetcasting supply, and once it arrives that shoul dbe the end of the leaks!
my next question is - what are you folks using for parting powder, can I use talc? do I need to use the commercial powders?
-todd
some basic questions.
Moderator: Harold_V

Todd,
I'm pleased to read you've ordered a proper crucible. Unless you coat a metallic one with a refractory material of sorts, you can expect nothing but trouble. Molten aluminum, like most other metals, are strong solvents of other elements. You need not achieve the molten point of steel for aluminum to dissolve it, as you've seen. This not only destroys your crucible (I'm using that term loosely), it also destroys the properties of your aluminum. It is not a recommended practice, although that hasn't stopped many of the home shop types from doing it anyway.
That solvent power of molten metals has been used for a long time in assaying of precious metals. Litharge (lead oxide) is a part of the charge of an assay. Upon heating, the litharge is reduced to oxygen and lead, with the oxygen oxidizing the sample being assayed, and the lead collecting traces of metals. While the temperature of the assay may never achieve anywhere near the temperature of molten platinum or palladium, they report in the assay if present, having been dissolved and collected by the molten lead.
If you must use a metallic melting vessel, it should have a wash applied.
Harold
If I might add some to the already excellent posts.
One day I will get a proper crucible, but until I'm rich instead of so darned good looking! I too am using a weld up crucible.
I extended the life of my steel crucibles by welding a floor, that is to say an ID plate into the bottom of the well pipe { I live in oil country so it is thick walled well pipe.}
Then I add another plate to the bottom approx 1/8 of an inch larger than the OD.
My "handle" is chain, and my pouring lever is a single large chain link welded to the bottom.
These are dead easy to make. Some I have lined with wash, some I have not. Actually it didn't seem to make a difference to the longevity of the crucible.
I also use charcoal, I get 3 melts from a 20# Bag of Kingsford if you don't dawdle. That's 3 melts into 8 Wally Mart echo mini-bread pans, approx 5" long x 3" wide by 2 1/2 deep. And I rotate the crucible for each melt, and
sometimes during windy weather I will rotate it during the melt.
I preheat over my lids vent hole. And have found consistently good results by making a tin foil sausage of HTH Pool Shock, about a heaping tablespoon; and submerging it into the melt with the cover on, try your best to get it to the bottom. I made a way but this is getting too long already.
Then I let the melt temper a little while, skim, and pour. Cut an ingot in half, if yi have thousands of small bubbles great, just add another minute or two to the temper. Big Ole Bubbles and inclusions; remelt, it will be better the second time, like Grandma's pies!
Take Care, Ken
One day I will get a proper crucible, but until I'm rich instead of so darned good looking!
I extended the life of my steel crucibles by welding a floor, that is to say an ID plate into the bottom of the well pipe { I live in oil country so it is thick walled well pipe.}
Then I add another plate to the bottom approx 1/8 of an inch larger than the OD.
My "handle" is chain, and my pouring lever is a single large chain link welded to the bottom.
These are dead easy to make. Some I have lined with wash, some I have not. Actually it didn't seem to make a difference to the longevity of the crucible.
I also use charcoal, I get 3 melts from a 20# Bag of Kingsford if you don't dawdle. That's 3 melts into 8 Wally Mart echo mini-bread pans, approx 5" long x 3" wide by 2 1/2 deep. And I rotate the crucible for each melt, and
sometimes during windy weather I will rotate it during the melt.
I preheat over my lids vent hole. And have found consistently good results by making a tin foil sausage of HTH Pool Shock, about a heaping tablespoon; and submerging it into the melt with the cover on, try your best to get it to the bottom. I made a way but this is getting too long already.
Then I let the melt temper a little while, skim, and pour. Cut an ingot in half, if yi have thousands of small bubbles great, just add another minute or two to the temper. Big Ole Bubbles and inclusions; remelt, it will be better the second time, like Grandma's pies!
Take Care, Ken
Hi Ken,
thanks for the input - my "pipe crucible" is almost exactly as yours - I used 1/2 chain link ears for the lift/holder and a 1/2 link at the bottom so I could tip it and pour.
I did not use the inner diameter "bottom" - I simply welded a piece of plate steel to the bottom (it was about 1/8" larger than the pipe diameter)
the steel plate did have some rusty sections, and perhaps this is where the aluminum is punching through.
I am going to try to put together another, and I will use you inner & outer bottom idea.
thanks!
todd
-
Marty_Escarcega
- Site Admin
- Posts: 1730
- Joined: Wed Dec 18, 2002 8:17 pm
- Location: Mesa, AZ USA
I am at a loss, why would you try and make a crucible or spend the time on them when they don't seem all that expensive? This outfit caters to the hobbyist:
http://www.budgetcastingsupply.com/Crucibles.html
I think I would much rather use the right tool for this job
http://www.budgetcastingsupply.com/Crucibles.html
I think I would much rather use the right tool for this job
"Jack of all Trades, Master of None"
Hi Todd,
My 3rd and Last attempt to get everything to work together!
Rule 1: Wire Wheel all your surfaces. As much as is possible, weld clean and shiny to clean and shiny!
************************Prep Inner Floor**********************
On the piece you have cut for the ID grind a small 45 deg bevel on top and bottom.
When I say "Well Pipe" in oil country that is greater than 1/4 inch and maybe 5/8 inch or less.
I seem to only be able to weld at one speed, so: Weld slowly around the inside and/or make 2 passes. It's not that bad if you scrape a spark on some scrap, then go into the crucible all around the bottom.
**********************Prep the Well Pipe**********************
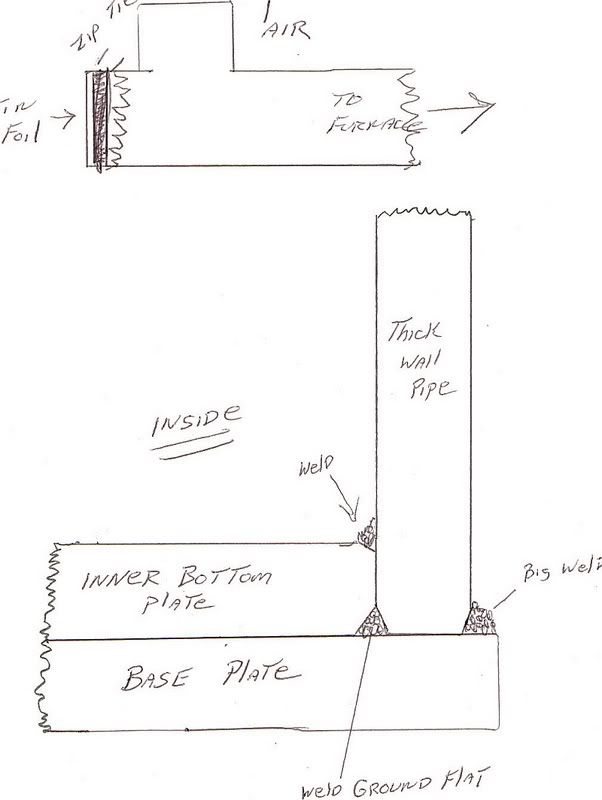
Grind the same bevel ID and OD. Weld the ID inside first, then the bottom, then grind so that the Base Plate is flat across the bottom.
*********************Add The Base Plate*********************
Put on the base plate and weld twice around the bottom utilizing the bevel space and the extra 1/8 inch. Lay it on thick man!
I have also "sprung a leak", lose a lot of good Hair Dryers that way,
So at the top of the drawing you will see a little mod I did to mine. My air inlet is 2 inch by 12 inch of Lowes "Grab and Go" pipe. On the end I added a "T" fitting with the hole facing up. My air goes in there.
Now we test your origami skills, fold up some heavy duty reynolds wrap until it is about 6 -8 layers thick, then use a Zip-Tie or a hose clamp to seal things up. Now if it leaks it will bypass the Air and burn right thru that tin foil, but I plan for the worst and put a bread pan there anyway.
You may have to cut and paste this. I shrank it quite a bit, I didn't know what kind of connection you have.
In the end however, Howard is right, we should get proper crucibles.
Thank You Marty, but when you live in the "Land of Make Do" Time is free, materials and goodies are not. But if they are all that cheap, I'm sure Todd and I would send you our addresses so that you could send us each one to get started.
Also when using a proper crucible you require lifting tongs, and a pouring cradle, not to mention someone to man the other end of the tool.
With my 2 re-bar hooks I can lift out the pipe crucible and pour it by myself, my other 2 friends are here though, me and I!
Take Care, Ken
My 3rd and Last attempt to get everything to work together!
Rule 1: Wire Wheel all your surfaces. As much as is possible, weld clean and shiny to clean and shiny!
************************Prep Inner Floor**********************
On the piece you have cut for the ID grind a small 45 deg bevel on top and bottom.
When I say "Well Pipe" in oil country that is greater than 1/4 inch and maybe 5/8 inch or less.
I seem to only be able to weld at one speed, so: Weld slowly around the inside and/or make 2 passes. It's not that bad if you scrape a spark on some scrap, then go into the crucible all around the bottom.
**********************Prep the Well Pipe**********************
Grind the same bevel ID and OD. Weld the ID inside first, then the bottom, then grind so that the Base Plate is flat across the bottom.
*********************Add The Base Plate*********************
Put on the base plate and weld twice around the bottom utilizing the bevel space and the extra 1/8 inch. Lay it on thick man!
I have also "sprung a leak", lose a lot of good Hair Dryers that way,
So at the top of the drawing you will see a little mod I did to mine. My air inlet is 2 inch by 12 inch of Lowes "Grab and Go" pipe. On the end I added a "T" fitting with the hole facing up. My air goes in there.
Now we test your origami skills, fold up some heavy duty reynolds wrap until it is about 6 -8 layers thick, then use a Zip-Tie or a hose clamp to seal things up. Now if it leaks it will bypass the Air and burn right thru that tin foil, but I plan for the worst and put a bread pan there anyway.
You may have to cut and paste this. I shrank it quite a bit, I didn't know what kind of connection you have.
In the end however, Howard is right, we should get proper crucibles.
Thank You Marty, but when you live in the "Land of Make Do" Time is free, materials and goodies are not. But if they are all that cheap, I'm sure Todd and I would send you our addresses so that you could send us each one to get started.
Also when using a proper crucible you require lifting tongs, and a pouring cradle, not to mention someone to man the other end of the tool.
With my 2 re-bar hooks I can lift out the pipe crucible and pour it by myself, my other 2 friends are here though, me and I!
Take Care, Ken
A topic on which I may be able to speak intelligently!
Gents, if you're deep in "Make-Do Land", as you seem to be, you might be interested in trying a maneuver we used to use (many moons ago, before Time and The Mysteries Of Numerical Control began...) in high-school foundry classes I taught. The ol' budget would get pretty shop-worn towards the end of the school year, and, what with six-thumbed students handling fragile-from-too-many-heats graphite crucibles over hard floors, we'd sometimes need to finish out the year with shop-made melting-pots. I've never tried this with cast iron or bronze, but it works o.k. for yellow brass and aluminum, and prevents the scaling/contamination of the pour from using bare-steel (or even thin-washed) pots.
Pack the inside of the clean (note emphasis) steel pot with some of the same refractory cement or fireclay used to make the jacket of the furnace. If you will run some beads around the inside walls of the pot before packing in the material, it will hold just fine once it has hardened completely. We used to make up a "plug", with fairly generous draft, using some scrap wood coated with wax or varnish and after hand-placing the cement in the bottom of the pot, put this in place in the center of the pot atop the cement, then pack the side spaces, tamping with a flattened bar-end. When this has air-dried for a couple of days, several successive heatings (starting with only a few minutes, and progressing to a half-hour or more) in the furnace will complete the drying process.
This should, with some care in use (especially care in handling when still hot - which should be your mode anyway!), last a good long time, will not leak if "cured" properly, and will not contaminate your pour.
One caution - dry thoroughly and carefully before heating metal in this - you don't want any excess moisture to remain in your cement liner, to be released into the metal.
Good luck with your melting - be careful, and be safe...
Making little ones out of big ones, and then trying to assemble big ones out of little ones...
"Engineering, after all, is determining the correct wrench to bash the proper screw into the appropriate size and shape slot..."
"Engineering, after all, is determining the correct wrench to bash the proper screw into the appropriate size and shape slot..."
Thank You OneOldCat,
I hear oh one of many Moons!
Very interesting. I had not thought to combine the refractory rig with the steel one.
I have the "Making Crucibles" book by Gingery, but as slow as I can dry it, I have not yet have one NOT crack. Dry mix, Wet mix, refractory instead of cement, I've attempted everything except using refractory as a Liner.
Thank You for the clue, it's a bit too cold right now, but I WILL give this a try!
No a steam explosion is not my idea of fun.
And to you also, Take Care Be Safe, and Thank You,
Ken
I hear oh one of many Moons!
Very interesting. I had not thought to combine the refractory rig with the steel one.
I have the "Making Crucibles" book by Gingery, but as slow as I can dry it, I have not yet have one NOT crack. Dry mix, Wet mix, refractory instead of cement, I've attempted everything except using refractory as a Liner.
Thank You for the clue, it's a bit too cold right now, but I WILL give this a try!
Most excellent, Todd are you getting this too?This should, with some care in use (especially care in handling when still hot - which should be your mode anyway!), last a good long time, will not leak if "cured" properly, and will not contaminate your pour.
No a steam explosion is not my idea of fun.
And to you also, Take Care Be Safe, and Thank You,
Ken
Last edited by Canyonman on Sat Jan 13, 2007 9:17 pm, edited 1 time in total.
While I am a strong supporter of using the right tool for the job, I can certainly understand others making choices that fit their budgets. Better you can pour a not-so-perfect casting than no casting, I agree.Canyonman wrote: In the end however, Howard is right, we should get proper crucibles.
It does no one any ham to be aware of potential pitfalls---so a constant reminder for those that may not know is in order if we promote less than ideal processes. Please keep in mind that there are many that use these boards as a source for helpful information. We should not be promoting methods that yield problems, but if we do, a mention of the potential pitfalls is in order. Let the reader make choices in keeping with their needs.
The point at hand is that anyone that gets involved in foundry work should understand the effect of contamination of their metal so when they have trouble with grain or other features that may not be to their advantage that they understand their melting and handling procedure may be responsible. The day can come when the less than perfect results are not acceptable.
I have often mentioned my affiliation with refining precious metals. One of my customers came to me after using gold from a questionable refining source, and was stuck with several brittle castings. The entire lot had been ever so slightly contaminated with lead, requiring a re-refine of the gold, with hours of lost time in re-carving the custom waxes that had been poured. This questionable refining source (a person I knew on a personal basis) became my best advertising over the long haul. His slip shod work habits virtually assured his failure.
While ductile, lead destroys the properties of gold. Traces render it hard and brittle, unable to withstand the slightest of bending, so in the example cited, above, it was impossible for diamonds to be mounted. That's completely contrary to the properties of either element, but, combined, each lose their toughness. That is true of other combinations of elements, so every effort should be expended in keeping metals free of cross contamination. It is for that reason I speak against the use of barren metallic melting devices. There are hazards -----be aware of them.
While it's true that the proper pouring shank and lifting device is required for handling bilge crucibles, there is nothing stated that limits one to requiring a second party. I still have numerous #1 crucibles, along with a pouring shank and a lifting device that are properly made for an individual to handle the crucibles without damaging them. I made one for a #8 crucible, which was borderline manageable for pulling the crucible from the furnace and pouring without changing to a pouring shank. It relied on hand grip, which was the limiting factor. A positive lock would have easily extended its capability, but was not required for the service for which it was designed (pouring silver anodes for electrolytic refining).Also when using a proper crucible you require lifting tongs, and a pouring cradle, not to mention someone to man the other end of the tool.
Single person pouring shanks are readily available for #16 crucibles, so while proper equipment may be required to handle bilge crucibles, they do not in and of themselves limit the individual as to capacity, no more so than a metallic crucible that is home built. Fact is, pound for pound, it's entirely possible that a proper crucible would yield more useable metal per heat, due to the excessive weight of a large steel melting vessel.
Use the vessel of your choosing, but always mention the pitfalls for the benefit of those that may not have the same level of knowledge and have turned to you for advice. It's the kind and polite thing to do.
Harold
Harold,
Message received and understood; Loud and Clear!
I would like to see your "one man" tools if you happen to have pix. I think I'd prefer an "A" crucible if I had my druthers. No logical reason really, personal preference.
I was not trying to lead someone down the Rosy Path to Doom, but if he chose this way I was just attempting to relay enough info for a "Leak Resistant" Pipe Crucible.
Something that should be mentioned I feel is making your own "Hi Concentration Acetic Acid". I use the freezer method. And I ALWAYS Check tyranny cases, quite a few have Magnesium in them. We all know what happens there!
Take Care, Ken
Message received and understood; Loud and Clear!
I would like to see your "one man" tools if you happen to have pix. I think I'd prefer an "A" crucible if I had my druthers. No logical reason really, personal preference.
I was not trying to lead someone down the Rosy Path to Doom, but if he chose this way I was just attempting to relay enough info for a "Leak Resistant" Pipe Crucible.
I also think; for some of the home projects we do; that we are over-thinking the contamination problem. But then I do have my ingots separated by type, Briggs & Stratton blocks, AL pistons, Intake and exhaust, etc.We should not be promoting methods that yield problems, but if we do, a mention of the potential pitfalls is in order. Let the reader make choices in keeping with their needs.
Something that should be mentioned I feel is making your own "Hi Concentration Acetic Acid". I use the freezer method. And I ALWAYS Check tyranny cases, quite a few have Magnesium in them. We all know what happens there!
Point taken.The point at hand is that anyone that gets involved in foundry work should understand the effect of contamination of their metal so when they have trouble with grain or other features that may not be to their advantage that they understand their melting and handling procedure may be responsible. The day can come when the less than perfect results are not acceptable
I don't believe I could have said it any better!Use the vessel of your choosing, but always mention the pitfalls for the benefit of those that may not have the same level of knowledge and have turned to you for advice. It's the kind and polite thing to do.
Take Care, Ken
and some pics!
Thanks folks for all the valuable input,
I have ordered a clay-graphite crucible.. I am also interested in constructing my own working one from steel. Almost all of the sites I have visited to get tips and construction ideas for my refractory, the metalcasters have used thier own steel crucibles. I simply would like to try to get one working for the sake of doing something mysef!
attached are some pics of my setup
thanks again to everyone for all of the great information.
- Attachments
-
- p1010172_192-resized.jpg (18.7 KiB) Viewed 4086 times
-
- p1010159_208-resized.jpg (9.76 KiB) Viewed 4086 times
-
- p1010139_956-resized.jpg (14.16 KiB) Viewed 4086 times
link to more pics
Hey all..
Since the forum only allows 3 pics, I uploaded a bunch to my website..
you can view them at:
http://rboss.lod.com/~todd
Any input would be greatly appreciated & heeded!
-todd
Since the forum only allows 3 pics, I uploaded a bunch to my website..
you can view them at:
http://rboss.lod.com/~todd
Any input would be greatly appreciated & heeded!
-todd