I've been scrounging and searching for stuff to build a foundry,and might actually have enough useful stuff.
My plan is for an oil burning furnace as I have plenty of free oil for whatever I need.
Some of the builds i've seen do show a supplemental source to get it started and heated up,and for that I plan to use propane.
For now I have a couple questions about the foundry structure itself though.
I've had trouble finding a suitable barrel,and then noticed my big old stainless pot I use for misc parts washing/soaking.
It is 24 1/2 inches diameter and 15 1/2" deep.
Are there any issues with using stainless steel for the barrel other than the obvious of wasting a stainless steel vessel?
This is an old pot I pulled from the dump one visit,looks just like the ones for deep frying turkey.
I know stainless has a melting point twice that of Al but don't know about expansion rates etc.. or fumes?
Advice needed.
I am using an old fire extinguisher as a crucible for now,it is 11" tall (not including taper) and 4 1/4" diameter.
Before I start mixing this $20/gallon high temp stuff I want to get an opinion on refractory.
I only plan to melt aluminum and need some advice on how to mix the components available to me.
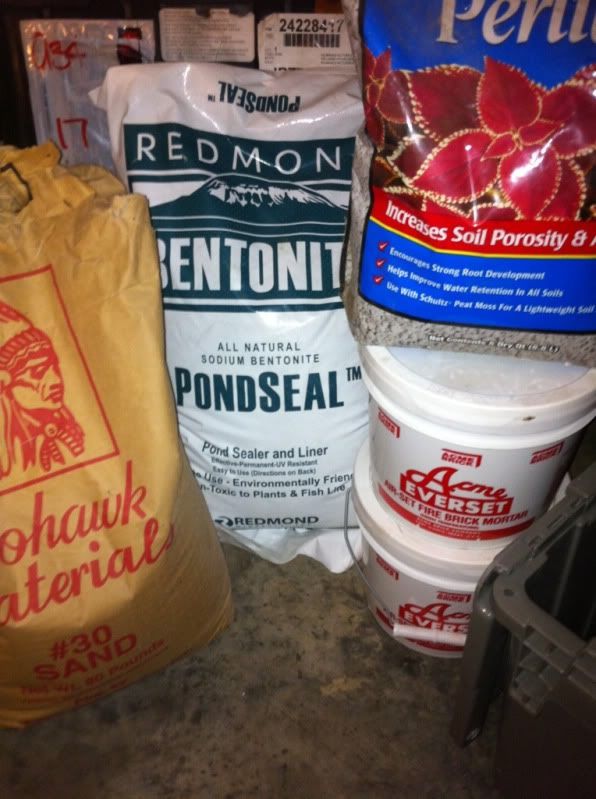
I have 2 gallons of Everset made by Acme brick,50lbs of silica sand and an 8qt bag of perlite.
Lime and portland are just a quick drive up the road to pick up,and pretty sure I got the perlite at walmart so another easy find.
Any experienced opinion or advice on mixing for a first timer?
I've been reading all the recipes and it gets confusing.
Thanks for any help on these questions,I will have more i'm sure and I'll try to take some pics in progress.
Building foundry,some noob questions.
Moderator: Harold_V

Re: Building foundry,some noob questions.
I highly recommend you lose the idea of using lime and Portland cement. The temperatures involved will reduce each to what they once were, so your furnace will self destruct. You also risk steam explosions when using cement.
In their place, do yourself a favor and investigate proper refractories. They're not cheap, but will save you from poor results. Also, be cautious about buying those that are out of date. They have a limited shelf life and don't set properly when too old. Been there, done that, learned the lesson well.
I'm not a fan of melting metals in metallic vessels. The use of a steel canister to melt aluminum isn't exactly the wise thing to do, if for no other reason, iron will alter the chemical makeup of the aluminum you'll melt, lowering its qualities. Between oxidation that sheds and the small amount of iron that is actually dissolved by molten aluminum, it's just not good practice. However, if you're intent on pursuing your goal, invest in a refractory wash that can be applied to the vessel, isolating the molten metal from contact. That is an acceptable alternative to using proper crucibles.
Before making a decision about the nature of your furnace, it might pay you to explore the use of bilge type crucibles, and build the furnace accordingly. I've built a small number of melting furnaces and wouldn't consider not addressing that issue.
Remember to allow for clearance for lifting and handling tools when you determine the diameter and depth of the chamber.
Harold
Wise people talk because they have something to say. Fools talk because they have to say something.
-
Playtoy_18
- Posts: 24
- Joined: Sat Jul 23, 2011 10:59 pm
Re: Building foundry,some noob questions.
While searching/reading yesterday I did find out about the steel crucible issues.
I plan to find some kiln wash to use on the crucible,thanks for the tip.
Also excellent idea on designing for proper crucible,I'll check and adjust measurements as needed.
What about using the stainless steel bucket/pot?
No issues I'm guessing so I'll go ahead and use it.
I'll update as I get time to hopefully work on it today.
Still looking through refractory recipes,gotta work with what I have for now.
I won't be able to fire it off for prob a week anyway,finished or not.
We are/have been under burn ban and as dry as it is I don't wanna tempt fate.
The first real firing will prob be while it's raining hopefully,lol or at least right after.
I might attempt a low temp firing to cure it,maybe.
Thanks for the help harold!
Re: Building foundry,some noob questions.
I'm not aware of any issues, and it will be nice to have a container that doesn't rust.Playtoy_18 wrote:What about using the stainless steel bucket/pot?
It's hard to insulate a small furnace adequately to avoid corrosion on the shell. Using stainless should prevent scale formation, so I like the idea. Wouldn't pay the price for a stainless vessel, but if it's something you have at your disposal, it's a great idea, especially if you move towards melting copper alloys.
Harold
Wise people talk because they have something to say. Fools talk because they have to say something.
-
steamin10

- Posts: 6712
- Joined: Sun Jun 08, 2003 11:52 pm
- Location: NW Indiana. Close to Lake Michigan S. tip
Re: Building foundry,some noob questions.
The furnace bore should be about 1.5 the diameter of the largest crucible, at minimum. If you build too small, like 5 gallon bucket size for a coupla lbs of Al, you may find you have done yourself a diservice.
A small furnace can be made very quickly without much more than some fiberfrax blanket, stuffed in a steel bucket, with a venturi burner for LP. A firebrick in the bottom and you can pour in about 20 minutes.
Those of us that expect to get more than a few cupfulls of melt, have a tendancy to overbuild, with more permenance, where maybe a pile of brick, may serve just as well. Many hit walls and are more for the curiosity, than the production, and abandon casting early on.
While stainless is a good material, I have built furnaces with a 55 gallon drum cut just above the bottom band, same with a 30 gallon drum, both lined with hearth brick, and grouted with fireclay and sand mix. I would use the lightweight kiln brick now, especially for the lower temps that aluminum runs at.
Many choices. iIt will become an extension of your knowledge and Ego. Play on.
Big Dave, former Millwright, Electrician, Environmental conditioning, and back yard Fixxit guy. Now retired, persuing boats, trains, and broken relics.
We have enough youth, how about a fountain of Smart. My computer beat me at chess, but not kickboxing
It is not getting caught in the rain, its learning to dance in it. People saying good morning, should have to prove it.
We have enough youth, how about a fountain of Smart. My computer beat me at chess, but not kickboxing
It is not getting caught in the rain, its learning to dance in it. People saying good morning, should have to prove it.
-
Playtoy_18
- Posts: 24
- Joined: Sat Jul 23, 2011 10:59 pm
Re: Building foundry,some noob questions.
Quick update,trashed the stainless bucket idea.
I'm an idiot,nuff said.
I did manage to locate a 40 gallon hot water heater though.
I've got it stripped and the tank cut in half.
Have the hole drilled for my blower pipe,and an unused hole plugged.
Just need to finish some minor trimming where I cut the internal vent out(gas).
Good news i've also found bentonite clay right up the road also.
6.99 for 50lb bag.
If i have time tomorrow i'll be finishin up the trimming and make a new form.
I've looked up the common size crucibles and new "design" will accomodate most sizes.
I've already begun filtering used oil I have in the shop.
I'm using a universal fuel pump,thru a 7.3 ford diesel remote fuel filter.
I still havent began on the oil burning apparatus,mainly because I'm trying to figure out how from a myriad of possibilities.
Current ideas for the nozzle involve either repurposed gas fuel injectors,7.3ford injectors or make something usin a handful of tiny n2o/fuel pills I had custom made for a 150cc bike I used to own.
They're so small i'll never use them for anything else other than a racing mower.
I've got a few different type pumps also,from Electric to pneumatic.
I'm planning to mount it on a mower deck I have.
My blower plans are also not finalized,but either going to duct an auto blower motor/plenum assembly or use a blower i've been building from an auto blower motor and casing/impeller from an electric leaf blower.
I've got lots of stuff laying around,but those are some of my ideas.
Still waiting on rain,so not in a huge hurry.
Figure i'll brainstorm a way to make it heat my 1300 sqft shop also.
Swapping an engine last year in 20* temps was no fun.
Thoughts or suggestions welcome.
Thanks for help so far,I do plan on some pics shortly.
-
steamin10
- Posts: 6712
- Joined: Sun Jun 08, 2003 11:52 pm
- Location: NW Indiana. Close to Lake Michigan S. tip
Re: Building foundry,some noob questions.
Ya, a yard leaf blower is too much blast air. I had cardboard to cover most of the intake and could not get low enough. The output end of a shop vac, was the winner for a temporary blower. I have commercial furnaces now, with the exception of my homebuilt aluminum furnace, and it is LP fired with a venturi burner, without blast.
Tinker a bit, You sound like you can gather the tidbits you need for a low cost producer. The water heater shell should work fine. It is just a container.
Tinker a bit, You sound like you can gather the tidbits you need for a low cost producer. The water heater shell should work fine. It is just a container.
Big Dave, former Millwright, Electrician, Environmental conditioning, and back yard Fixxit guy. Now retired, persuing boats, trains, and broken relics.
We have enough youth, how about a fountain of Smart. My computer beat me at chess, but not kickboxing
It is not getting caught in the rain, its learning to dance in it. People saying good morning, should have to prove it.
We have enough youth, how about a fountain of Smart. My computer beat me at chess, but not kickboxing
It is not getting caught in the rain, its learning to dance in it. People saying good morning, should have to prove it.
-
Playtoy_18
- Posts: 24
- Joined: Sat Jul 23, 2011 10:59 pm
Re: Building foundry,some noob questions.
I have a 12 gallon shop vac pro if needed,but it's pretty easy to regulate the speed of a blower motor so figured I would just do that.
What about injection? Most people just seem to be using small drilled holes or crimped pipe.
I am hoping to refine it a bit though.
Anybody tried blowing oil through a fuel injector?(i know diesel will flow through them)
I can test at home using my injector flushing setup but not too keen on having to clean the oil from it or replacing the filters on it.
If they do blow fine i'll still need to filter my oil better I think to keep from clogging.
Fortunately I have a box full of fuel injectors.
I figure if nothing else I could cut off the tip and jbweld it into a pipe just for a nozzle.
I do like the idea of modulating the pulsewidth on the injector to control oil flow though,could probrably make it linear with blower voltage without too much problem.
Bit overboard? I have all this stuff onhand to spare so figure why not.
I habe a tendancy to overthink,so reel me in if needed.
-
Playtoy_18
- Posts: 24
- Joined: Sat Jul 23, 2011 10:59 pm
Re: Building foundry,some noob questions.
Okay,I'm ready to pour the refractory and would love some experienced people to share thier criticism.
Here's some questions then some pics of where i'm at.
Is my inlet too small at 1 3/4"? I can go as high as 4" if better and have enough air to push good velocity if needed at that diameter pretty sure.
I'm thinking mix 2parts clay,Acme Everset and sand with 1.5parts perlite.
What is your suggestion?
I have no experience with this refractory,any advice with ram vs. pour or reinforcement needed would be helpful. I have both chicken wire and chainlink and other materials.
I've got high temp 1400* exhaust paint,500* engine paint,rustoleum etc..
Should I paint the inside or outside of the tank with something?If nothing else as an indicator of heat?
Any suggestions on anything at all?
Once the refractory is curing I will start on injection and air,I've got everything in a pile just have to sort how i'm going to use it.
I'm gonna stick with my current fire extinguisher crucible for now and thanks to advice kiln wash is being shipped.
Some pics
Tank 16" across,17" concaving to 18" interior depth.

2" inlet hole

Bottom of core form.
Core is 2 stacked paint cans,auto blower squirrel cage on bottom. Taped together,wrapped in sheetmetal then wrapped in tape and plastic


Core in tank,4 1/2" between core and wall for refractory.


The inlet pipe in place where it will go (in taper at bottom,pointed and twisted at an angle to follow curve.)


Cut on the end of pipe (1 3/4" exhaust pipe)

Refractory supplies
Perlite (walmart)
Bentonite clay "Pondseal" (Farmer co-op) $7/50lbs
Acme Everset (Acme brick) $20 bucket
Sandblast sand (co-op)
Already had the sand and perlite,can't remember price but under $10 i'm sure.
Again guy's thanks for all the input so far,I know i'm slow as I tend to overthink everything.
But I'll get it finished,I tend to agonize over details though.
Here's some questions then some pics of where i'm at.
Is my inlet too small at 1 3/4"? I can go as high as 4" if better and have enough air to push good velocity if needed at that diameter pretty sure.
I'm thinking mix 2parts clay,Acme Everset and sand with 1.5parts perlite.
What is your suggestion?
I have no experience with this refractory,any advice with ram vs. pour or reinforcement needed would be helpful. I have both chicken wire and chainlink and other materials.
I've got high temp 1400* exhaust paint,500* engine paint,rustoleum etc..
Should I paint the inside or outside of the tank with something?If nothing else as an indicator of heat?
Any suggestions on anything at all?
Once the refractory is curing I will start on injection and air,I've got everything in a pile just have to sort how i'm going to use it.
I'm gonna stick with my current fire extinguisher crucible for now and thanks to advice kiln wash is being shipped.
Some pics
Tank 16" across,17" concaving to 18" interior depth.
2" inlet hole
Bottom of core form.
Core is 2 stacked paint cans,auto blower squirrel cage on bottom. Taped together,wrapped in sheetmetal then wrapped in tape and plastic
Core in tank,4 1/2" between core and wall for refractory.
The inlet pipe in place where it will go (in taper at bottom,pointed and twisted at an angle to follow curve.)
Cut on the end of pipe (1 3/4" exhaust pipe)
Refractory supplies
Perlite (walmart)
Bentonite clay "Pondseal" (Farmer co-op) $7/50lbs
Acme Everset (Acme brick) $20 bucket
Sandblast sand (co-op)
Already had the sand and perlite,can't remember price but under $10 i'm sure.
Again guy's thanks for all the input so far,I know i'm slow as I tend to overthink everything.
But I'll get it finished,I tend to agonize over details though.
Re: Building foundry,some noob questions.
I noticed your burner port is tangent to the bore. That's good. You don't want the flame to impinge directly on the crucible.
Regardless of the method you use, use as little water as you must, which will help limit cracking and deterioration of the lining. Something too stiff to pour, that would require ramming, is likely in your best interest. Slower and harder to insert, but likely to yield the best results.
Keep us posted. I'm interested in seeing how the lining turns out.
I see no need to paint any of the interior surfaces, but a painted exterior, assuming it doesn't get too hot to destroy the paint, is a nice touch.
Harold
Wise people talk because they have something to say. Fools talk because they have to say something.
-
steamin10
- Posts: 6712
- Joined: Sun Jun 08, 2003 11:52 pm
- Location: NW Indiana. Close to Lake Michigan S. tip
Re: Building foundry,some noob questions.
BBQ paint, or silver boiler paint will work. Rusty-0leam has high temp paints available most anywhere.
Keep your mix on the dry side., the process of ramming willl mush any water you add through the layers that you ram up. Chicken wire can be added as a belt toward the inside lining, and rammed into the mix. This can help prevent separation if it cracks.
Keep your mix on the dry side., the process of ramming willl mush any water you add through the layers that you ram up. Chicken wire can be added as a belt toward the inside lining, and rammed into the mix. This can help prevent separation if it cracks.
Big Dave, former Millwright, Electrician, Environmental conditioning, and back yard Fixxit guy. Now retired, persuing boats, trains, and broken relics.
We have enough youth, how about a fountain of Smart. My computer beat me at chess, but not kickboxing
It is not getting caught in the rain, its learning to dance in it. People saying good morning, should have to prove it.
We have enough youth, how about a fountain of Smart. My computer beat me at chess, but not kickboxing
It is not getting caught in the rain, its learning to dance in it. People saying good morning, should have to prove it.
-
Playtoy_18
- Posts: 24
- Joined: Sat Jul 23, 2011 10:59 pm
Re: Building foundry,some noob questions.
Well,this evening found me in my shop doing some mudwork on vent scoops and the trunklid on one of my cars.
When I got done figured I might as well get some mudwork done on the foundry.
I mixed about half the bentonite,half the sand,all the perlite and the 2 gallons of fire mortar up.
Got it mixed as much as possible while it was really dry except for moisture of the fire mortar.
Fire mortar had the consistency of pond mud under the dry layer if you know what I mean.
Mixed it by hand pretty much till the end when I began to add some water to tighten it up.
Took a shovel and some post hole diggers and continued to mix it up while adding some water from a gallon jug a bit at a time.
When a core started forming in the hole diggers I stopped,had the consistency of dry caked oil almost.
It kept form when you squeezed it in a ball but broke apart without trouble.
I placed a plastic lid over the 4" hole in the bottom. In the plastic lid I drilled a hole and stuck a syringe holder for a 60cc syringe.
It has a taper in the top,and after the plastic burns out will leave a nice funnel for spills.
I shoveled my mix in,without the inlet pipe or form at first.
After a couple inches when it got to the top of syringe funnel I put the form in and shoveled in around it a few inches at a time.
I used both a 5lb sledge and splitting maul to ram with.
I just taped over the inlet hole and rammed over it.
When I got about a couple inches or so above the inlet hole I stopped and ran the pipe into the hole backwards.
Pulled it out,knocked out the stuff inside and did it again.
When I got a nice hole and could see the core and was where I wanted I left the pipe in place and rammed it in some more.
Unfortunately I ran out of mix,I knew I would pretty much.
I'll have to get some more fire mortar tomorrow,it's in a town about 30m away.
I'm going to try and keep it as moist as I can till then without getting it too wet.
I would rather not have a parting seam in the middle,but if I can't help it I can't help it.
I do plan to paint it,but that will be after I fire it to cure the mix Be easier to just burn off the insulation glue I figure.
In all I don't think it came out terribly.
I'll post up a couple more pics later,but here's where I finished up at.
The core might or might not be exactly center or level,meh.