7.5” gauge electric Porter (builders log)

This forum is dedicated to Riding Scale Railroading with propulsion using other than steam (Hydraulics, diesel engines, gas engines, electric motors, hybrid etc.)

Moderator: Harold_V

rangerjoel
Posts: 27
Joined: Fri Oct 10, 2008 11:13 pm
Location: Cloverdale CA

7.5” gauge electric Porter (builders log)

Post by rangerjoel »

Greetings all, below you will find a copy of my builders log for a Porter 0-4-2 locomotive that I am making. The posts were taken from another website that is not as heavily used as this one so this may be new to some of you. I hope you enjoy it and I will update it as I go.
:lol:
Now that I have joined the Redwood Empire Live Steamers and have access to a 7.5” gauge track I have decided to start building a new porter locomotive. I do not have the skill or patience to make a live steam loco yet but decided instead to make an electric that resembled a steam loco.

Unlike the first ride on locomotive that I built, this one will not be made of plastic!

The smaller 4 ¾ gauge porter while cute proved to be way too flimsy. Stronger materials will be required for its 7.5 gauge big brother. I still do not possess all of the tools necessary to make the loco out of metal so a good portion of it will be made of ¾” plywood and covered in thin (22 gauge) sheet metal. Below are photos of the progress so far.
Image
Image

Image
“Do something even if it is wrong”
Marty Walkenfuss
rangerjoel
Posts: 27
Joined: Fri Oct 10, 2008 11:13 pm
Location: Cloverdale CA

Post by rangerjoel »

I changed gauge From my first model because it seems like there are more clubs out there that support 7.5” than 4.75”. I initially chose 4.47 because I was planning on building a short loop of track on my property and the smaller trains allowed for tighter turns. Now that I’m in a club, it makes more sense to build bigger for the club track.

The 4.75 inch porter that I build is powered by a windshield wiper motor and has enough power to pull me in a gondola and a caboose as well, but it is underpowered on grades and could use a larger motor. Eventually it will use the same bicycle motor as the larger version will use.

Image

Also, below is the web site where I get my parts like electronic speed controls and throttles. These prices are much lower than some of the large scale manufactures.

http://www.electricscooterparts.com/motors.html
“Do something even if it is wrong”
Marty Walkenfuss
rangerjoel
Posts: 27
Joined: Fri Oct 10, 2008 11:13 pm
Location: Cloverdale CA

Post by rangerjoel »

The drive wheel castings showed up a couple of weeks ago and I have been hard at work making the chips fly on my lathe. The wheels are about 6” in diameter which is about the maximum my lathe can handle. These take a long time to turn and it’s definitely been a learning experience. Now all I have to do is machine thee more to the same tolerances. No easy feat for a guy who usually goes by “the ten foot rule” (if it looks good from ten feet away, than it’s OK).
Image
Image
Image
“Do something even if it is wrong”
Marty Walkenfuss
rangerjoel
Posts: 27
Joined: Fri Oct 10, 2008 11:13 pm
Location: Cloverdale CA

Post by rangerjoel »

I have a little more progress to report on.
The first task completed was to get the drive wheels quartered. I did this by building a simple plywood jig to hold the wheels in the proper position while they are being quartered.
The wheels may not be at exactly 90 degrees, but because both sets were done on the same jig the error will be the same on both and because this is an electric locomotive, I do not have to worry about valve timing.
Image
The second project was to make some blocks to hold the axle bearings.
Image
Finlay, I was able to borrow a friend’s Mig welder to weld up the side frames.
Image
I have also fabricated some frame spaces but have not gotten any photos of them yet. I hope to get these installed this week and get some photos.
“Do something even if it is wrong”
Marty Walkenfuss
rangerjoel
Posts: 27
Joined: Fri Oct 10, 2008 11:13 pm
Location: Cloverdale CA

Post by rangerjoel »

A little more progress to report on the Porter.

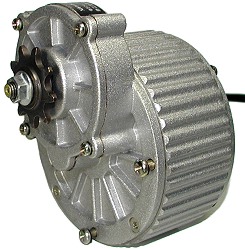
The bearing blocks are in place complete with springs and the motor mounts have been fabricated and installed. This locomotive will be powered by two bicycle motors from electricscooterparts.com.

I should have a running chaises very soon.
Image
Image
“Do something even if it is wrong”
Marty Walkenfuss
rangerjoel
Posts: 27
Joined: Fri Oct 10, 2008 11:13 pm
Location: Cloverdale CA

Post by rangerjoel »

For Valentine’s Day my wife gave me an air nibbler from harbor freight. Clearly, she still loves me…but wants me out of the house.
Image
I was able to put it to good use and did a lot of sheet metal work over the past few weeks.
Image

To start with, I cut out the rear battery cover and bent it so that it would appear to be the fire box.


I then welded some sheet metal on the back.

Image

The saddle tanks also got some sheet metal stuck on the side that will allow the tank to sit just above the second marine battery.
Image

I spent all day last Saturday going around Goodwill and Salvation Army stores looking for old pots and pans that could possibly be used as steam and sand domes. I had very little luck but was able to stumble upon a real gem. Sitting in the bottom of a bin was a set of wall lamps with metal shades. These will be perfect for a diamond stack!
Image

Image


More photos to fallow
“Do something even if it is wrong”
Marty Walkenfuss
rangerjoel
Posts: 27
Joined: Fri Oct 10, 2008 11:13 pm
Location: Cloverdale CA

Post by rangerjoel »

Hi all, I have a lot of progress to report today.

To start with, I was able to put my milling machine to work building some dogs for the front of the smoke box. WOW, what a difference it makes having a good tool to work with!
Below is a photo of the finished dogs in place.
Image
The next project was to attach the smoke box to the water tank. This was easily done because both parts have a wooden skeleton so it was simply a matter of screwing them together.
Image
You will also notice that the sand dome and smoke stack are in place. The sand dome was a $9.00 stainless steel pot from K-mart and the remainder of the smoke stack is made of standard ABS pipe fittings.
Image
Image
I also started work on the locomotive cylinders which are made of ABS plastic. I could have cut these slots on the table saw, but I figured I should start making my mill earn it’s keep in the garage.
Image
I also had a chance to take the loco to a member of the Redwood Empire Live Steamers for a quick run on a section of club track. The loco worked fine, but we discovered that the drivers are not within ILBS wheel standards. Looks like I will have to spread them a little further apart. I’m going to wait on this until I have a dial caliper large enough to check my work!
“Do something even if it is wrong”
Marty Walkenfuss
rangerjoel
Posts: 27
Joined: Fri Oct 10, 2008 11:13 pm
Location: Cloverdale CA

Post by rangerjoel »

More progress has been made.

I built a number plate out of a candle holder that I picked up at the good will store for $1 and a house number that I got at my local hardware store. I also received a set of wheels from RMI the other day for the construction of the trailing truck. The wheels were around $23 each and were a bargain as they came machined and ready to go. I am now in the process of building bearing blocks nearly identical to those used earlier in the project.
Image
Finally, The Redwood Empire Live Steamers have begun to lay track in a park in Santa Rosa. As soon as I learned this, I had to cart my loco out to the location and snap some photos of it on the track. There is still a lot of work to be done on both the track and the loco, but you can see that both are taking shape nicely.
Image

Joel
“Do something even if it is wrong”
Marty Walkenfuss
rangerjoel
Posts: 27
Joined: Fri Oct 10, 2008 11:13 pm
Location: Cloverdale CA

Post by rangerjoel »

It’s been a long time since I have posted, but I have been very busy during that time. The photos below will attest to that!
Image
Image

I started by completing the installation of the drive rods and piston rods. I checked for binding and had no trouble.
Image
Image
I then fabricated a frame to mount the pilot beam to and fashioned a pilot beam out of oak. All the bolts got a coat of “brass black” (witch reacts with the zinc plating to turn them black)

The Head lamp is made of sheet metal and incorporates a bulb and reflector form a cheap 6 volt flashlight.
Image

I am working on the trailing truck and hope to have it ready to go by the first of August.

Joel
“Do something even if it is wrong”
Marty Walkenfuss
rangerjoel
Posts: 27
Joined: Fri Oct 10, 2008 11:13 pm
Location: Cloverdale CA

Post by rangerjoel »

Test day at the park!
I took my loco out and got a chance to run it for the first time. Because this is an inexpensive loco, it caught the interest of a few of the younger club members. Below is a photo of one operating the loco.
“Do something even if it is wrong”
Marty Walkenfuss
User avatar
Benjamin Maggi
Posts: 1409
Joined: Wed Apr 25, 2007 10:38 pm
Location: Albany, NY

Post by Benjamin Maggi »

rangerjoel wrote:For Valentine’s Day my wife gave me an air nibbler from harbor freight.
Are you sure it wasn't "ear nibbler." Oh nevermind! :)
"One cannot learn to swim without getting his feet wet." - Benjamin Maggi
- Building: 7.25" gauge "Sweet Pea" named "Catherine"
User avatar
Benjamin Maggi
Posts: 1409
Joined: Wed Apr 25, 2007 10:38 pm
Location: Albany, NY

Post by Benjamin Maggi »

It is impressive how someone with everyday objects can create something that is both really unique and useful. The track at the park looks nice too... except that I think it needs a end-of-track bumper! The track just turns into grass!
"One cannot learn to swim without getting his feet wet." - Benjamin Maggi
- Building: 7.25" gauge "Sweet Pea" named "Catherine"
Post Reply