Page 1 of 1
Help with chuck jaws not being true
Posted: Mon Mar 01, 2010 11:22 am
by 737mechanic
I purchased a used 3 jaw cushman 2 piece chuck with a backplate for my lathe. I mounted it and the first thing I noticed was there is massive amounts of wobble. So I figured maybe I can true it enough but I am not sure. The main problem I am worried about is when I clamp a piece of 1" drillrod in the jaws it makes contact at the inside of the jaws before the outside makes contact. When it is just snugged up you can grab the drillrod and wiggle it around in a circle. The jaws are screwed to the matching adapters and are in there respective positions. It makes me wonder if it was put through a sudden stop or something. Unless I am missing something I don't know what else to check or do. Any idea's would be great.
The jaws are very hard and the chuck looks to be very high quality so I would really love to get this thing working good.
Posted: Mon Mar 01, 2010 11:56 am
by Fender
737,
I had exactly the same problem with a 10" chuck on my big lathe. Turns out the reason was that the socket head bolts holding the chuck to the backplate were bottoming out in their holes, and not pulling the chuck tightly against the backplate. All I had to do was cut about 1/8" from the length of the bolts, and the problem was solved.
Posted: Mon Mar 01, 2010 1:39 pm
by GlennW
Unfortunately, it could also be that the
jaws are "sprung" from tightly grabbing short lengths of stock. Doing so causes the
jaws to "bellmouth" over time due to deformation of the jaw ways.

Hopefully, Fender is correct!
I try my best to only work with stock that engages the entire depth of the
jaws, but if needed, tighten the
chuck very carefully with short pieces.
Posted: Mon Mar 01, 2010 2:39 pm
by Harold_V
Most likely what Glenn said.
The jaws can be ground in place to correct the error. The process is much like machining soft jaws.
Harold
Posted: Mon Mar 01, 2010 2:55 pm
by 737mechanic
Fender: I checked the bolts and there are plenty of threads so I dont see the bolts botteming out as being the problem.
I faced the backplate and got it running true. The jaws on the other hand I dont know what to do. I unbolted them from there adapter plates and clamped them in my mill vise and used a pointer in the spindle and ran the table back and forth to see if the jaw gripping surfaces where running untrue but they showed to be right on the money so I am starting to think the adapters that the jaws bolt too or the chuck body itself must be tweeked somehow but not sure how to go about checking them to see what could be the problem and if it will be possible to correct it. Below is a pic of what I am talking about.
Harold: What would be the best approach to grind the jaws.
I was thinking of clamping a short piece of 1" stock in the very back of the jaws and setting up my dremel grinder in a holder on the compond and lightly run the grinder in to grind the surfaces true again. If this is a crazy idea let me know what would be better.
The yellow arrow shows where the jaws just touch and the blue arrow shows how much of a gap there is at the outer jaw area.
Posted: Mon Mar 01, 2010 3:16 pm
by Harold_V
You can do as you suggest, gripping a short piece of material at the very rear of the jaws, then kill that area after the jaws have been ground.
The alternative method is to use a ring, that locates either from the bolt holes, or has a bridge assembly that picks up the jaws from the sides, on the angled portion. That method is risky, for the slides may be loose sideways, too, which will most likely load the jaws in such a fashion that they are not straight with the slide. Net result will be minor run-out. I don't advise this method be used.
Some propose drilling a hole in the face of the jaw, which you then use with a pin, closing on a ring. That can be a daunting task due to the jaws being heat treated.
Regardless of which method you choose, it's important that you mark one of the holes of the chuck. Use that hole only when you set the jaws to be ground, and always when applying the chuck after it has been ground. That way you'll have the best chance of a chuck that grips properly. That's due to the scroll having clearance. It loads in a given way when you use each hole.
Harold
Posted: Mon Mar 01, 2010 4:37 pm
by Richard_W
You make a chucking fixture like the one shown in the link. Then
chuck it as close to the front of the
jaws as possible. Then grind the
jaws true. I think a dremel is to small to use. A large die grinder is a better choice if you have an air compressor to handle the volume of air needed. Grind the master
jaws a few thou bigger than the top
jaws.
http://lathe.com/tips/chuck-jaw.htm
Harbor Freight sells a long die grinder that may be a good choice.
http://www.harborfreight.com/cpi/ctaf/d ... mber=99698
Your
chuck is most likely worn from use. I would tear in apart and clean it. Then put it back together and grind the
jaws. Once you are done
grinding then tear it apart again and clean out the grit from the
grinding process. That is the way I do it. Save your fixture for the next time this needs to be done.
Richard W.
Posted: Mon Mar 01, 2010 5:16 pm
by SteveM
Richard_W wrote:Grind the master jaws a few thou bigger than the top jaws.
Just to clarify (because I did a double take on that sentence).
The master
jaws should be ground to a larger diameter than the tops, not to a larger size. The masters should not be gripping the work.
Steve
Posted: Mon Mar 01, 2010 7:41 pm
by Rich_Carlstedt
You don't have to be fancy when
grinding the
jaws
Protect your ways. and place some scotch tape inside where the master
jaws engage the scroll, to prevent grit from entering the scroll through centripical force.
Clamp on a ring at the front (!) of your
jaws to preload ( Compression , not tension !)
jury rig a grinder if you don't have a ID Grinder.
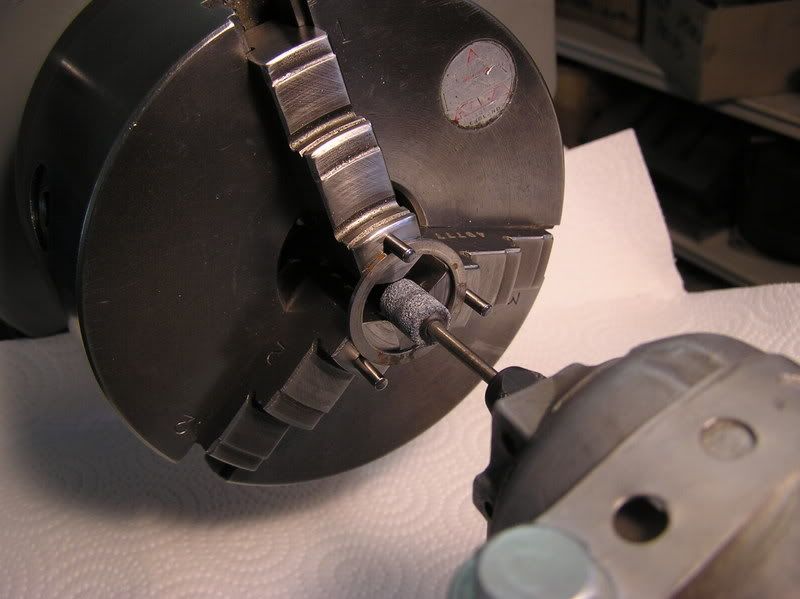
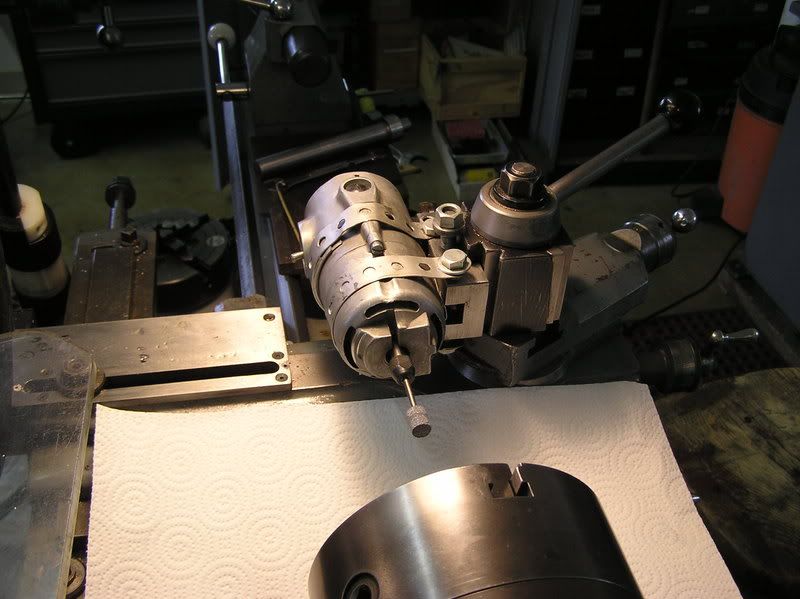
The picture here shows a chain saw sharpener (25K RPM) mounted to a Aloris post. Simple but very effective.
The pins on the front of this
chuck are 1/8 dowels, and the holes were drilled with a 1/8 masonary bit (with water cooling) and exact hole location is un-necessary, as the ring loads the
jaws irrespective of location.
Mark the contact point of each jaw with a felt tip marker.
As you grind, you will see the contact point move outward as the ink is ground off. as soon as all ink is gone, spark out , and quit.
I like to cover my ways with plastic sheet , and then lay a wet paper towel on it to absorb all grit. when done, wipe everything down , and roll up the plastic and toss
BEFORE you start, you need to select ONE wrench socket and mark it !
I like to use the one near the Logo. This is the socket to use for tightening on your ring, and becomes "The Master Socket"
After revising the
jaws, and mounting work, the master socket will always give you the most accurate concentricity because the scroll was shifted from that point !
Rich
Posted: Mon Mar 01, 2010 9:33 pm
by Richard_W
Yes just what Steve said. Grind the ID of the master jaws a few thou bigger than the bolt on tops.
The link I pointed to was originaly done by Scott Logan of Logan lathes. If my memory serves me right? I first used a 3/8" plate made like that a little over 30 years ago.
Richard W.
Posted: Mon Mar 01, 2010 10:13 pm
by jim rozen
"...I noticed was there is massive amounts of wobble. "
Massive - 1/8 inch? 1/16th inch? Three thou?
My feeling is that life is too short to spend time rehabilitating clapped
out chucks. Any chuck that shows massive wobble, to me this says
the jaws and jaw slots are badly worn. They can be trued up as
suggested, but the chuck will not hold parts securely after that, the
jaws are still wallowing in the chuck body.
There's more to a good chuck, than holding parts concentric with the
spindle axis. There's a rigidity issue as well. I've purchased exactly
*one* used chuck (9" six jaw buck adjust true) from a seller that I
trusted explicitly - Dave Ficken - and the success in that one instance
tells me that I've used up my luck on used scroll chucks!
Jim