Builder01 wrote: ↑Fri Mar 23, 2018 5:19 am
I have read Kozo's Pennsy book. He does show "machining" the surface of the flanged boiler plates by using a jig to run them by an end mill cutter. This seems like a pretty dangerous way to do it.
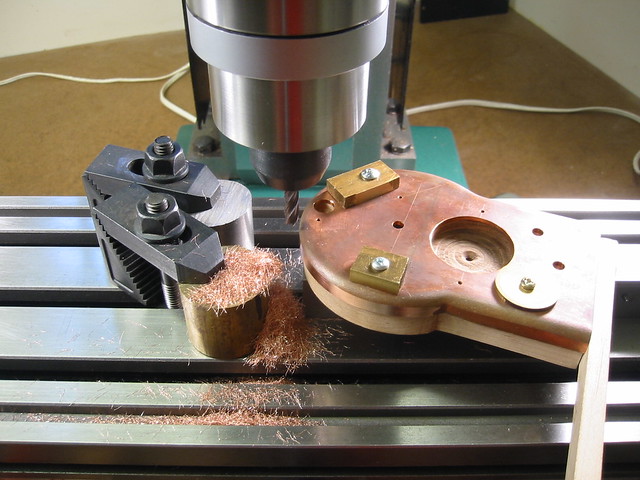
While I have not read the instructions you mentioned, I have machined a relatively large chamfer on edges of brass bars by a similar method. The bars were fed by hand, without issue. Key to success is to NEVER attempt a climb cut. That's a sure recipe for trouble.
H
Wise people talk because they have something to say. Fools talk because they have to say something.
Kozo is using this method for "machining" the face of the flange, not the edge of the plate, so, there is the full width of the flange in contact with the cutter. Even if not climb cutting, there is not really a need to do this. In Kozo's boiler design, there are no "inside" radius on the flanged plates, so, it is possible to do it his way. But, once again, just fit the flanged plates to the flat plates, and vise versa, it's pretty easy and you will have fine joints for silver soldering.
Yes, you can use screws instead of rivets for seams as well as attaching plates to flanges. There should be a photo of the leg extension for the outer wrapper. These screws are actually too large. These were commercial 6-32 bronze screws. I would use my little home made 4-40 copper screws next time. This is a simple seam with a plate to go over the top of it held in place for soldering with screws. There are only enough screws to get the job done. Too many screws, or even rivets, will not allow for good flow of the solder. Also, do not have the screws tight for the same reason. Pull things up with the screws, then back them off a bit.
Yes, Bill is right about the screws. They must be clean, you can use acetone, or, as I did, lacquer thinner. Also, before I actually used them for the soldering job, I also put them in my citric acid bath for one last clean. The joints are fluxed, put together, and a screw, covered with flux, is put in place to hold the assembly together.
Attached is a photo of my home made copper screws holding together the front foundation ring to the throat plate and the fire box tube sheet. The throat plate is already soldered in. The foundation ring is being test fitted. You can see there are four screws going through the throat plate. Two of them hold the foundation ring to the throat plate, and two of them go all the way into the fire box tube sheet. You can also see the ends of two screws holding the firebox inner wrapper to the tube sheet. These are all home made flat head copper 4-40 screws.
When these parts fit to my satisfaction, things were soldered in steps and not all all once.
Hi Sky,
When I built my A3 boiler, I successfully followed Kozo's methods. Because the design uses simple shapes, milling is possible to just help a bit on keeping proper joint clearances.
Learning how to manage the torch heat and solder was a much larger learning curve than the copper-smithing techniques. Just work your way through it step by step and the skills come in time. Truing Boiler Backhead by Greg Easter, on Flickr
Nice work on the Pennsy boiler! Yes, with the simple shapes that Kozo offers, it is possible to "mill" the flange surfaces, just seems a bit scary to me! I checked out more of your photos on Flickr. Looks like you have built it as a saddle tanker? Is that the SCRR you were testing it at? Beautiful locomotive!
Wow! nice work Greg and David. I sure hope mine turns out as well. Thank you very much for sharing your hard work and builders knowledge. It is greatly appreciated! I will take my time to get my seams and joints correct and clean before soldering.
sky
Thanks guys! Yes- I built it as a PRR class A3a saddle tanker. I'm a member at the St.Croix and it's run many many laps around the high-line.
The experienced folks here and on another forum helped me out immensely getting through my first silver brazed boiler. Just ask if issues come up.
Copper is super grabby and I have always avoided milling it if possible. If I'm seeing this correctly, the copper plate is being fed by hand on a pivot point? I can't see where it's needed if you have the "machinists touch", and can saw cut, grind, and file to fit.
hello all, new issue. My front tube plate didn't come out to the 7/16 Kozo specs, mine came out 3/8. If I make the ribs to the specified height am I still ok? the over lap on the boiler tube would be only 1/8 as he as the front tube plate stick out 1/4".
sky
Hello all,
I finally got a working boiler. Ist was a great learning experience. 2nd held pressure!!
now I am on the Safety Valves. I bought Kozo's Shay book to find out how to size my o-rings for my pistons and I see he has a Safety Valve design in the back of the book also. So, I was looking to use that design in my A3. The question is do I just make the orifice longer to come up the steam dome?
sky